
Use Outlook to book a meeting room. Outlook works better for booking a room than the browser-based OWA (Outlook Web App). However, not all meeting rooms can be booked through Outlook/OWA. Only some of the meeting room reservations have been transferred to the Office 365 system.
Usually you should book the room at the same time as you send invitations to the meeting. You can make a room reservation and send an invitation to the meeting in several ways. These instructions first cover a quick and simple way of creating a meeting invitation and booking a room for a specific room.
Below you will find instructions for selecting an available room from a group of several rooms, such as all meeting rooms in a specific building.
NOTE: The right to use the rooms may be limited to a specific group of users. Even if you see a meeting room on the list, you might not be able to make a reservation. If you can’t reserve a room you should be able to reserve, please contact the person in charge of reservations at your facility.
The room always sends a response message once you have sent a meeting invitation. The message contains information on, for example, who has the right to reserve the room and who you should contact to ask about reservation rights.
-
The room has sent a accept response message (Accepted), and the meeting details have not been changed afterwards. Make sure that the reservation message comes from the room, as the attendees also send them.
-
Open the room reservation calendar and check that your own reservation is there. The room reservation calendar is the only reliable way of checking who has valid reservations.
-
If the meeting has been changed, remember to inform all attendees and the room of it (Send Update), and make sure that you receive accept response messages.
Quick help
Make sure that you are making the reservation in your own calendar!
I want to book a specific meeting room
- Double-click the day for which you want to make a booking.
- Enter Subject and Start time/End time in the window that appears.
- Click Scheduling Assistant.
- Select the room you want in Add rooms.
- Select the people to be invited in Add attendees.
- Click Send.
I want to book any available meeting room
- Double-click the day for which you want to make a booking.
- In the window that appears, complete the Subject and meeting Start time/End time.
- Click Scheduling Assistant.
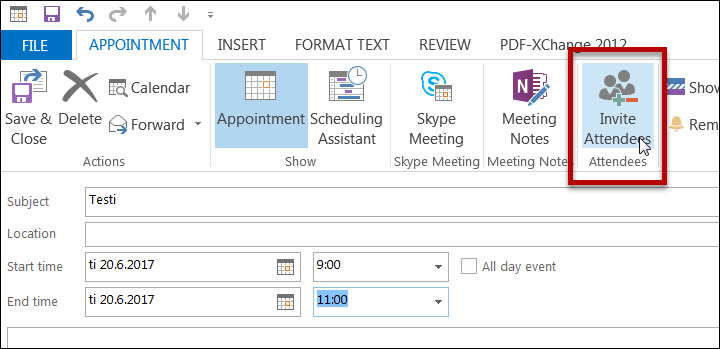
- Click Invite Attendees.
- The Room Finder appears on the right-hand edge. Select the building where you want to arrange the meeting in Show a room list.
- Select the room you want by adding a checkmark to it in the left-hand room list.
- Select the people to be invited in Add attendees.
- Click OK and Send.
Detailed help
Table of contents
- I want to book a specific meeting room
- I want to book any available meeting room
- Reserving equipment
- Tracking responses
- Directing replies into a separate folder
- Editing a meeting afterwards
- Cancelling a meeting
- Replying to a meeting invitation
- Checking the reservation status in the room calendar
- How can I make sure that by room reservation was successful?
- How can I find out who has valid reservations for a specific room?
- What can go wrong with room reservations?
- Overlay and parallel view of calendars
I want to book a specific meeting room
Arranging a meeting in a specific room.
If you want to arrange a meeting in a specific room, follow these instructions. If you want to select any available room in a specific building, see the instructions below.
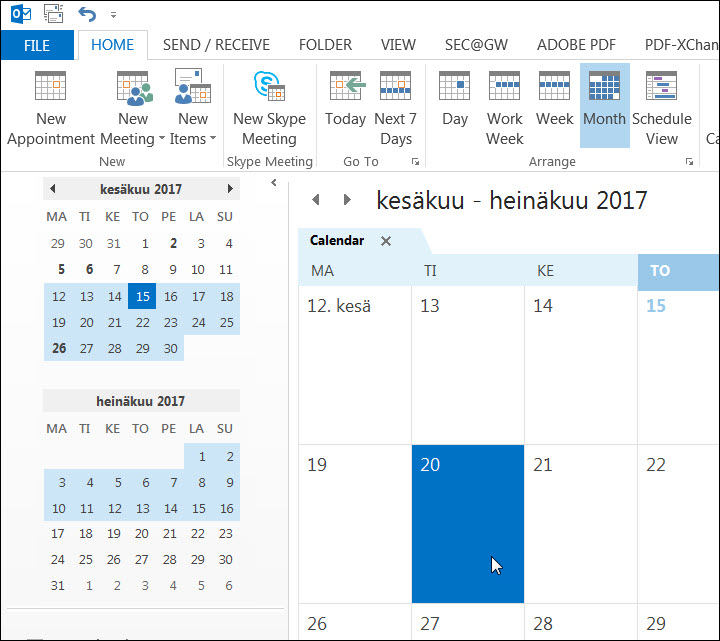
In this example, Raimo Keski-vääntö is the meeting host (Meeting Organizer). Raimo first reserves the meeting time and room and then invites one attendee. The calendar is opened in the monthly view. In the weekly and daily view, the new blank meeting that opens looks a bit different.
- Open the calendar. Check that it is your own calendar.
- Double-click the day for which you want to make a booking.

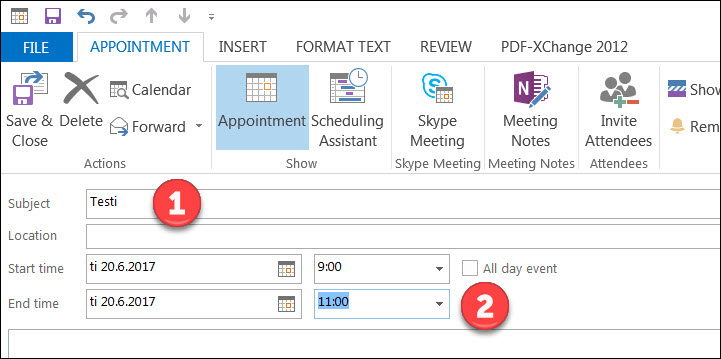
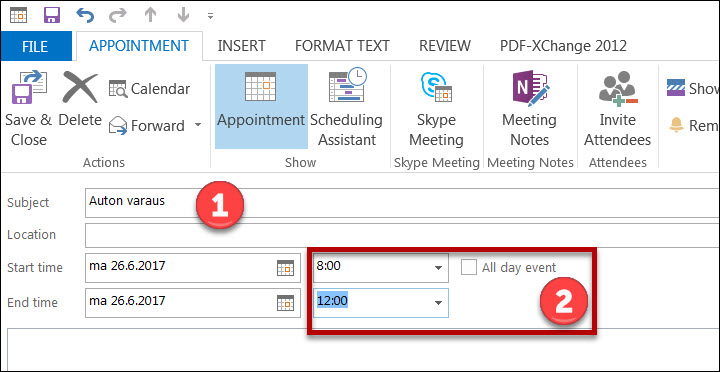
- Add the invitation subject to the Subject field (2) under Appointment (1).
For some rooms, anyone can see the reservation subject in the reservation calendar. Do not type anything in the Subject field that should not be displayed to all university people. - Remove the tick mark of All day event (3).
- Select the meeting time in (4). You can change the time later. At this point, the most important thing is that the duration of the meeting is not the entire day.
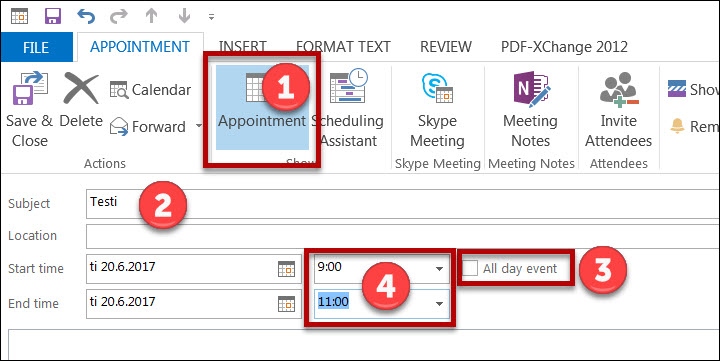
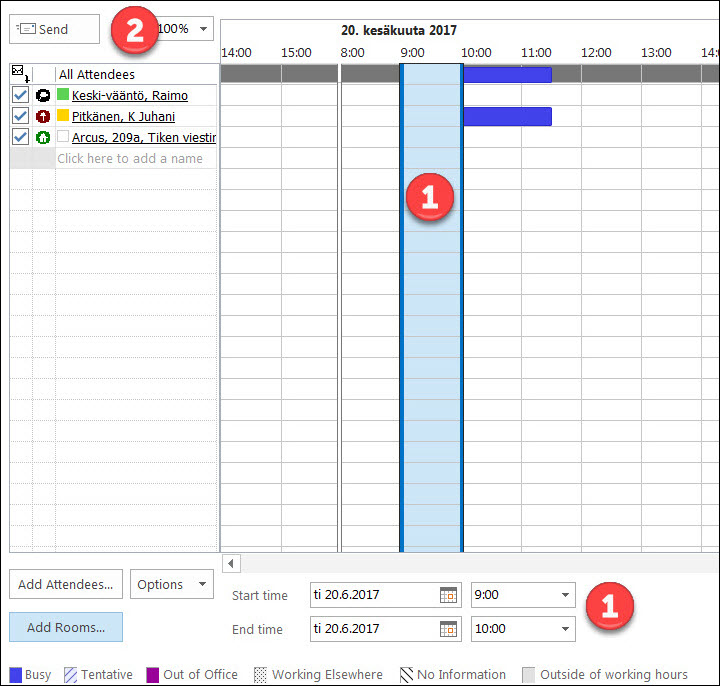
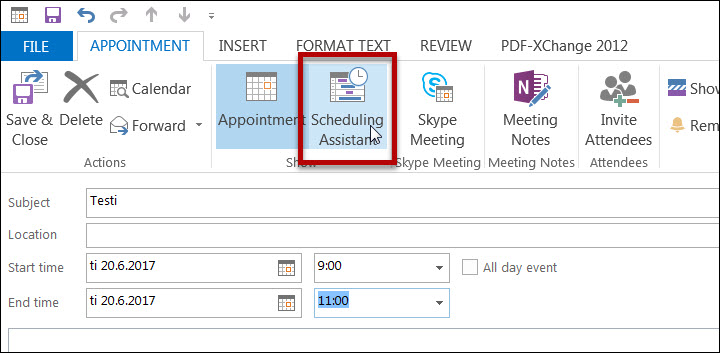
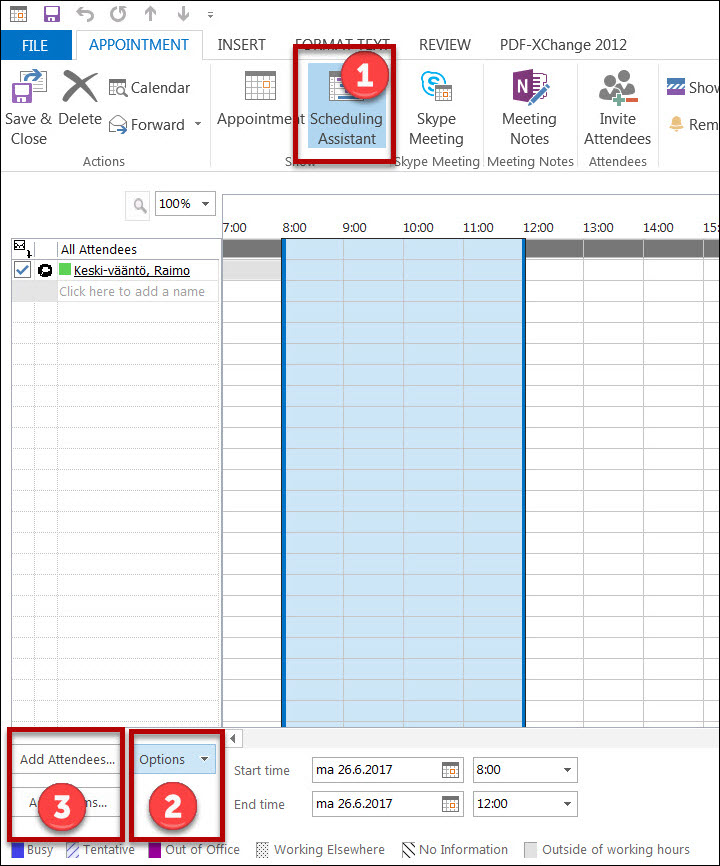
- Open the Scheduling Assistant (1).
- The preliminary meeting time is highlighted in the calendar and in the menus below (2).
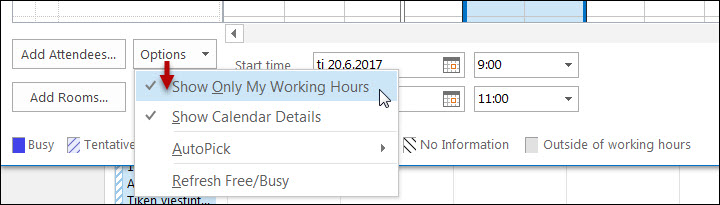
- Open the menu Options (3).
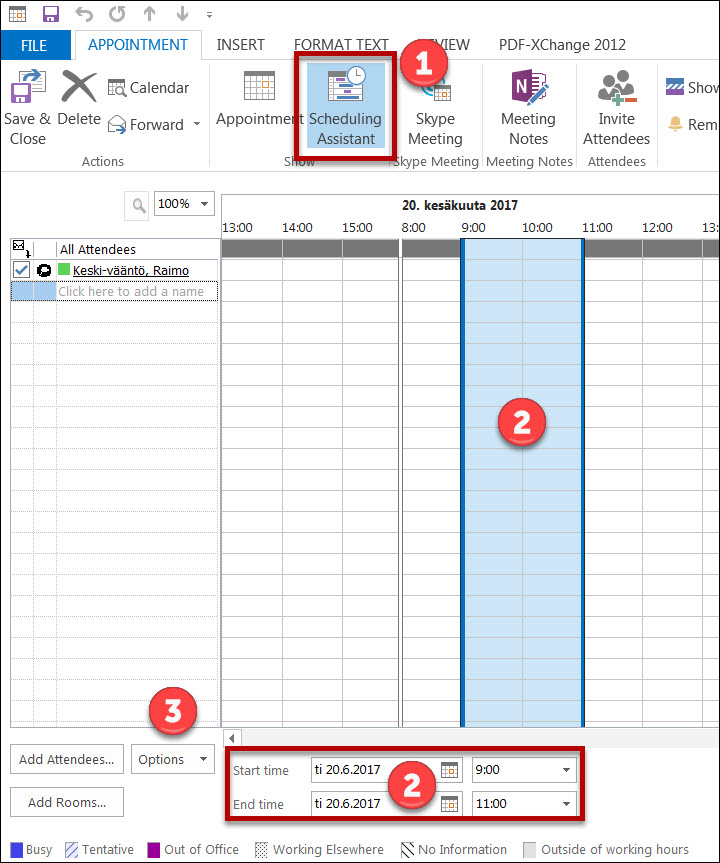
- Make sure that Show Only My Working Hours is selected. Otherwise, Outlook displays all the hours of the day.
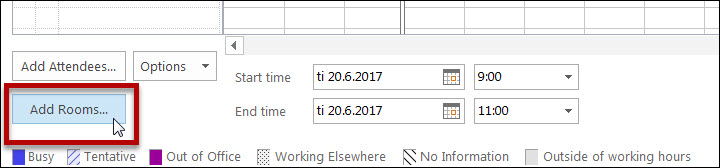
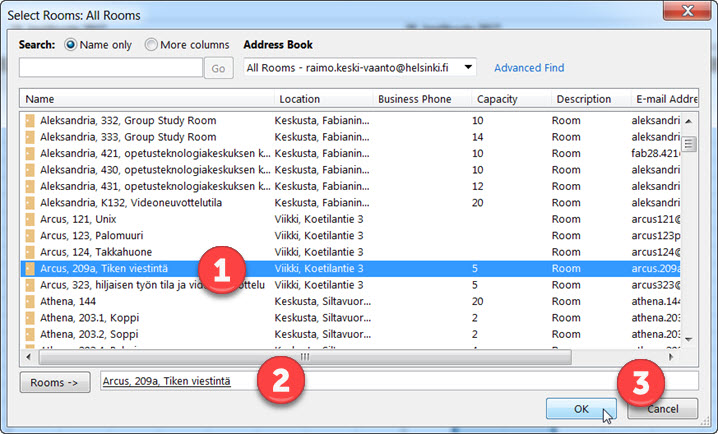
- Click Add Rooms.
- Select the room you want from the list (1). In the case of some rooms, the maximum number of attendees is displayed.
-
Add the selected room to the list by clicking Rooms (2). You can select several rooms, but in practice you should use the method described later if you want to select the meeting room from among several rooms.
- Click OK (3).
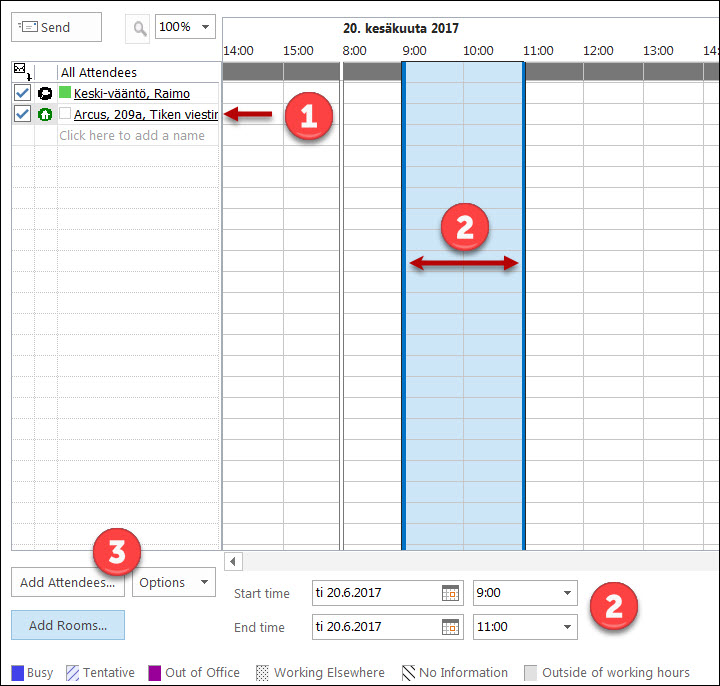
- The room is displayed in the attendee list (1).
- The meeting host, in this case Keski-vääntö, is also displayed in the list of attendees.
- The reserved time is highlighted in the calendar view and in the menu below (2).
- Next, add the other attendees.
- Click Add Attendees (3).
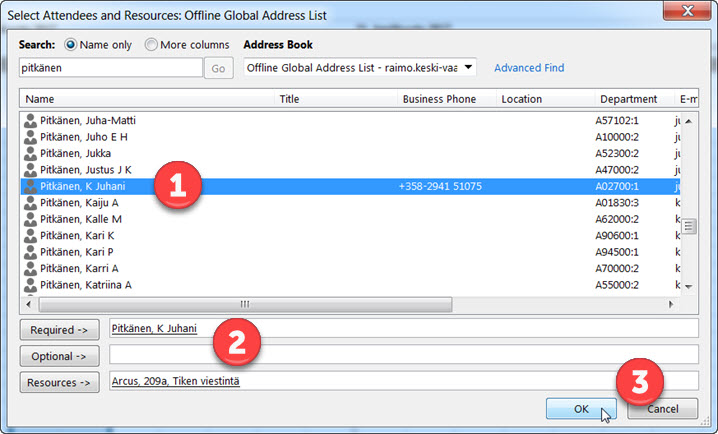
- Select an attendee from the list (1).
- Click either Required or Optional, depending on the attendee’s presence is required or not (2).
- Add all attendees and finally click OK (3).
-
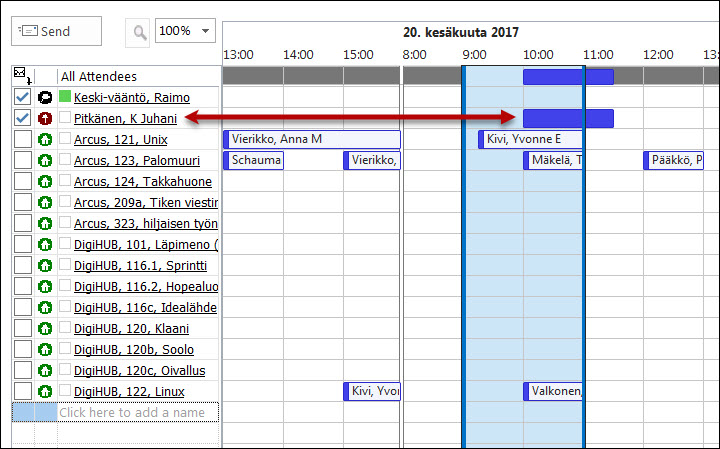
Pitkänen, K Juhani has been added to the list of attendees. The dark blue bar indicates that he has an overlapping reservation at 10.00–11:30.
- Change the meeting times either by dragging the blue vertical lines or by changing the time in the menus at the bottom.
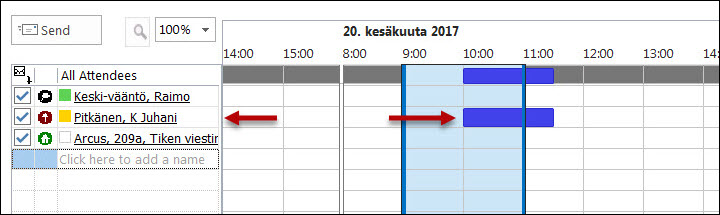
- In the image, the meeting time has been changed so that there are no overlaps (1).
- Click Send (2).
I want to book any available meeting room
The method described above can be suitable for organising meetings when you know that a room is probably available and you want to use exactly it. However, it is normally recommended to first select several possible rooms from among which you can find a suitable room.
- Double-click the day for which you want to make a booking.
- Enter the subject of the meeting in Subject (1).
- Remove the tick mark of All day event and select the meeting start and end times from the drop-down menus (2). You can change the time later, but you should select an approximately suitable time already at this point. The Scheduling Assistant does not work properly, and cannot suggest rooms if the meeting duration is too long or outside the permitted reservation hours of the room.
- Click Scheduling Assistant.
- Click Invite Attendees.
- The Room Finder opens in the right-hand side of the window.
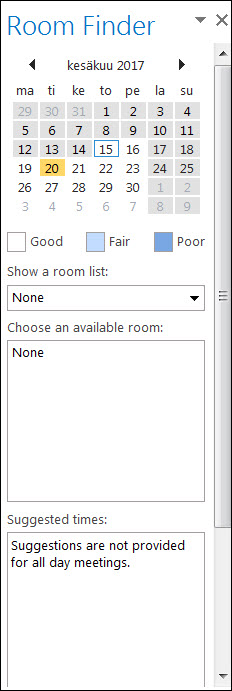
- Select the building where you want to arrange the meeting in Show a room list.

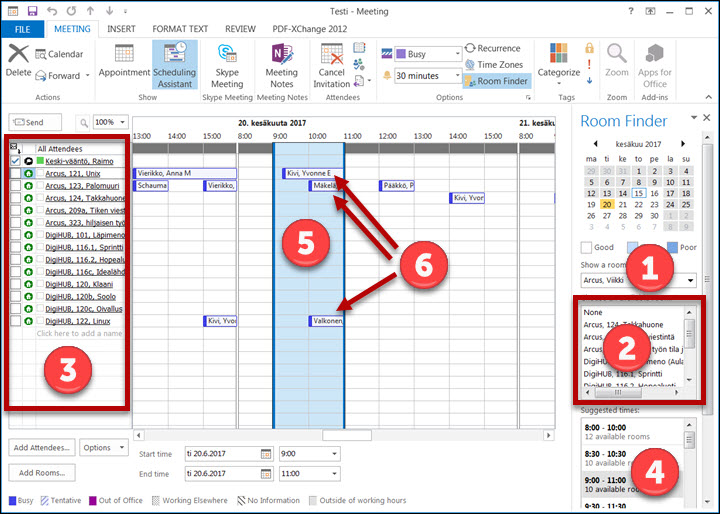
- In the example, the building “Arcus, Viikki” (1) has been selected.
- All of the available rooms in this building are displayed in (2).
- The same room list is displayed on the left-hand side in (3). Note that none of the rooms is selected yet (no checkmark before the room name).
- The Scheduling Assistant proposes suitable rooms in (4).
- The planned meeting time is highlighted in blue in the calendar in (5). Three rooms in Arcus have an overlapping reservation at 9:00–11:00 (6). You can change the meeting time by dragging the blue vertical lines or changing the times in the menu at the bottom. In this example, it is not necessary to change the time because there are vacant rooms available.
- Select the room by adding a tick mark to the box (3).
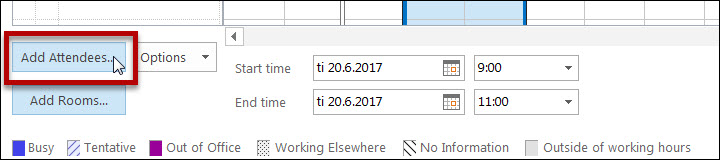
Next, add the attendees.
- Click Add Attendees.
- Select the attendees (1).
- Click either Required or Optional, depending on the attendee’s presence is required or not (2).
- Add all attendees and finally click OK (3).
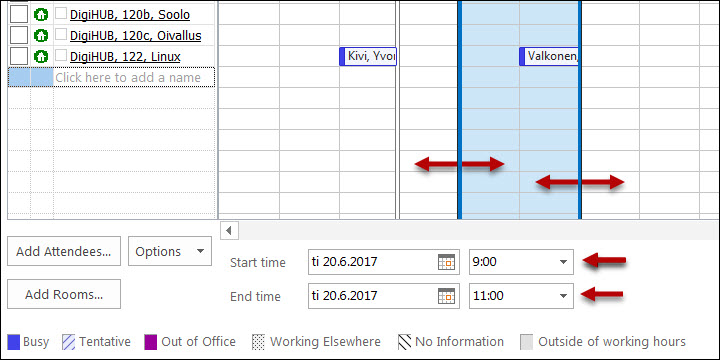
- The Scheduling Assistant shows whether the attendees have overlapping reservations. In the example, you can see that the attendee Pitkänen, K Juhani has a partly overlapping reservation.
- You can change the time by dragging the blue vertical lines or using the menus at the bottom.
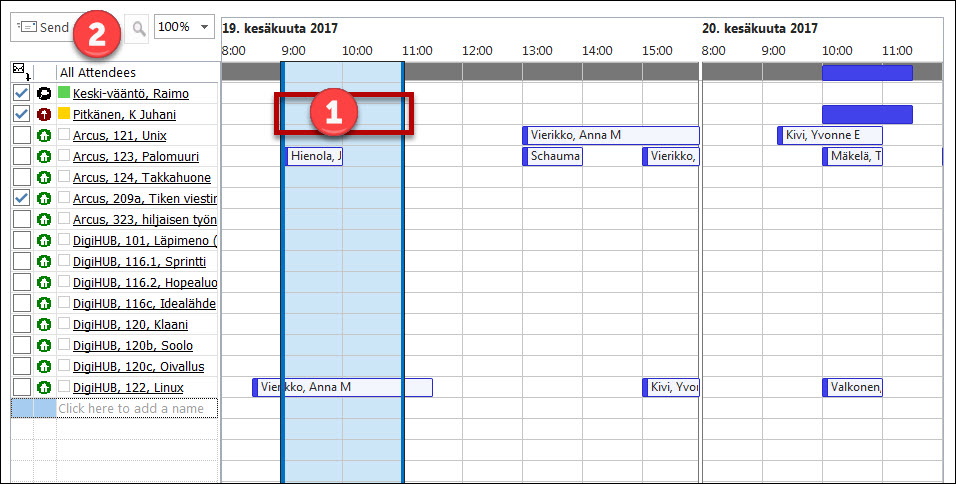
- In the next image, the meeting time has been moved to the previous day.
- There are no conflicts anymore (1).
- Make sure that you have selected all the attendees, only one room and that the room is correct.
- Send the invitation by clicking Send (2).
Reserving equipment
You can reserve certain pieces of equipment, such as research equipment and vehicles, in Office 365.
The right to use certain equipment may be limited to a specific group of users. Even though you may see an item of equipment on the list, you might not be able to make a reservation. If you can’t reserve equipment you should be able to reserve, please contact the person in charge of reservations at your facility.
In this example, you book a car for use. The same method applies to reservations of other equipment as well.
Note that this will also create a reservation in your own calendar for the same time. Others will see you as reserved.
- Open the Outlook calendar view.
- Double-click the day for which you want to make a booking.
- Type a description of the event in the Subject field (1).
- Open the Scheduling Assistant (1).
- In Options, select Show Only My Working Hours (2).
- Click Add Attendees (3).
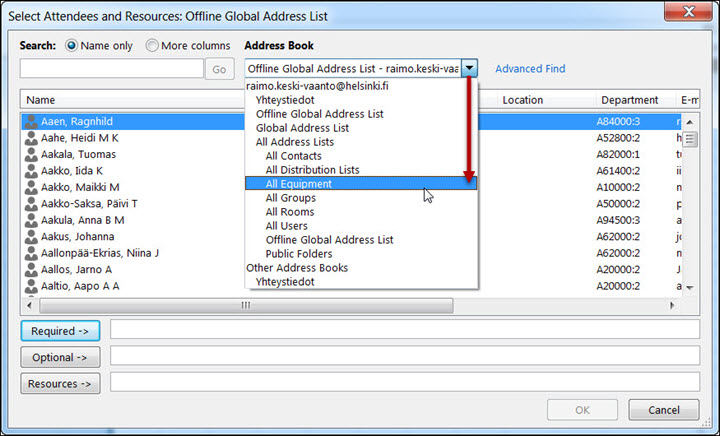
- In the Address Book menu, select All Equipment.
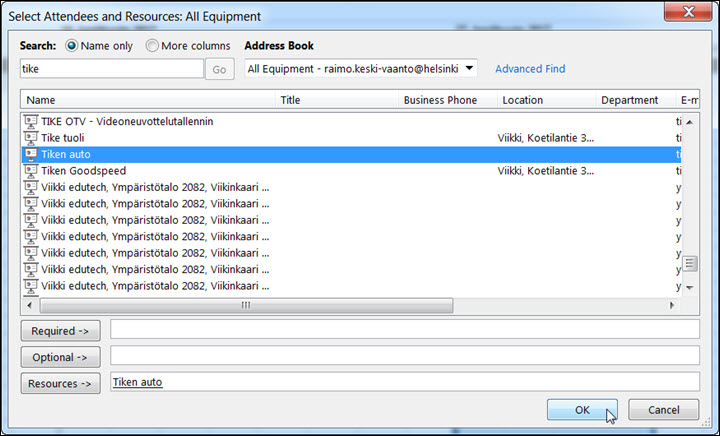
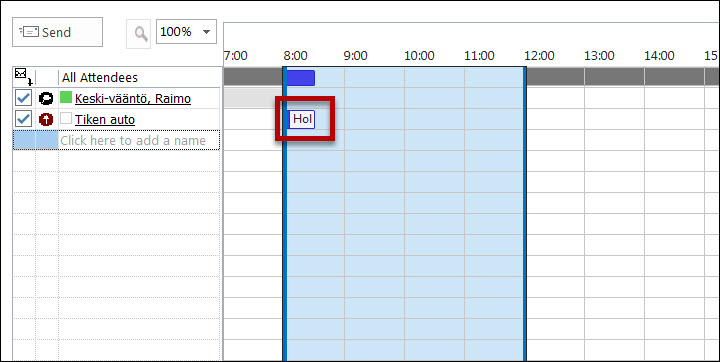
- Select the desired resource from the list, such as Tiken auto (IT Center car), click Resources and finally click OK.
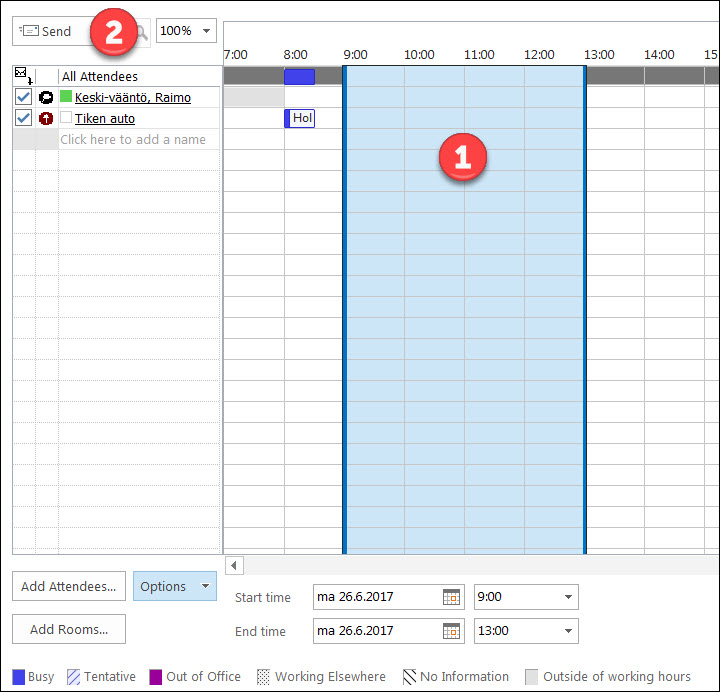
- You can see the reservation status of the selected resources highlighted in the calendar. In the example, the car is booked from 08:00–08:30.
- Choose an available period in the calendar. Click Send to book the selected resource into your use. In the example, you are booking the car for yourself for the period 09:00–13:00.
Contact the contact person at your department for further information on bookings and any restrictions applicable (such as usage time).
Tracking responses
- Once you have sent a meeting invitation, check your email immediately to see that the selected room has accepted your reservation. The room always sends a response message.
- The response message may contain additional information about the room. In the example, you can see the sender of the response message, room “Arcus 209a, Tiken viestintä” (1), information about the reservation having been accepted (i.e. that the room was available) (2) as well as information about who has the right to reserve the room and whom to ask about the reservation rights (3).
- You can also open the room calendar and check whether the reservation is shown in it (instructions below).

- You can also later use the Tracking function to check who has responded to your invitation. Click the meeting entry in the calendar. The Tracking icon appears in the top bar. NOTE: Only the meeting host can see the icon. Other attendees can’t see it!
- By clicking the icon, you can see who has responded to your invitation and whether they have accepted it. If the reservation is successful, the room responds Accepted.
Directing replies into a separate folder
If you create many calendar invitations, the replies may fill up your inbox, making other emails difficult to notice. You can direct all replies automatically to another folder where they won’t interfere with the processing of normal mail.
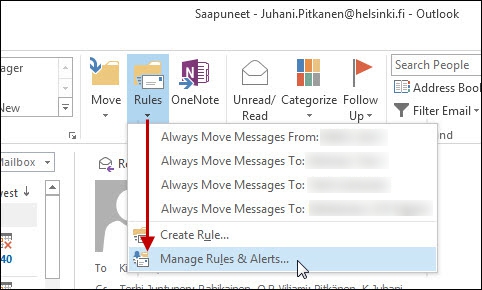
- Open the HOME tab in Mail.
- Open the Rules drop-down menu.
- Choose Manage Rules and Alerts.
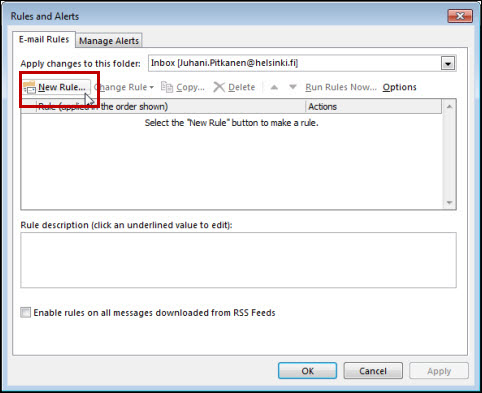
- Click New Rule.
- Choose Apply rule on messages I receive.
- Click Next.

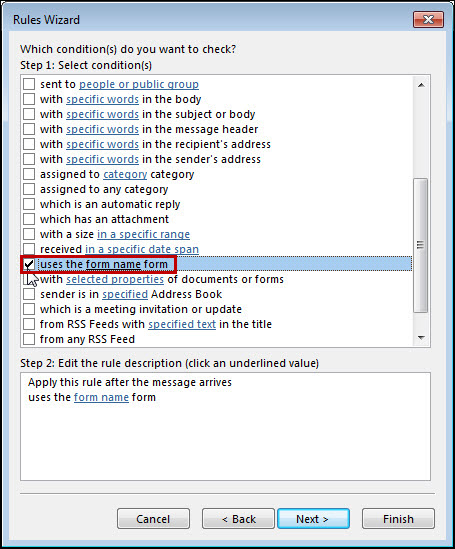
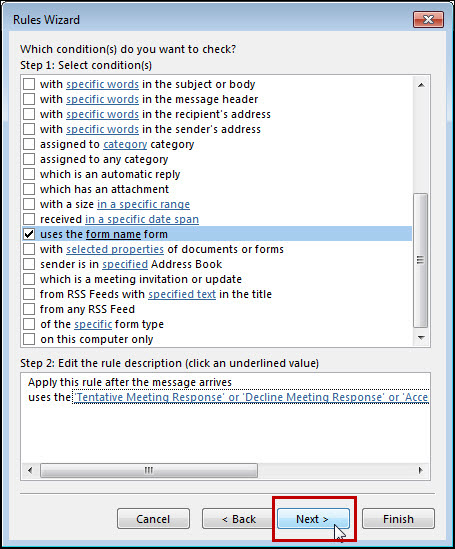
- Choose uses the form name form.
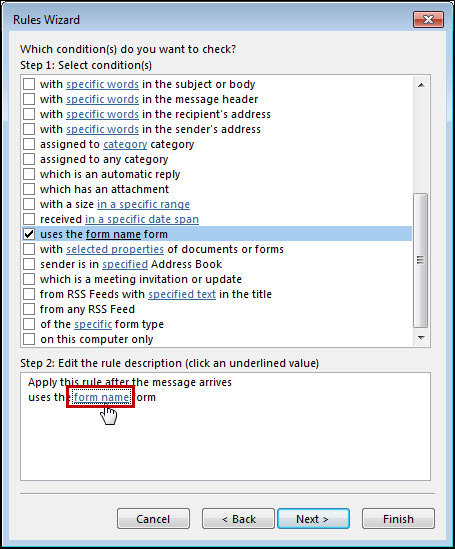
- Click form name.
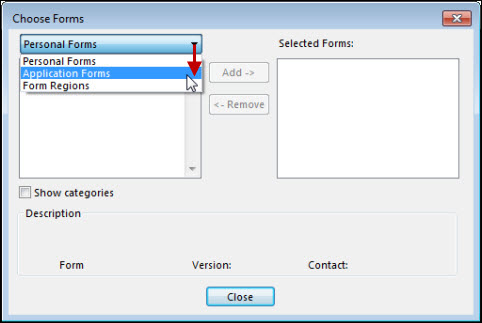
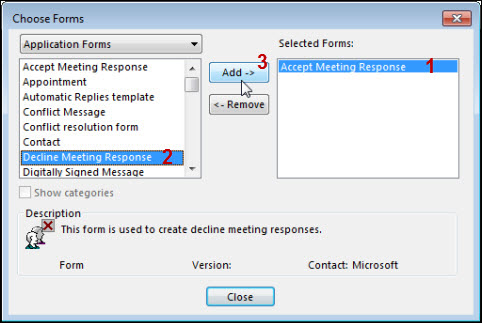
- In the drop-down menu, choose Application Forms.
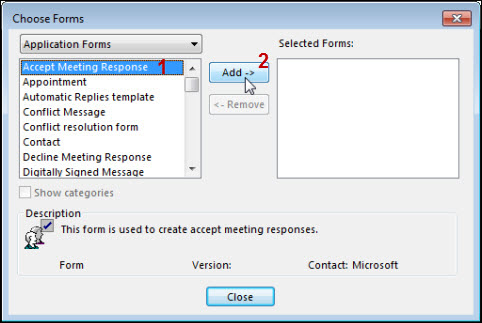
- Choose Accept Meeting Response (1).
- Click Add (2).
- The selected condition is added to the list (1).
- Choose Decline Meeting Response (2).
- Click Add (3).
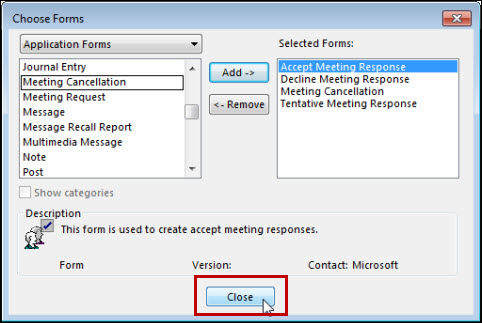
Add additional conditions in a similar way. The example uses the conditions Accept Meeting Response, Decline Meeting Response, Meeting Cancellation and Tentative Meeting Response. You can naturally also create a separate rule for each case, and direct different cases to different folders.
- Click Close.
- Click Next.
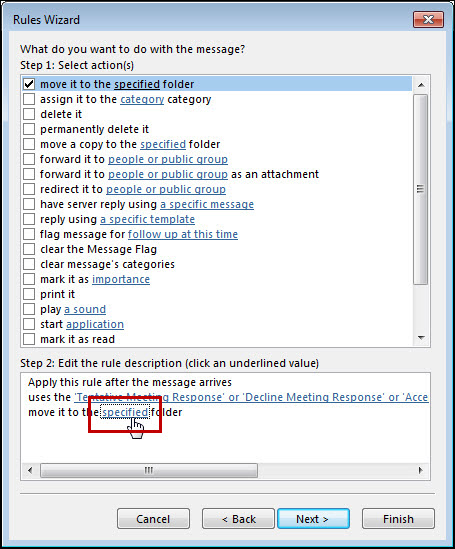
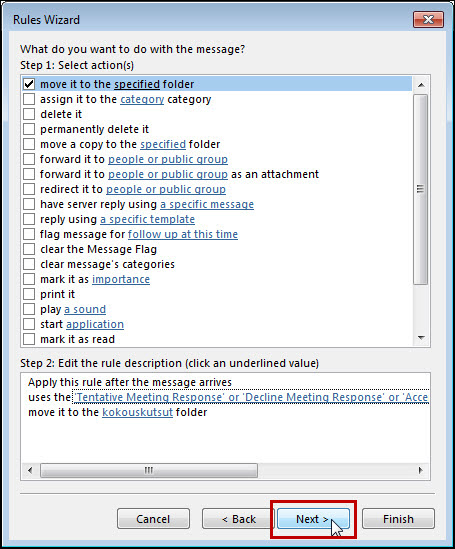
- Choose move it to the specified folder.
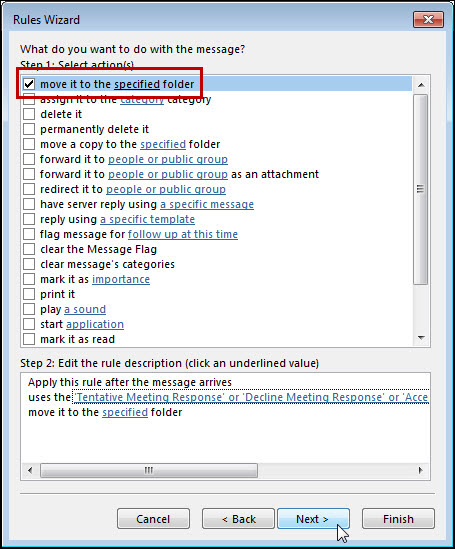
- Click specified.
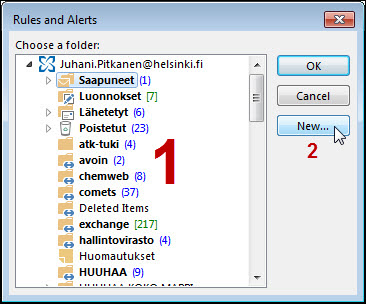
- Click New (2) to create a new folder.
- You can also select an existing folder (1).
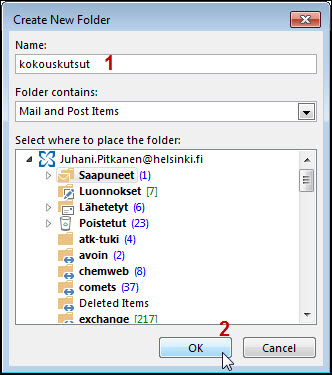
- Enter a name for the folder (1).
- Click OK (2).
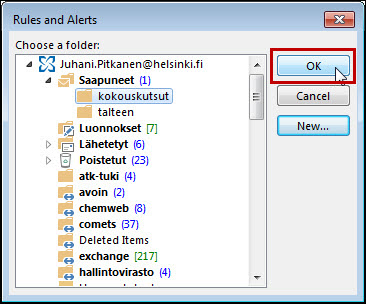
- Click OK.
- Click Next.
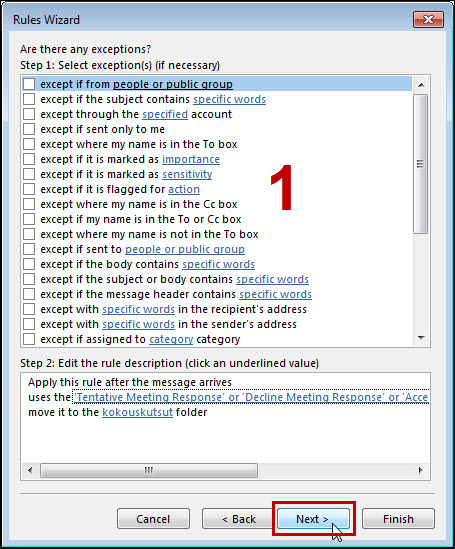
- You can add exceptions to the rule (1). This is not, however, done here. Click Next.
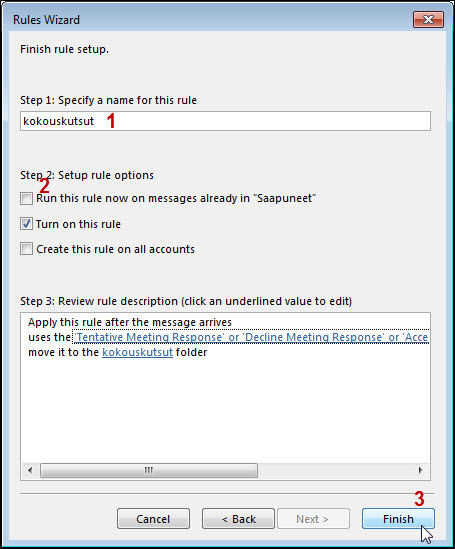
- Enter a name for the rule (1).
- Tick (2) if you want to apply the rule to messages that are already in the Inbox.
- Click Finish.
- Click OK.
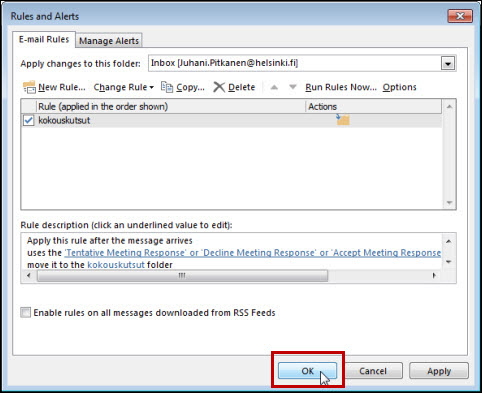
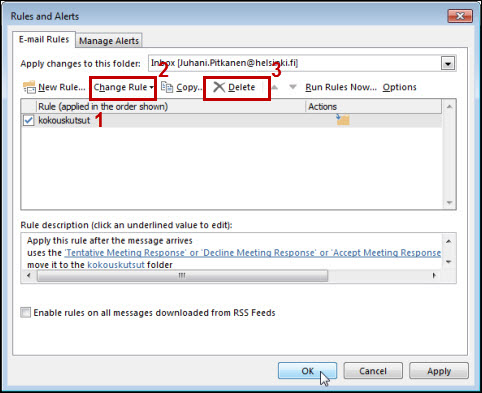
- You can delete or edit the rules by choosing Rules > Manage Rules & Alerts.
- Choose the rule to edit in the list.
- Select whether you want to edit (2) the rule or delete (3) it.
Editing a meeting afterwards
If you need to edit a meeting (add or remove attendees, change the time or room etc.) after you have sent the invitations and made the room reservation, please take the following matters into account:
- Track the attendees’ responses. If you change the meeting time, they need to accept the meeting invitations again.
- When you change the meeting time, always check the Scheduling Assistant to ensure that the previously booked room is also available during the new meeting time.
- Always use the Scheduling Assistant to change the room, and check that the room is also available during the new meeting time.
- Be careful when editing recurring reservations! For popular rooms, it can be very difficult to change the reservation times. In the worst case, you might lose the entire room reservation.
- Always remember to send the changes to the attendees and the reserved room.
- Make sure the room accepts the changes (sends a new message).
- Monitor the situation with the Tracking function.
Cancelling a meeting
- You can cancel meeting requests that you have created.
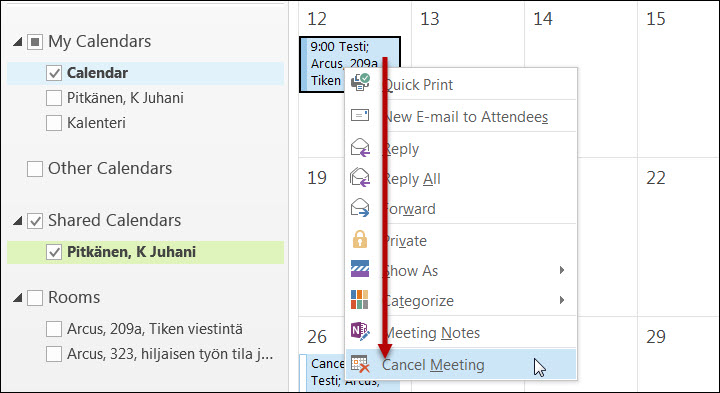
- Right-click the event to be cancelled in your own calendar.
- Click Cancel Meeting.
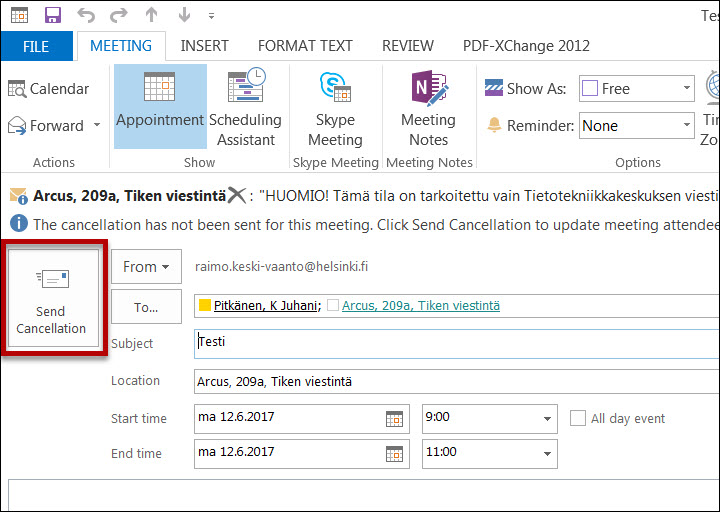
- Click Send Cancellation to send the cancellation message. If you do not send the cancellation, the attendees and the booked room are not informed of the cancellation.
Replying to a meeting invitation
- When someone has invited you to a meeting, you get the following notification to your email: Always respond to the meeting invitation so that the meeting host will know who is coming and who is not.
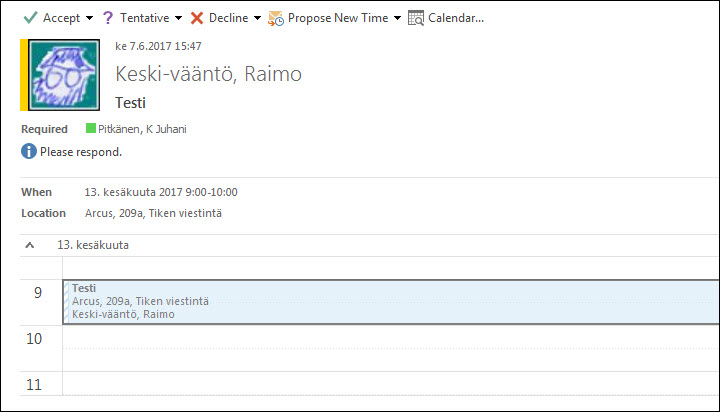
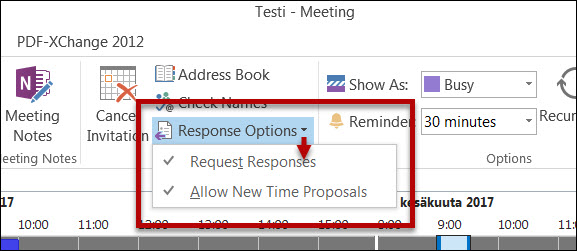
- At the top, there are the menus Accept, Tentative , Decline and additionally Propose New Time if the invitation author has allowed proposing a new time.
- The author of the invitation can enable or disable proposing a new time in Response Options.
- The author of the invitation can enable or disable proposing a new time in Response Options.

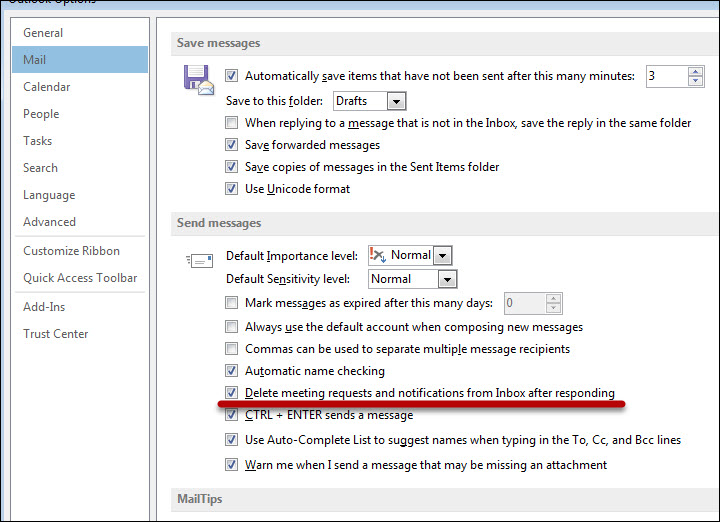
- When you have replied to the meeting invitation, the message is removed from the Inbox. You can change this setting in the “Backstage view” in Outlook options : File > Options > Mail > Send messages by unticking Delete meeting requests and notifications from Inbox after responding.
Checking the reservation status in the room calendar
You can check the reservation status in the room calendar as follows:
- Open the room calendar. Click Open Calendar > From Room List .
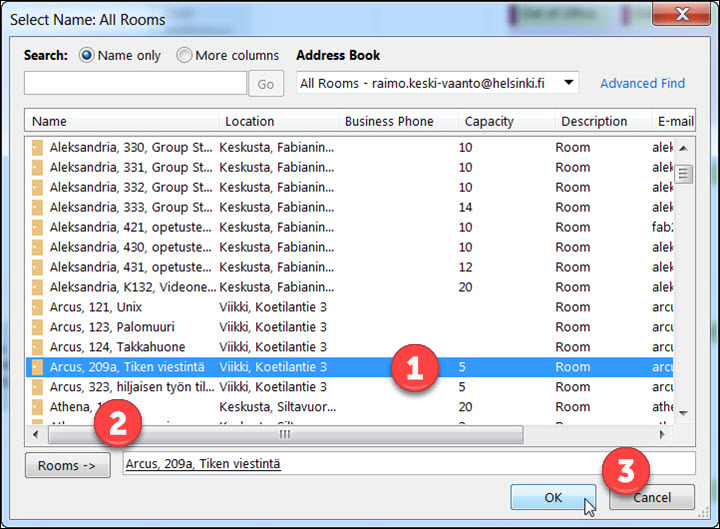
- Choose the room (1) and click Rooms (2).
- Click OK (3).
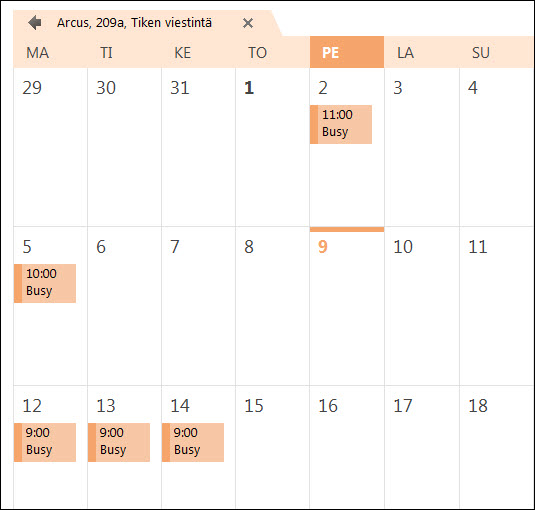
- Normally, you only see whether the room has been reserved (Busy). For some rooms, additional information is displayed.
- You cannot usually open the reservation by double-clicking the room calendar; this results in an error message. In case of your own reservation, you can open the meeting there and make the required changes.

How can I make sure that by room reservation was successful?
- The room has sent a response message (Accepted), and the meeting details have not been changed afterwards. Make sure that the reservation message comes from the room, since attendees also send them.
- Open the room reservation calendar and check that your own reservation is there. The room reservation calendar is the only reliable way of checking who has valid reservations.
-
If the meeting has been changed, remember to inform all attendees and the room of it (Send Update), and make sure that you receive accept response messages.
How can I find out who has valid reservations for a specific room?
- Open the room reservation calendar and check the reservation data in it.
- In some buildings, caretakers may check the reservation status from the calendars for the rooms that can be reserved in the building.
- If you are in a hurry to find out who has a valid reservation for a room, and the room calendar does not display the details of who has the reservation, you can try to make a new overlapping reservation for the room (the start and end times of a valid reservation are always displayed in the room calendar). You can see the details of who has the reservation in the automatic response message. Trying to make a reservation should result in a negative response, with the response message usually mentioning whose reservation prevents you from reserving the room. To attempt to make an overlapping reservation, you must have the right to reserve the room in question. If you have no reservation rights, you will be notified that the reservation request has been rejected for this reason.
Note that you cannot make a room reservation in the past–the start time of the reservation can only be in the future (it is enough that it slightly overlaps with the clashing reservation). Finally, cancel this extraordinary meeting in your own calendar.

What can go wrong with room reservations?
- Reservation requests are sent to the rooms as email messages in the same way as to the persons attending the meeting. Delivery of a message can be delayed due to various reasons. The room also sends the response message by email. So you should wait for a moment for the delivery of the messages.
- Some of the university’s distribution lists are located outside Office 365. These include 1) groups beginning with grp for which an email address is used 2 ) automatic groups beginning with hy 3) Majordomo mailing lists. These lists cannot be found in the Office 365 address book. Office 365 considers these email messages external, and cannot determine who is behind the addresses. Therefore, meeting invitations that use these groups can in some situations behave differently from meeting invitations sent using the Office 365 system’s own groups, or if the attendees have been selected one by one.
- Anyone can make an appointment in their own calendar for a time and type anything in the Location field without actually reserving anything. A meeting in one’s own calendar is not proof of a room reservation.
- The person who made the reservation may have displayed all of the rooms in a room list but not selected any of them, in which case the meeting invitations may have been sent accidentally without a room reservation. Fortunately, a room reservation can also be added to a meeting afterwards by editing the meeting, choosing the room, and sending an update.
- It is possible that a rejection message concerning the reservation has been generated as it should have been, but it has not been noticed or it was ignored. However, the meeting remains in your own calendar. A rejecting message sent by the room will not delete the meeting from your own calendar.
- It is possible that the meeting time has been changed afterwards, and updates concerning the meeting (including the room that has been reserved) have not been sent to the attendees.
- You should make sure that you received the acceptance message from the same room you tried to reserve.
- In unclear situations, check that the reservation is valid in the calendar of the room in question. If the reservation details are not displayed, ask the building’s caretakers for help.
- It is possible that the time zone has been set incorrectly in the computer settings. Check the settings to make sure that other sources of problems have already been ruled out.
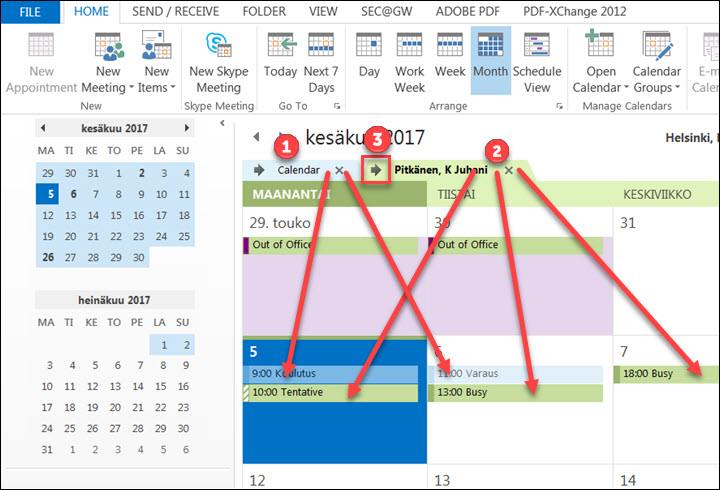
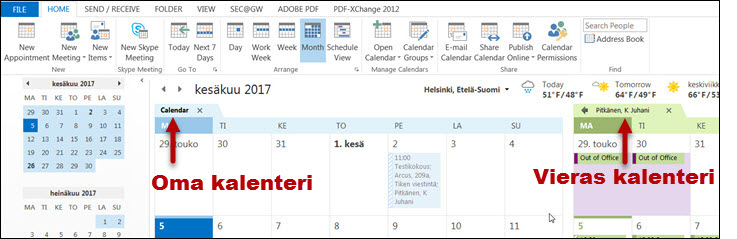
Overlay and parallel view of calendars
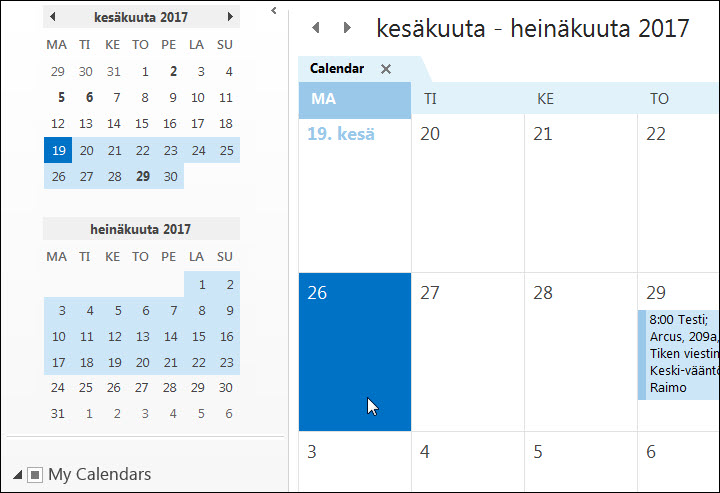
Make sure you are making the reservation in your own calendar! First open the calendars in parallel, and only then make the reservation.
In this example, Raimo Keski-vääntö has added Juhani Pitkänen’s calendar to his own, and the calendars are displayed in the overlay view. At the top left, Raimo’s own calendar is displayed in blue (1) and Juhani Pitkänen’s calendar in green (2). In the actual calendar sections, entries belonging to both are marked in a matching colour. You can move from the overlay view (upper image) to the parallel view (lower image) by clicking the arrow (3).
Microsoft guide >>
Calendars in overlay view
Calendars side by side
Video instruction
Give feedback
The instructions site of the University of Helsinki's IT Helpdesk helps you with IT-related issues related to your work. Let us know how we can improve our instructions. We greatly appreciate your feedback!
How would you improve these instructions?