
Microsoft Teams brings meetings, tools and content together. You can create and edit files, communicate via video or instant messages and use the other Microsoft 365 software directly through Teams.
Teams is a cloud service enabling easy and efficient group work online. What makes Teams different from services such as Jabber and other chat software is that it allows you to divide the Team to different channels.
Microsoft's Teams application can be used on Windows, Mac and Linux workstations as well as on mobile devices through the app (install the app in your device's app store). If you cannot or do not want to install the application, Teams can also be used through the browser. The recommended browser is Chrome.
Key terminology used in the instructions
- Teams = the entire software/application
- Chat = a quick discussion between two people or a small group
- Team = An area created in Teams for a specific group
- Channel = An area in Teams to discuss a specific topic. Name the channels clearly: well-named channels help all the users to find the right channels for their discussions
- Thread = A discussion on a specific topic. A discussion in a Team/channel.
Start by watching the video: Welcome to Microsoft Teams (English)
Quick help
Table of contents
Quick tips for using Teams
- Reply to thread
- Adjust the notification settings of the Teams application to suit your preferences (Microsoft guide)
- You can adjust the notifications of individual channels (Channel Notifications).
- You can adjust the notifications of individual channels (Channel Notifications).
- Show the most interesting channels and Teams and hide those you are not interested in:
- Click on the three dots (•••) next to the name of the Team / channel > Show/Hide.
- You can pin your most important channels/Teams to the top of the Teams list
- Your Teams status will follow the status in your Outlook calendar (e.g. 'busy' when you are attending a meeting) but notifications of received messages will still be shown to you. If necessary, you can block popups by changing your status to Do not disturb.
- You can switch to this status quickly by typing/dnd in the search field at the top of the screen.
- The Teams search field also has other quick links behind the/ and @ characters.
- Make sure your messages are noticed by tagging people (@name), an entire channel (@channel), or an entire Team (@team) in them.
- You can also create a group of the Team members and tag the group.
- You can also create a group of the Team members and tag the group.
- Use the format option to edit your channel messages.
- You can format links, bold, underline, highlight, etc.
- You can also send the same message to more than one channel/Team.
- You can also add links to other messages, Team files or external websites.
- If you need more specific topics, you can create new channels under the Team.
- If necessary, the channel can be moderated (e.g. channel for news only) ••• > Manage Channel
- If necessary, the channel can be moderated (e.g. channel for news only) ••• > Manage Channel
- It is also possible to create a hidden channel only visible to the members connected to that channel (must be Team members)
- This is usually a better idea than creating an entirely new Team.
- This is usually a better idea than creating an entirely new Team.
- The chat is the best place for discussions between two people. The chat disappears when the last message has been sent for more than 6 months.
- More participants can be added to a chat during the discussion. When adding new people, you can choose whether the new members get to see the entire chat history or whether to create a new discussion.
- More participants can be added to a chat during the discussion. When adding new people, you can choose whether the new members get to see the entire chat history or whether to create a new discussion.
- Team members can be assigned tags (e.g. manage Team > Members) which can be used to target notifications or start a chat group @tag_name.
- Quick editing in chat: use the upwards arrow on the keyboard to quickly edit your previous comment. Save your changes with the Post button.
See the Detailed help tab for more detailed help
Changes of the default views
NB! Microsoft has made changes to the default views of Teams in the recent version (spring 2024).
We recommend that you make the following changes to your application settings after enabling the new Teams to maintain your user experience:
1. To make your Teams groups appear as a list instead of a grid view, select Settings -> Appearance and Accessibility under the three dots in the top right corner of Teams (to the left of your profile picture) and under Layout, select List:

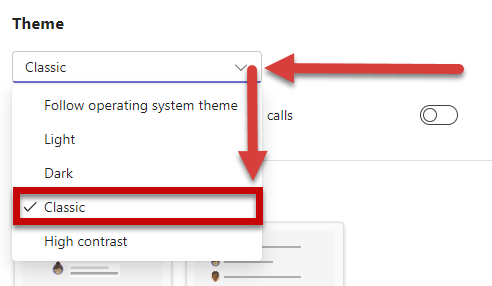
2. To keep the previous theme of your Teams, select Settings -> Appearance and Accessibility under the three dots in the top right corner of the Teams (to the left of your profile picture) and under Theme, select Classic:
Detailed help
Chat and Teams (Teams groups)
In Teams, you can communicate in the public channels/Teams and in private chat messages.
Chat
A chat is a discussion between two people or a small group. In a chat, you can write, create and edit materials together using the Office applications and share them. The chat has no owners; all the chat participants are equal members. The chat disappears when the last message is more than 6 months.
Teams (groups in the Teams)
Teams are permanent communication platforms for a larger groups where you can create various channels for different topics and groups of people. You can add up to 5,000 users to a Team. A specific Sharepoint space is created for the Team. Files shared between the Team are stored in Sharepoint.
As Teams always communicate in threads, make sure that your replies are relevant to the topic. However, if you have posted a reply as a new thread, you can always delete it (see instructions below).
Please note that the thread with the most recent messages will always be moved to the bottom.
Deleting and restoring a Team/channel
The messages in a Team and their attachments will be stored 'permanently' until the Team/channel is deleted.
Deleting and restoring a channel
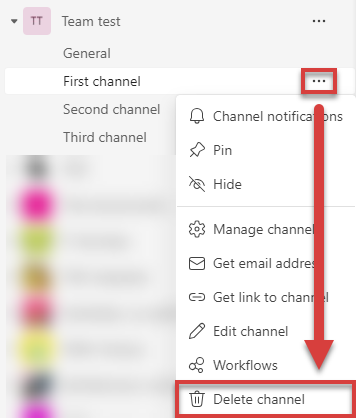
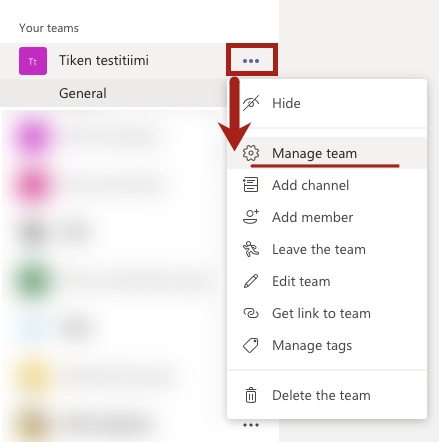
To delete a channel, click on the ••• symbol after the channel. Select Delete channel.
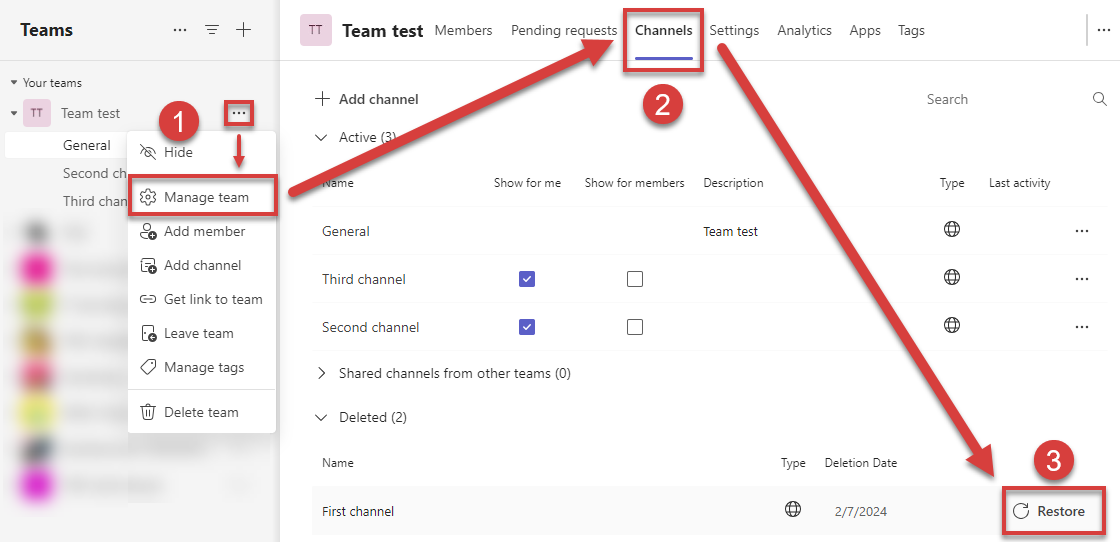
After this, you can restore the channel for the next 30 days yourself, after which the channel will be permanently deleted and even the administrators will not be able to restore it.
To restore a channel, go to the Team settings. Select (1) Manage team , (2) go to the tab Channels > Deleted and (3) select Restore for the deleted Team.
Deleting the entire Team
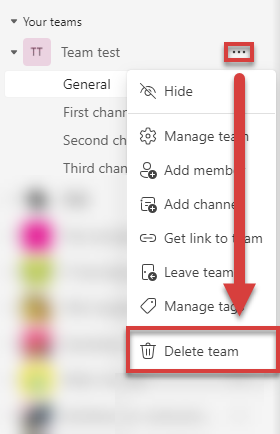
A Team is deleted in the same way, but this deletes ALL the Team files and messages. Note that only Office 365 administration can restore a deleted Team. You can contact it through Helpdesk.
To delete a Team, click on the ••• symbol after the Team. Select Delete the team.
Modifying the display settings and other settings
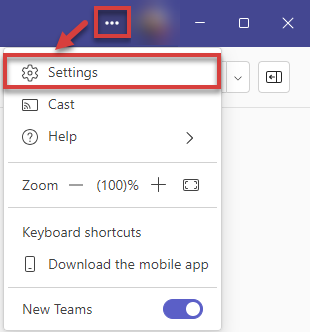
You can adjust the appearance and settings of Teams by clicking on the ••• symbol next to your picture in the Teams top bar. In the menu, select Settings .
Your saved settings will be stored across all platforms, so you only need to modify them once and the appearance will be the same everywhere.
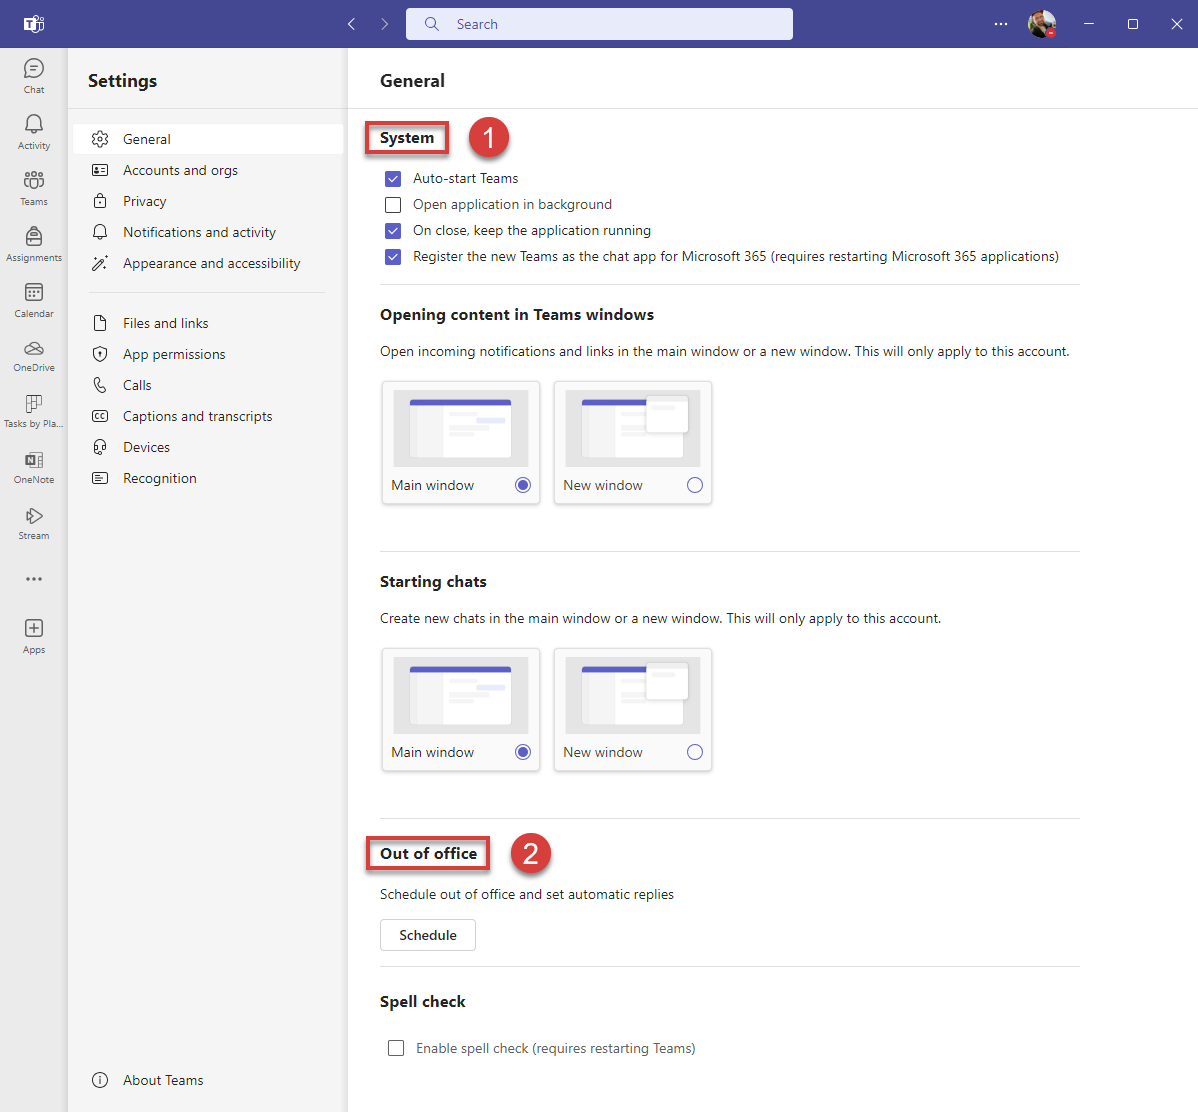
In (1) System settings, you can, for example, set Teams to open automatically when starting the computer (Auto-start Teams). Another setting under the system settings is (2) Out of office, which allows you to report your absence on Teams, for example, during a holiday or other longer absence.
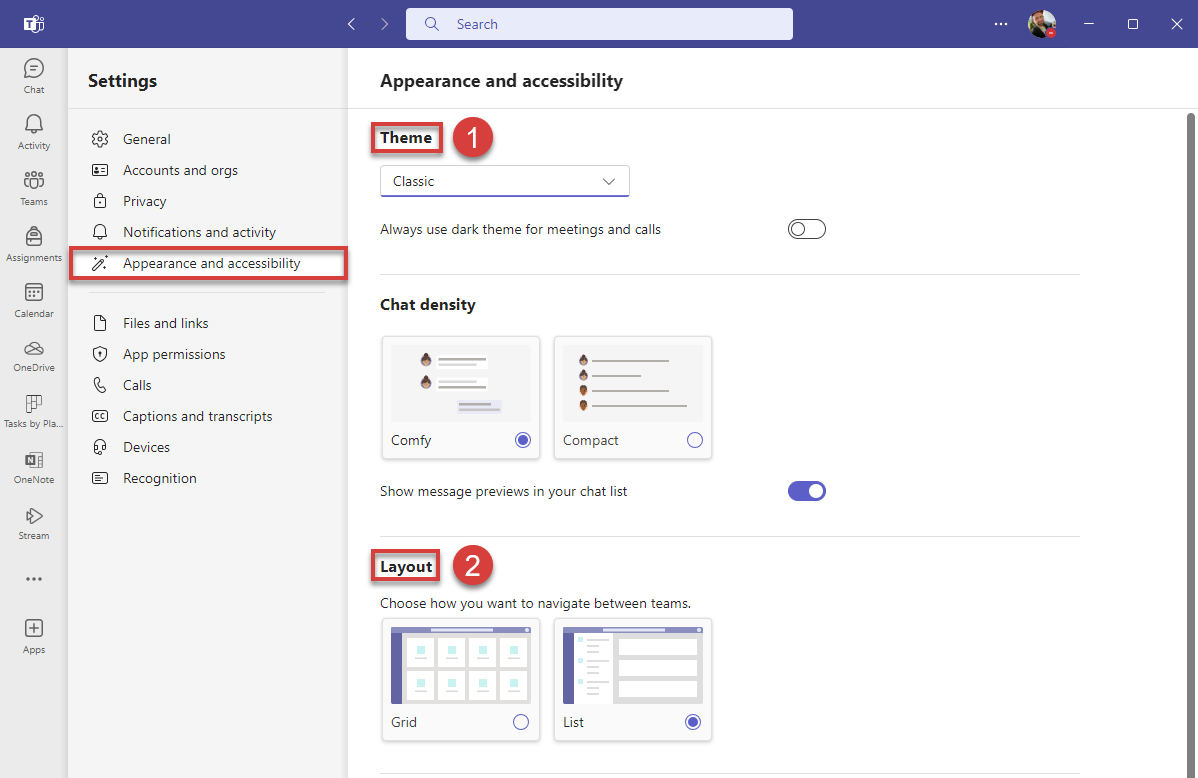
In the settings submenu Appearance and accessibility, you can (1) edit the Theme and (2) Layout. In the Layout list, we recommend trying the List view to see all the chats / Teams in a single list. The default setting is Grid.
Changes in default views
NB! Microsoft has made changes to the default views of Teams in the recent version (spring 2024).
We recommend that you make the following changes to your application settings after enabling the new Teams to maintain your user experience:
1. To make your Teams groups appear as a list instead of a grid view, select Settings -> Appearance and Accessibility under the three dots in the top right corner of Teams (to the left of your profile picture) and under Layout, select List:
2. To keep the previous theme of your Teams, select Settings -> Appearance and Accessibility under the three dots in the top right corner of the Teams (to the left of your profile picture) and under Theme, select Classic:
Installing Teams
For university computers, Teams can be found as an optional installation in the Software Center (Windows) or the Managed Software Center (Mac). Teams instructions for Cubbli can be found from Cubbli’s own wiki.
Install Teams on your home computer at: https://teams.microsoft.com/downloads
- The installation will not require administrator rights.
After installation, log in to the service using your credentials in format:
- username@ad.helsinki.fi (such as rkeskiva@ad.helsinki.fi)
Creating a Team
We recommend taking your time when creating a Team and carefully considering the purposes for which the Team will be used. It is often a good idea to create a Team that is as multipurpose as possible (for example, a Team used by an entire faculty or department) and create smaller group channels under the Team for different groups of people and different purposes. It is possible to create both public groups and hidden channels limited to specific users (see also instructions for creating channels).
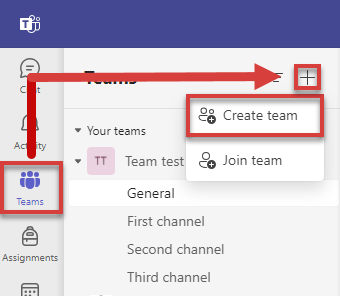
Click the Teams menu, then click on the + symbol and select Create team in the menu.
The next question is what is the purpose of the Team. There are four different options. As a rule of thumb, if you do not know what to choose, select Other. There are very small differences between the types of Teams. You can read more about Team types in the Microsoft Help.

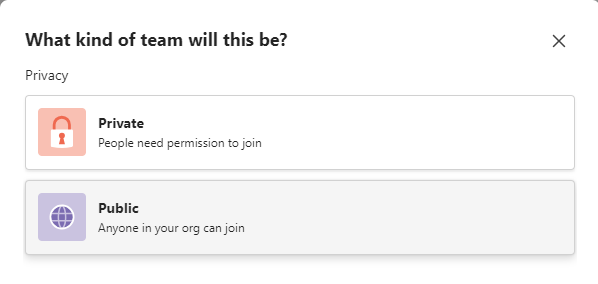
Next, define the Team Privacy, or if the Team is Private or Public.
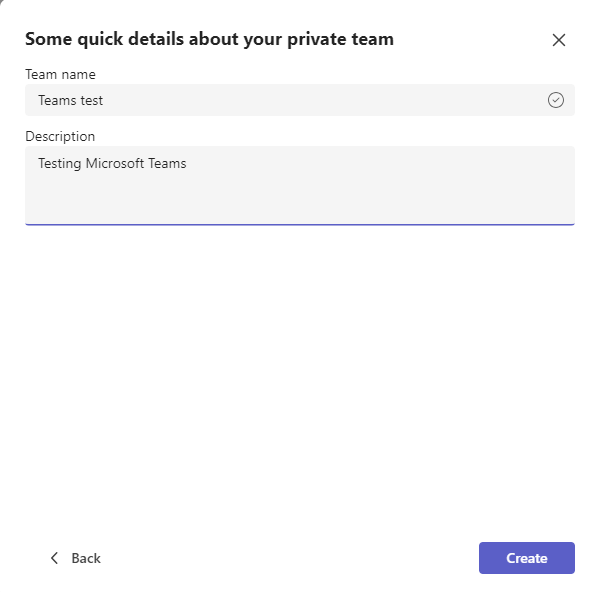
Naming the Team
Adding members
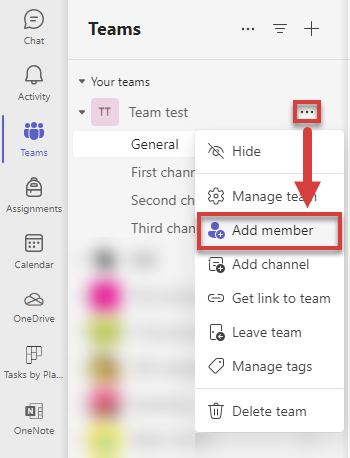
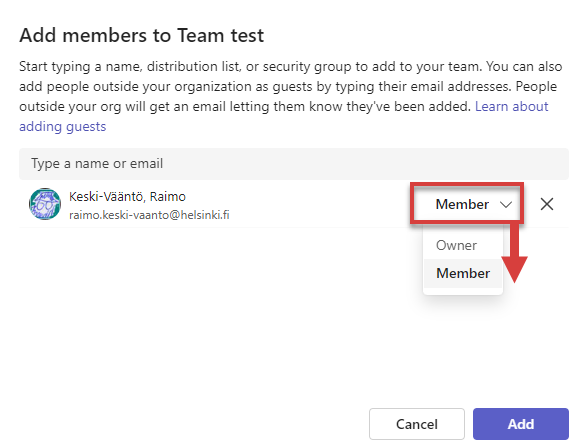
To add members to your Team, click on the ••• symbol next to your Team name and in the menu, select Add member.
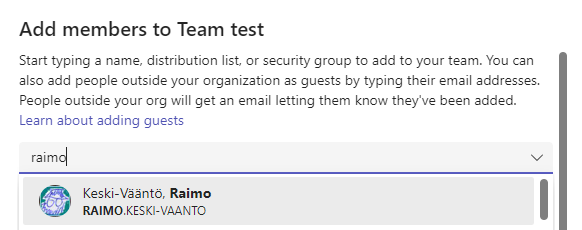
Add the members to the list (when you start typing a name, you will see suggestions). You can also use IAM groups, but note that any later changes to the IAM group will not be automatically updated in the list of Team users.
You can determine the necessary rights for individual people: Member or Owner.
We recommend having more than one owner in the Team to ensure the Team can function without interruptions during holidays and absences. Helpdesk does not have the right to edit Teams. Only the Office 365 administration can edit Teams, but they will only do it when it is absolutely necessary.
Once you have found the name on the list, select it and click Add.
Channels
You can create channels for various purposes/topics in a Team. There may be several smaller channels in a large Team. This is better than creating several Teams as a large number of Teams means that the discussion is lost in the flood of information and, at worst, the same topic may be discussed in several Teams.
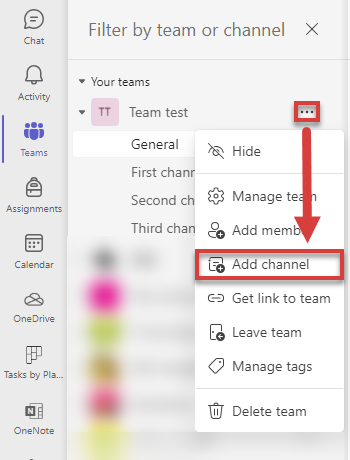
To create a Channel, click on the ••• symbol next to your Team name and in the menu, select Add channel.
We do not recommend creating new Teams for smaller groups in a larger Team. If you want to communicate with a smaller group, create a Private channel.
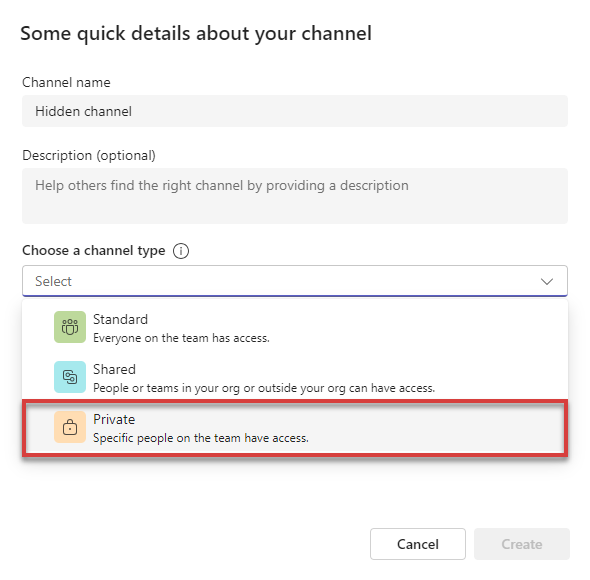
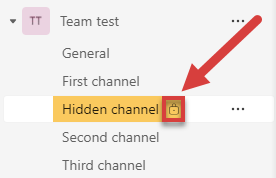
A private channel is visible only to the members of the said group and there is a lock next to the name of the channel.
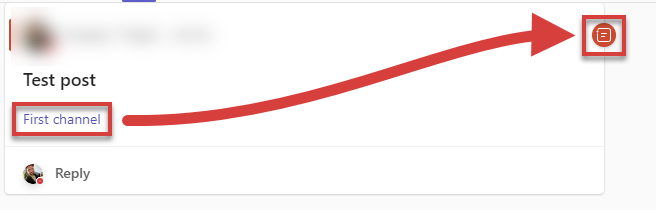
Editing or deleting a message
Teams communicate in threads. If you have accidentally posted a reply as a new thread, you can always copy and paste it to the correct thread and delete the misdirected reply.
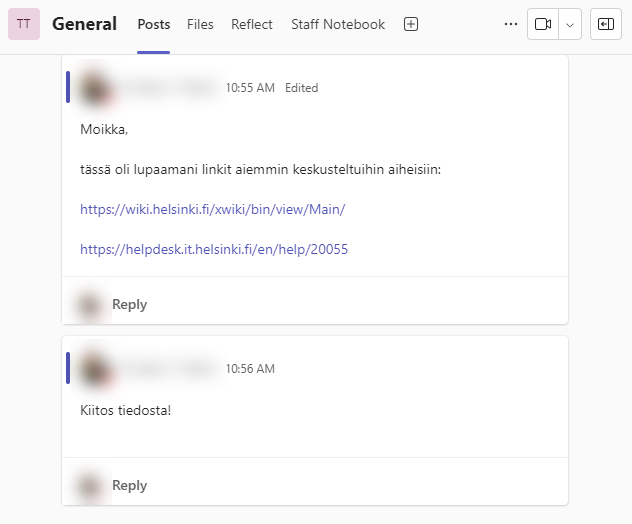
Here is an example of a misdirected reply in a new thread:
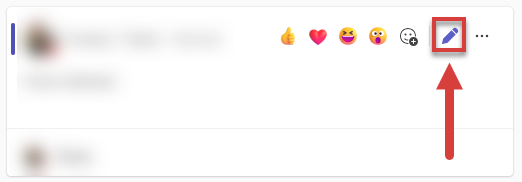
You can edit an already published message by clicking the editor tool in the emoticon menu. The menu opens automatically when you hover your cursor over the message. Click Edit.
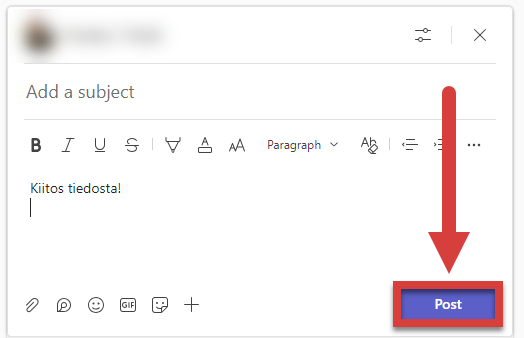
This opens the editor where you can edit your message. Click Post to save your changes.
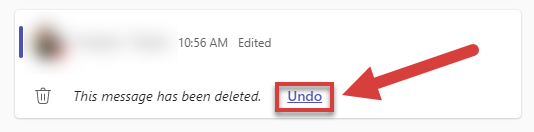
You can delete a sent message by clicking on the three dots in the emoticon menu. In the menu, click Delete.
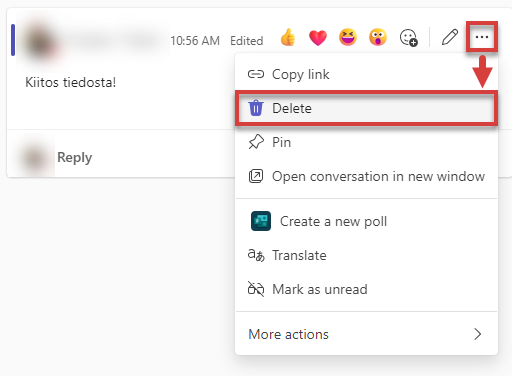
The message is deleted. After this, you can restore the deleted message by clicking Undo.
Notifications
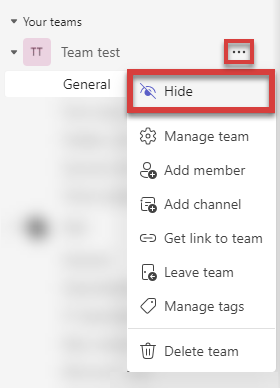
Show the most interesting channels and Teams and hide those you are not interested in or that do not concern you. Click on the ••• symbol next to the name of the Team/channel > Show / Hide).
We recommend only using the Do Not Disturb status if you are attending a meeting or need to focus. We do not recommend using the status all the time as it blocks all messages and notifications. Remember to always respect your colleagues' DnD status.
Editing
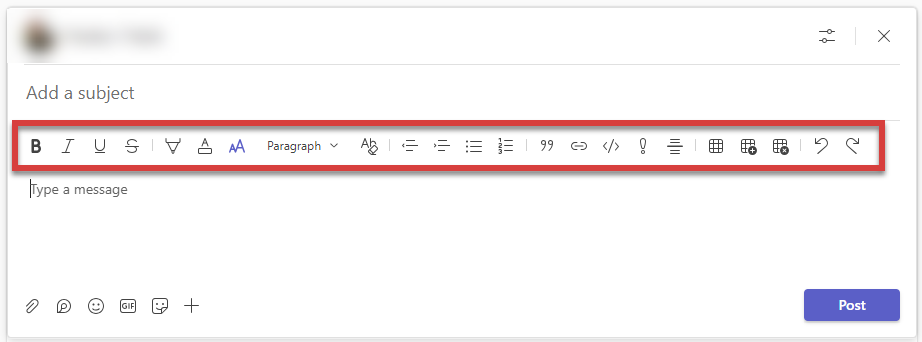
To edit a message in the writing and editing mode, use the format option that opens in the top of the view.
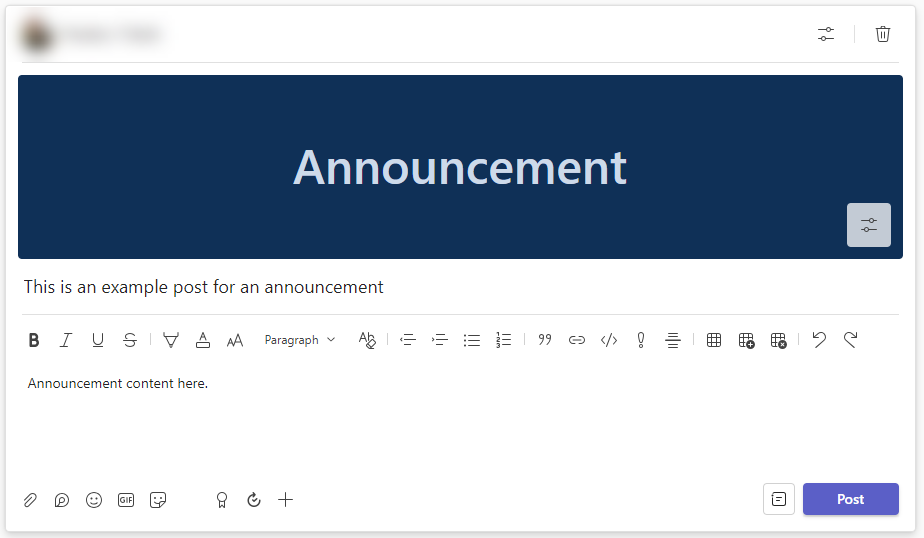
Announcements
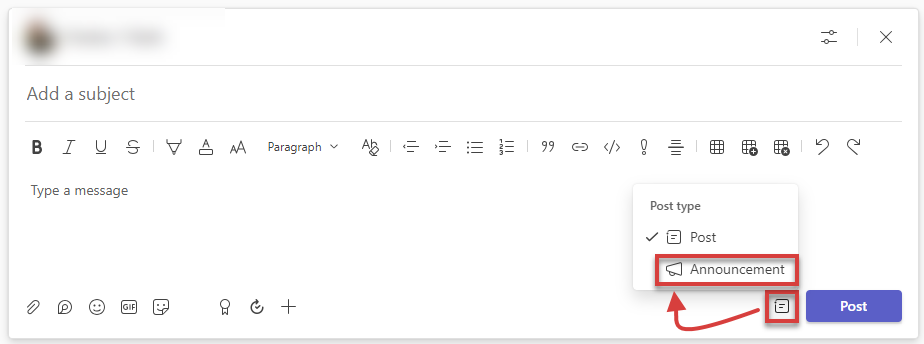
In addition to a regular thread, you can also publish on one or several channels at the same time by selecting Announcement as your post type. Click on the Post type symbol next to the Post symbol, and in the menu, select Announcement.
An example of an announcement template:
Tags
You can tag a person using their name by adding the @ symbol in your message and after it, writing the name of the tagged person without a space (e.g. @Raimo). It is also possible to tag the individuals in a specific target group (e.g. on-site support, Helpdesk) based on the tags created for the Team. You can manage tags and the related individuals in the Team settings (note that tags are Team-specific).
Example of tagging a person:
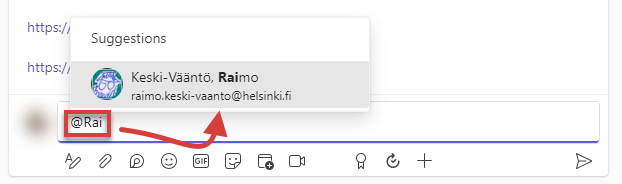
You can catch the attention of the individuals related to the tag as follows: Type @tag (e.g. @ Supportchannel, @First channel) and the users related to the tag will see the message highlighted with a red symbol.
You can manage tags in the Team settings. Click on the three dots next to the Team name and select (1) Manage team or (2) Manage tags.
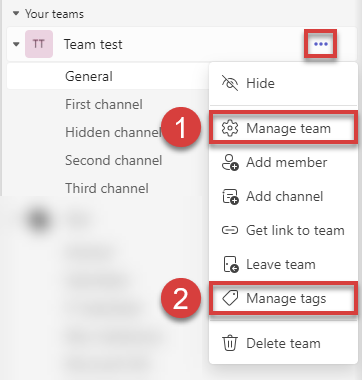
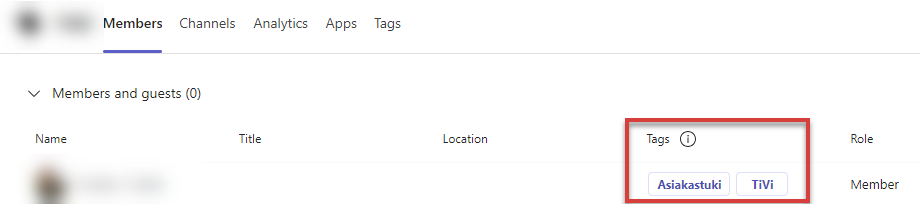
Through Manage Team > Members, you can see the Team members and their tags. You can also see the members who do not yet have tags.
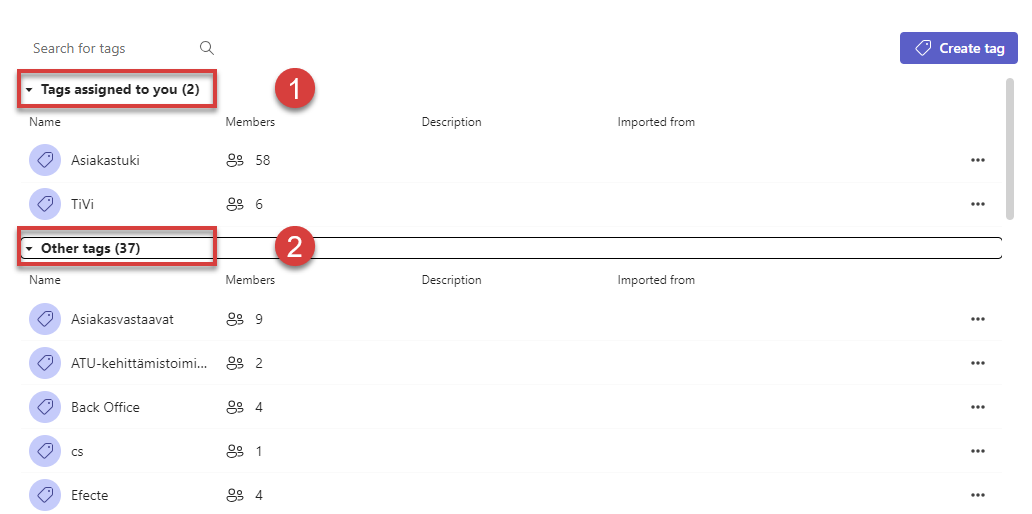
The Manage team > Tags option is the easiest way to view existing tags. There you can review (1) Tags assigned to you and (2) Other tags .
Adding an RSS feed to a Team
A Team administrator can add a new RSS application (RSS app) to a Team (see instructions on this page below). Any Team member can then add an RSS feed to the channel of their choice.
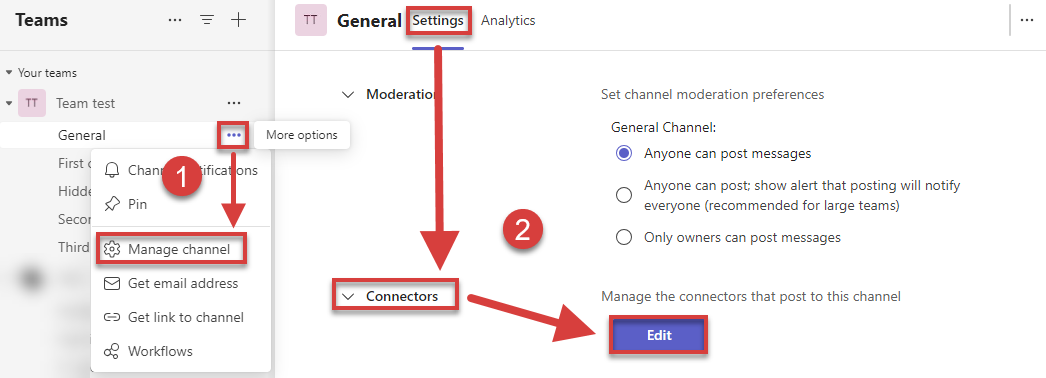
Choose a channel to which you want to add an RSS feed. Click (1) on the three dots after the channel and select Manage channel. Alternatively, you can open the channel and right-click on the three dots in the upper right corner. After this, select (2) Settings and Connectors > Edit.
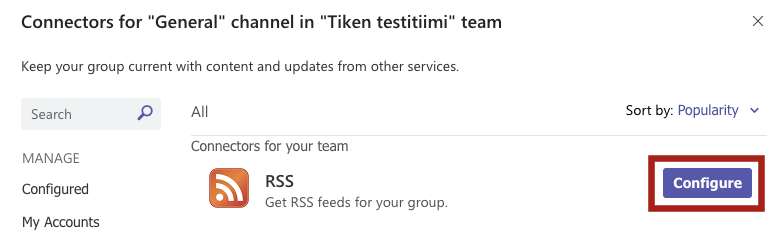
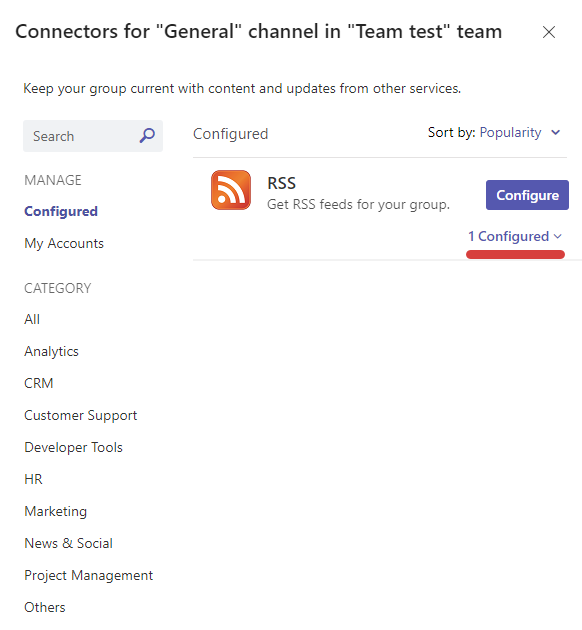
A window opens with a list of Connectors . Find RSS in the list and click Configure.
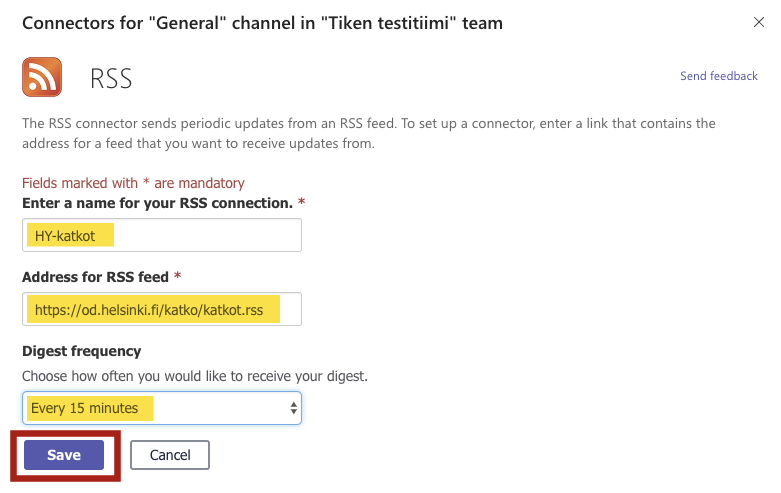
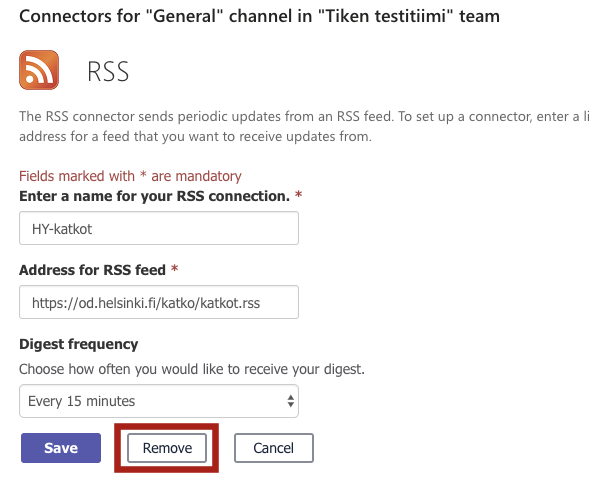
Fill in the fields:
- Enter a descriptive name for the RSS feed (for example, HY service breaks).
- Give the address for .rss feed (for example, https://od.helsinki.fi/katko/katkot.rss).
- Choose digest frequency or how often the feed is updated. In this example, the update frequency is set at every 15 minutes.
Last, you'll see a view where you can see the connectors added to the channel. You can add other connectors for the channel from this view. To close the view, click the X symbol on the title bar.
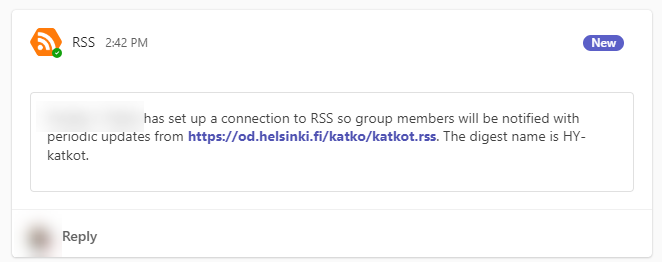
You will return to the Team channel and a notification will appear informing you that you have added an RSS feed to that channel. The service break notifications appear according to the specified frequency (in this example, every 15 minutes).
If you wish to edit the RSS feed, follow the instructions in the beginning to find the configurations of the channel’s connectors. Find Configured in the RSS menu and click 1 Configured > Manage.
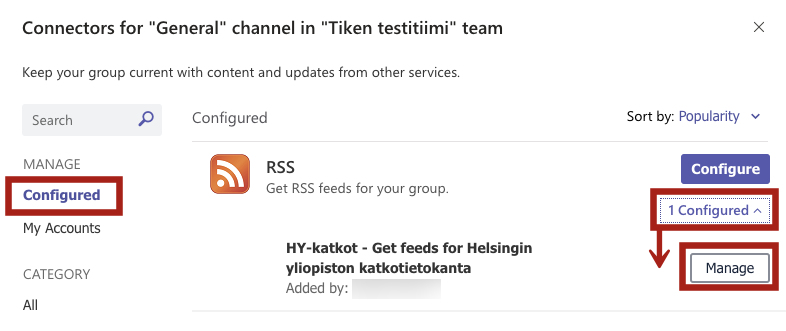
You can edit a previously added RSS feed and, if necessary, delete the feed by selecting Remove.
Instructions for the administrator
Click on the three dots next to the Team name >Manage team.
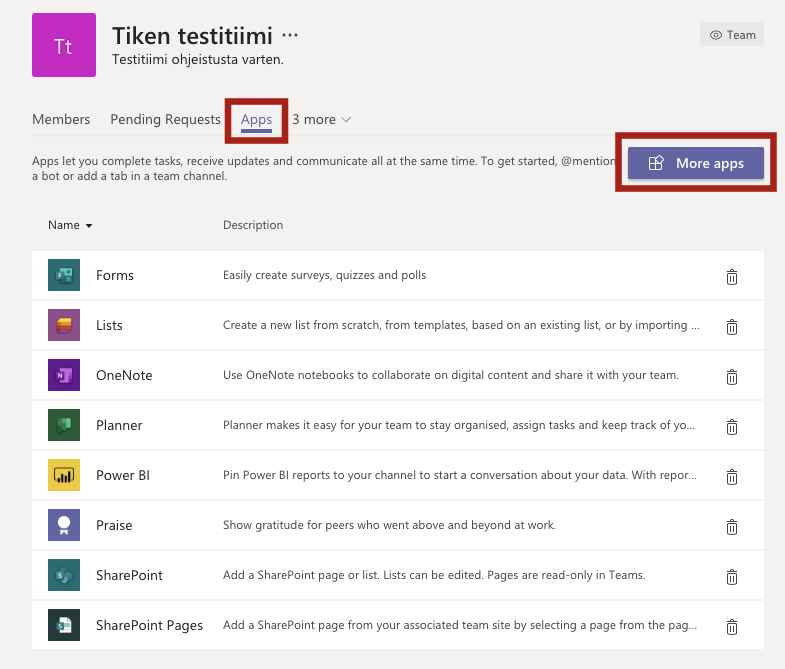
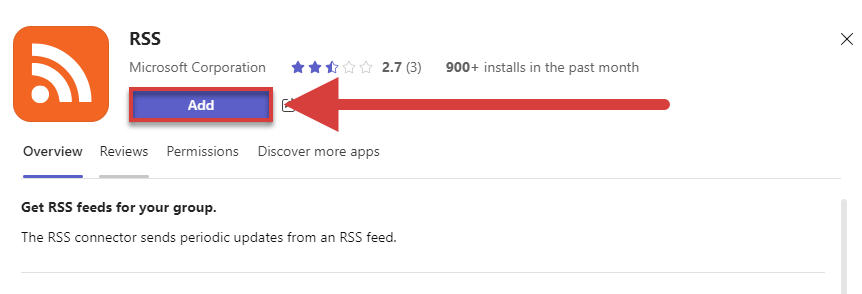
Select the Apps tab. Select RSS from the list. If the app is not found on the list, select More Apps.
Type rss in the search field. Click the RSS box.
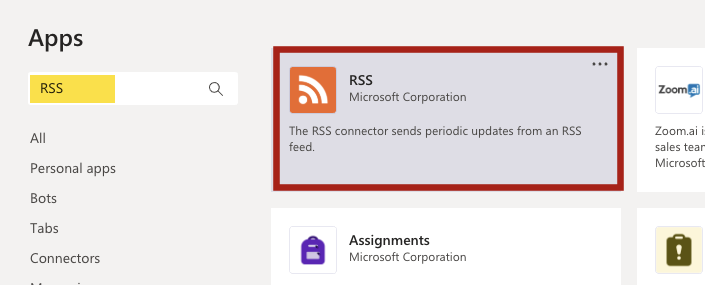
Add the RSS app to your Team by choosing Add.
Once an RSS app is added, anyone on the Team can add an RSS feed to the channel of their choice on that Team. Note that you must add Connectors separately for each Team.
More tips
Here are some other features you can try:
- You can pin your most important Teams/chats to the top of the view. Click on the ••• symbol next to the name of the chat and select Pin.
- You can name the chat based on the topic being discussed. Chats should usually be used to discuss a single topic: in this case, naming the chat is a good idea to keep the discussion relevant to the topic. Name the chat by clicking on the pencil symbol:

Video instruction
Give feedback
The instructions site of the University of Helsinki's IT Helpdesk helps you with IT-related issues related to your work. Let us know how we can improve our instructions. We greatly appreciate your feedback!
How would you improve these instructions?