
Unitube is a service aimed at university staff and students that enables viewing, publishing and managing video material. Unitube has been developed at the University of Helsinki in collaboration between the IT Center, the facilities centre, the Communications unit and the Educational Technology Centre since 2010. The services are available on a self-service basis and they are free of charge to University students and staff.
Quick help
The Unitube service consists of the following components:
See instructions from Detailed Help tab.
Detailed help
Unitube Viewer
Unitube Viewer is a video and audio file interface developed for use by university staff and students. Unitube Viewer is available on the university website at https://www.helsinki.fi/en/unitube.
Unitube Viewer provides university staff and students with browser-based access to video and audio recordings published by others at the university. On the university’s main pages, you can search for videos using keywords. On Flamma, you can search for recordings using keywords, in chronological order or sorted by series and units
Unitube Uploader
Unitube Uploader is a tool for university staff and students to publish video and audio recordings, such as lectures and research recordings they have produced. The recordings can include videos recorded using a tablet, a smartphone camera or a video camera, computer animations, audio files created using a dictation machine or other media files.
Unitube Studio
Unitube studios provide a quiet space for recording audio and visual material with high-quality equipment. They are designed for making instructional videos, for example.
Questions about Unitube Studio? Please contact opetusteknologia@helsinki.fi
Unitube Lecture Recording Rooms
The university’s facility services unit and the IT Center have together installed self-service Unitube lecture recording equipment in certain lecture rooms at the University of Helsinki. The lecture recording equipment is not remotely scheduled. Instead, the organiser (lecturer) must always start and stop the recording device.
Note: in some lecture rooms, the streaming button may not accurately reflect whether streaming is on or off. You can check whether streaming is operational by trying to open the stream as a viewer.
For more detailed instructions, please refer to the instructions for Unitube-compatible lecture rooms.
Click here for information on the locations of rooms and their booking status
Ethical principles and copyright rules related to the recording of lectures
- As the author of the recording, you must have the consent of the people featured on the recording to have the session recorded and published on the internet.
- As the author of the recording, you are responsible for ensuring that the recording does not contain any material that breaches intellectual property rights. In other words, you must own the copyright to the presented material or have permission to present the materials (including videos, audio recordings and photos shown during lectures, etc.).
- The recording system may be used for purposes that serve the University of Helsinki’s teaching, research and social interaction. Using the system for political and personal purposes is not allowed.
- The IT Center reserves the right to delete recordings that do not conform to the IT Center’s general terms of use or disrupt the system’s technical functioning.
- The IT Center is not responsible for the content published by the authors of recordings.
Instructions for using Unitube-compatible lecture recording rooms
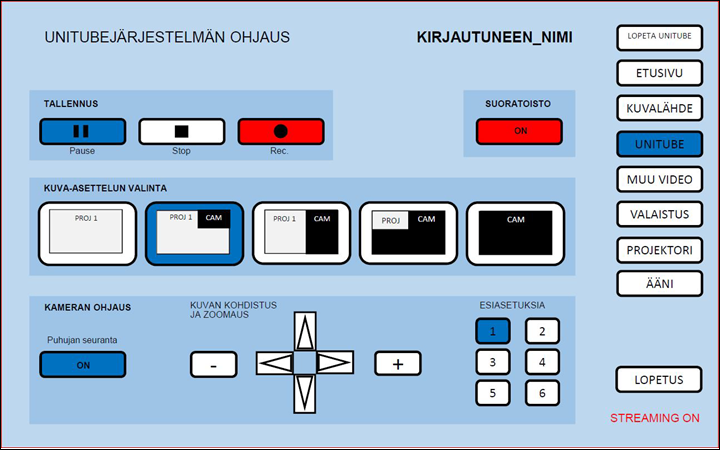
Recording controls are found on the lecture room’s control panel, under UNITUBE in the menu on the left. The control panel layout may vary from one room to the next, but the operating logic is always the same.
Start/pause/stop recording by tapping the circular RECORDING (TALLENNUS) button.
Start/stop streaming by tapping the STREAMING (SUORATOISTO) button.
When recording or streaming is on, the corresponding buttons will turn red. The other buttons turn blue when activated
1. Before an event that will be recorded or streamed
- Read the instructions.
- Ensure that you have a valid card registered for Unigrafia’s printing at least 24 hours before the event (see section 2).
- If you use presentation slides, make sure they are compatible with recording.
- The font type in slides, for example, must be large enough to show on a laptop screen.
2. Start by scanning the card registered for printing in the card reader (usually a HSL travel card, for example)
- The Unitube system requires authentication with the card that you have registered for printing.
- Authentication ensures that the video recording will be forwarded to the owner’s Unitube Uploader interface for further processing and release.
- Note! The card must be registered by the previous day at the latest to ensure that the information is updated in the database used by the Unitube system.
3. Checklist at the beginning of the event
- Lighting
- It’s better to have too much light than insufficient light in the room.
- If you intend to write on the board, turn on the board lights. Otherwise keep them turned off.
- If you use presentation slides, turn off the board lights to improve the speaker’s visibility.
- Camera targeting
- Choose a camera angle using the control panel presets 1–4. You can save custom angles for buttons 5 and 6 by holding the buttons for about 10 seconds once the camera has been adjusted to your liking. Use the arrow buttons to adjust the camera. The Speaker tracking (Puhujan seuranta) button allows you to set the camera to track the presenter automatically.
- Choose a camera angle using the control panel presets 1–4. You can save custom angles for buttons 5 and 6 by holding the buttons for about 10 seconds once the camera has been adjusted to your liking. Use the arrow buttons to adjust the camera. The Speaker tracking (Puhujan seuranta) button allows you to set the camera to track the presenter automatically.
- Recording views: choose the right option from the panel (the projector 1 feed can be the PC feed, visualiser feed, etc., i.e. a video source of your choosing).
- Only the projector feed (as shown in the room’s left-side projector, from the audience’s perspective)
- Projector feed (e.g. slides) in the full-screen window, with the camera feed at the top right (note: covers the top rightcorner of other material, such as slides)
- projector feed and camera feed side by side
- camera feed in the full-screen window, slides in a small window at the top left
- only the camera feed
- Audio
- The lecturer should always use a Madonna mic or a tie-clip mic. Check that the microphone is turned on and the transmitter does not display a low battery warning (to avoid having the microphone run out of power during the lecture).
- The table mics in certain rooms have a separate on/off switch. If all mics are switched off, the only sound that will be picked up in the room is the wireless mic audio.
- Video source
- Choose which video source to display on the projector screen from the VIDEO SOURCE (KUVALÄHDE) page on the control panel. The source can be the lecture room’s computer, visualiser, laptop computer or other source (the connection cables usually indicate the video source corresponding to the control panel)
- The recorded feed is usually taken from projector 1, which is the projector image on the left from the audience’s perspective (if there are two). Use the preview monitor in the lecture room (usually the display on the left) to confirm that the correct feed is being used for the recording.
- Choose which video source to display on the projector screen from the VIDEO SOURCE (KUVALÄHDE) page on the control panel. The source can be the lecture room’s computer, visualiser, laptop computer or other source (the connection cables usually indicate the video source corresponding to the control panel)
- Start recording from the control panel: rec=record, the button turns red when activated.
- Start streaming from the control panel: the button turns red when activated.
- If you are streaming the event, start streaming well in time! Do this even if you are not presenting anything before the beginning of the event. This helps you ensure that everything is working. The viewers of the events also see that the streaming is working and do not send unnecessary, anxious messages to you or to the Helpdesk.
4. During recording/streaming
- The display next to the panel shows the view that is being recorded. Keep an eye on this display to ensure that you stay in the shot. If you write on the board, make sure you write in large enough letters that can be seen by the camera. If necessary, adjust the camera’s focus using the panel.
- In most lecture rooms, the panel includes a camera tracking function to have the camera track the person that is actively moving at the front of the room.
- If you use this function, any people at the front of the room who are not currently speaking should stay as still as possible.
- For audience questions, use a handheld microphone or a CatchBox. If audience mics are not available, repeat the question before answering it to ensure that the questions are included in your recording.
- To pause the recording, tap the Pause button (two vertical lines). Tap the Rec button to resume recording. Anything that happens while the recording is paused is automatically left out of the recording.
5. Stopping recording/streaming
- To stop recording, tap the button with the black square. The rec button will turn white to indicate that recording has been stopped.
- The recording is automatically sent to the user’s Unitube Uploader after recording is complete.
- To stop streaming, press the streaming (“suoratoisto”) button again. The button turns white once streaming has stopped.
6. Using the recording
- When the recording has been processed on the server, it will appear in the logged user's Unitube Uploader view under the series name inbox username. The series is not visible to others.
- You can download the recording from the series for editing. Right-click the Download video icon in the list of recordings.
- You can add your recording into another, published or Moodle-linked video series if you wish. In that case, new recordings will be visible to users according to the series' settings when you move them into that series.
- You can embed recordings in a public series by using the embed code shown in the Unitube uploader.
- You can also embed recordings in the University of Helsinki’s wikis or Workgroups. Select the wiki or Workgroup page in the edit view Add content (+ icon). In the window that opens, click Other macros and type “unitube” in the search field that opens. Enter the ID of the recording in the field and click Add. Finally, save the changes to the page.
Remember to turn off recording and/or streaming when you are finished! The surest way is to switch off the entire lecture room system using the control panel, which also stops all recording and streaming.
If you wish to edit your recordings on your own computer, you can download the video from the Unitube Uploader interface by clicking Download recording.
7. Troubleshooting
If you encounter technical problems that you can’t overcome in lecture rooms with Unitube recording, call +358 2941 24240 (weekdays 8 a.m. to 4 p.m.) or send e-mail to av-tuki@helsinki.fi.
Unitube videos on Moodle
Recordings published on Unitube can be used on Moodle in many different ways.
Using videos set as public on Moodle
When a series of recordings has been set as public using the Unitube Uploader tool, you can embed recordings from the series in question in your Moodle course content page by following the general file embedding instructions.
Granting viewing rights to protected Unitube recordings for Moodle courses
You can opt to restrict the availability of videos to the participants of a certain Moodle course. For instructions, please see the Instructions for teaching.
Note that you can use Unitube Uploader to set viewing rights for a series of recordings to allow multiple Moodle courses to access recordings from the same series. To do this, click the “Add new Moodle course number” button and add the Moodle course ID numbers for the courses in question to the series viewing rights.
Viewing series of recordings on Moodle
When the viewing rights for a series of recordings have been configured on Unitube Uploader, you can publish all of the videos in a protected series of recordings in your desired Moodle course area by following the Moodle instructions in Moodle wiki.
If you have questions about Moodle, please contact moodle@helsinki.fi
More information
- Moodle team’s instructions on how to link Unitube recordings to Moodle can be found here.
- More detailed information on current issues and peer support is also available on Yammer in the following groups:
- You can also take a look at Frequently Asked Questions.
Video instruction
Give feedback
The instructions site of the University of Helsinki's IT Helpdesk helps you with IT-related issues related to your work. Let us know how we can improve our instructions. We greatly appreciate your feedback!
How would you improve these instructions?