
Unitube is a recording service for all University staff and students, providing a platform for uploading, viewing and saving videos, publishing them in different environments and managing the publishing rights of your own recordings. You can view the recordings in Unitube Viewer and upload new content to the service in Unitube Uploader. Different campuses also have Unitube studios and Unitube lecture rooms that can be booked separately, allowing you to use card-based authentication to record directly into Unitube. Further information about Unitube studios and lecture rooms can be found in the Unitube instructions.
Unitube Uploader is available at https://lataamo.helsinki.fi
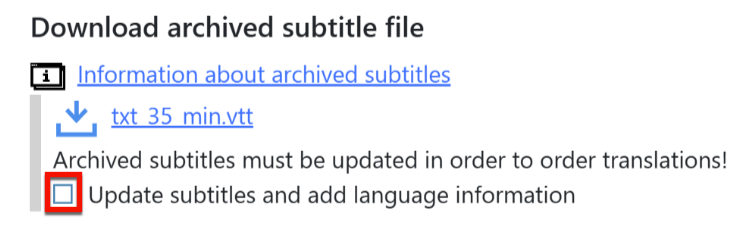
Is the subtitle file in your video marked as an archived subtitle?
Archived subtitle files are subtitles uploaded to Unitube before July 2025 that do not yet support multilingualism. They are still visible on the video player, but without language information. If you want to display the subtitle language in the video properties or order automatic translations of the subtitles into the base text, you must first convert the subtitles to the new format.
You can convert archived subtitles to the new type by pressing the button below. After this, you can also order automatic subtitles for other languages in the service. Currently, Unitube recognizes subtitles in Finnish, Swedish, and English.
These instructions describe how to use Unitube Uploader. Separate instructions for adding captions to videos are available.
Quick help
Information security
Please consider information security when you save and share recordings in Unitube. It is subject to the same rules and guidelines as other tools, such as your e-mail.
See the Detailed help tab for instructions.
Detailed help
Table of contents
- Login and basic view
- Uploading a recording to Unitube Uploader
- About licences
- Copying recordings from Unitube Uploader to your computer
- Deleting a recording
- Recovering a deleted recording
- Sharing a recording: ID, link and embedding code
- Collections, sharing them and administrator rights
- Validity of recordings and extending it
- Automated captioning and translating captions
- Advice and support for problems
Login and basic view
Log in to Unitube Uploader at https://lataamo.helsinki.fi
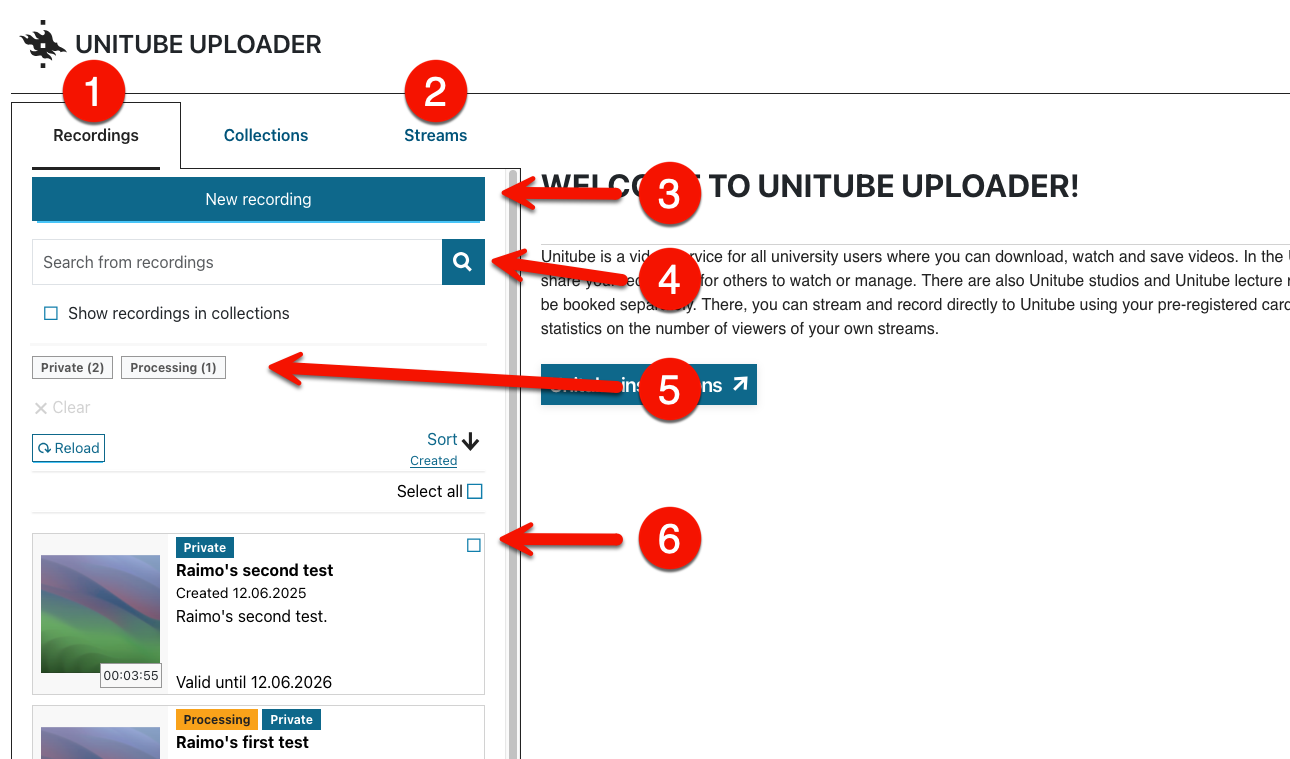
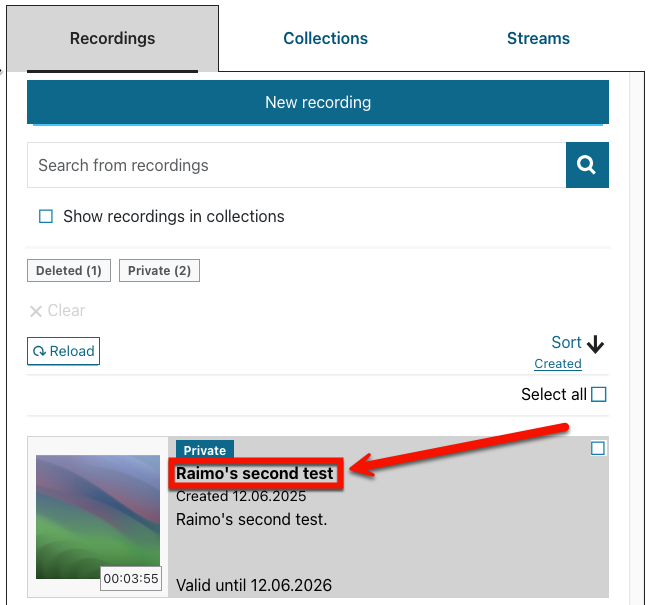
All recordings that you upload to Unitube Uploader are first shown on your (1) Recordings tab. You can use the other tabs to view your own collections and streams. Statistics on any Unitube streams you may have made in the university lecture halls are displayed on the (2) Streams tab. To add recordings, click (3) New recording. The Recordings tab has a search function (4). You can also use various tags to limit your search (5). A list of your recordings is shown below them (6).
Uploading a recording to Unitube Uploader
The service supports the most common video file formats, such as .avi, .mov and .mp4. The Uploader should be able to process any recording files from the programs in use at the University (e.g. Zoom and ScreenPal).
The maximum file size is 25 GB.
Please note the resolution. Please downscale high-quality videos (e.g. 4K) to HD before uploading them (or record the videos in native HD). In any case, the backend system will convert the videos to HD, and uploading will take longer if conversion is required. For example, processing a lecture-length HD-quality recording can take half an hour or even longer.
Please note that you cannot update the video using the same ID. A separate ID is created for each upload.
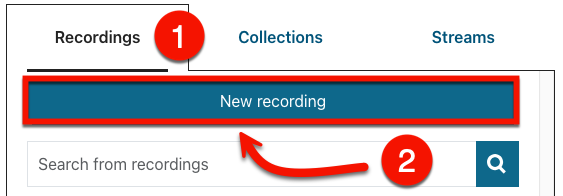
- You can upload new recordings to Unitube Uploader on the Recordings tab (1). Click (2) New recording.
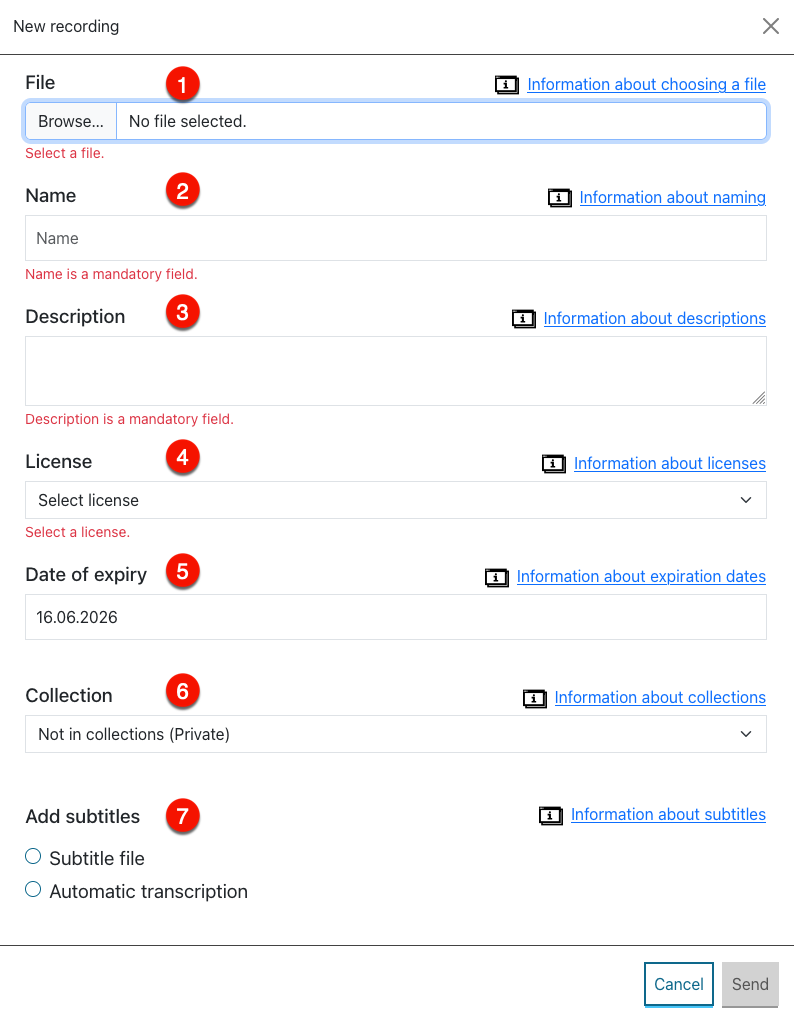
- The New recording window will open in your browser. You can click [i] Information… next to each field for further instructions on filling them in.
- Click Browse and locate the file you want to upload on your computer.
- Name the recording. The title will be visible wherever the recording is published.
- Give the recording a public description.
- Select a publishing licence for your recording. Read about licences under Licences.
- Select an expiry date for the recording. Further information can be found in the instructions under Validity of recordings and extending it.
- Select the collection to which you want to add the uploaded recording.
- Learn more about collections. Select a caption file in .vtt or .srt format for the recording or order AI-generated automated captioning for the recording.
-
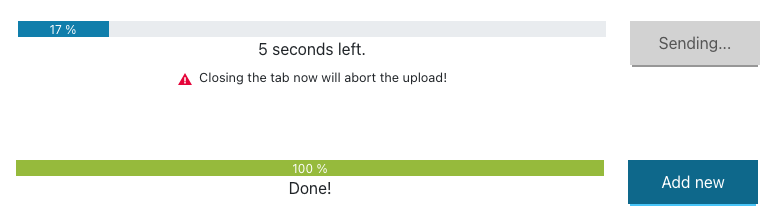
Wait a moment. The upload progress bar shows the progress of the upload. You can close the view when you see the notification under the upload bar.
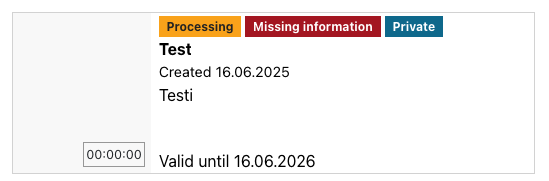
- The recording will show the Processing tag until it has been processed and the tag is removed.
About licences
When uploading a new recording to Unitube Uploader, you must select its publishing licence as mandatory information for the new recording. More information about licences is available on the Creative Commons community website at https://creativecommons.fi/.
- “All rights reserved” in accordance with the Unitube terms of use.
This publishing licence may be used, for example, if the rightsholder of a recording has permitted you to upload a recording in Unitube, but you do not own the rights to the recording yourself, or especially if any further sharing of the recording is prohibited. In such a case, you must explain this and give credit to the rightsholder in the description field! - CC-BY – may be modified and utilised freely; the source must be mentioned
This publishing licence allows the recording to be freely utilised, redistributed and modified as long as the original creator is credited. - CC BY-NC-ND – may be distributed freely for non-commercial use
This publishing licence allows the recording to be redistributed for non-commercial use (e.g. use in education), but it may not be modified and appropriate credit must always be given to the original creator. - CC0 – no copyright reserved, free to use
This publishing licence states that the original creator waives all copyright to the recording to be published.
Changing the publishing licence
- You can change the licence of a recording previously uploaded to Unitube Uploader by finding the desired recording under the Recordings or Collections lists and clicking the name of the recording.
- In the recording information box that opens, select Licence.

Copying recordings from Unitube Uploader to your computer
- You can copy the recording uploaded to Unitube Uploader to your computer from the recording information box. Find the desired recording under the Recordings or Collections lists and click the name of the recording.
- In the information box that opens, select Download recording. There are always two different versions of the recordings available for download: a high-quality version and a smaller, more compressed version. Click on the desired version, and it will be downloaded to your computer.

Deleting a recording
- When you delete a recording from Unitube Uploader, it will remain in the Deleted status for a few months, during which time you can recover it to Unitube Uploader. The content will be permanently deleted in a few months.
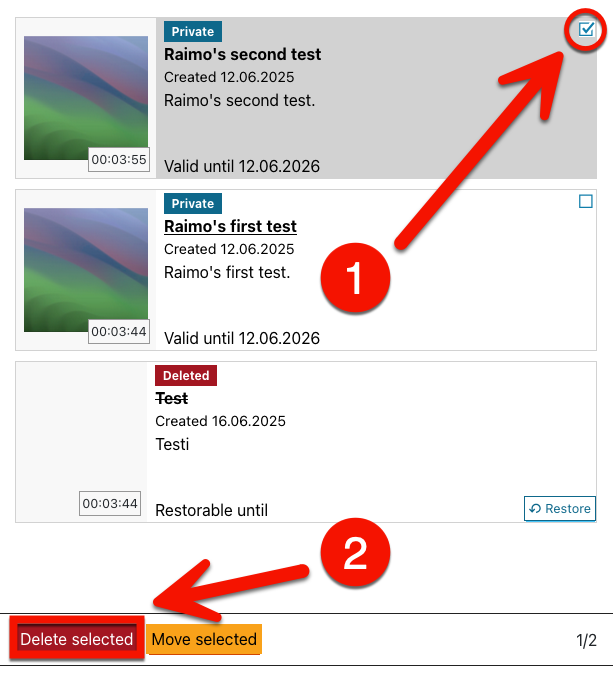
- To delete one or more recordings, find them under the Recordings list, (1) tick the checkbox next to them to delete the recordings you want and (2) finally click Delete selected.
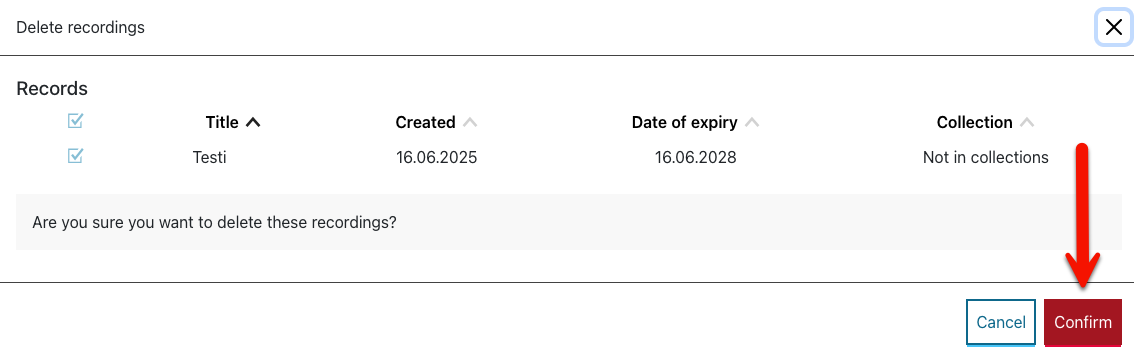
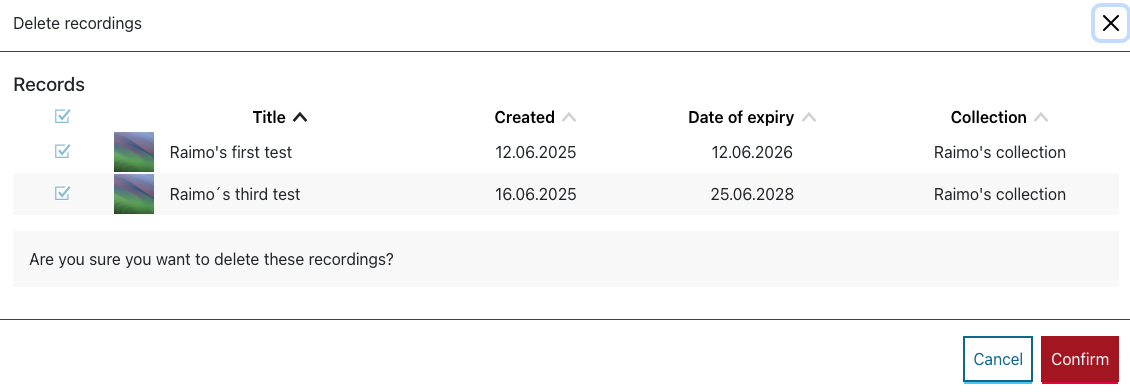
- The Delete recordings box will open, asking you to confirm the deletion of the recording. Select Confirm to delete the recording.
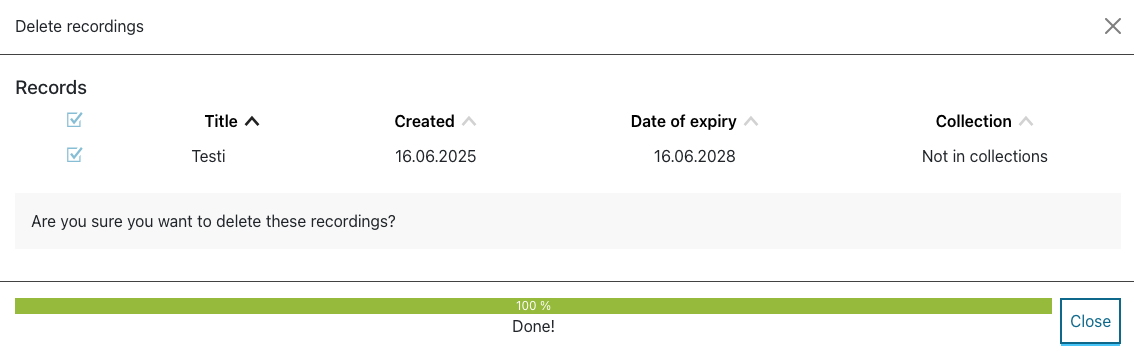
- At the bottom of the page, you will be notified of the progress of the deletion and you will also be notified when you can close the Delete recordings box.
Recovering a deleted recording
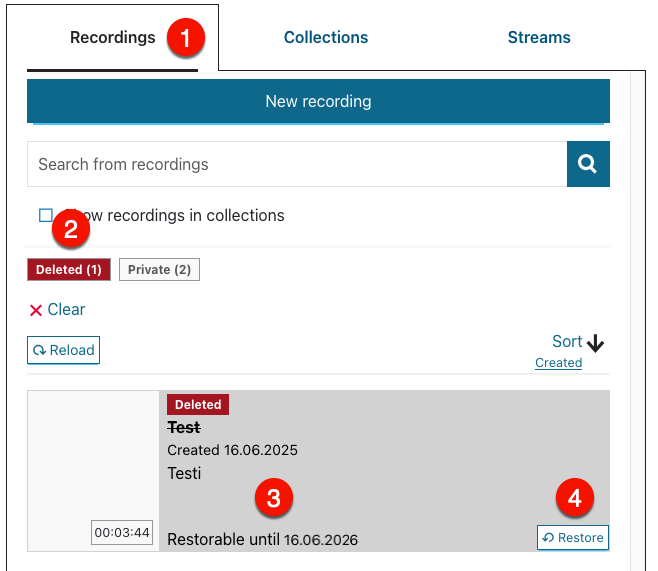
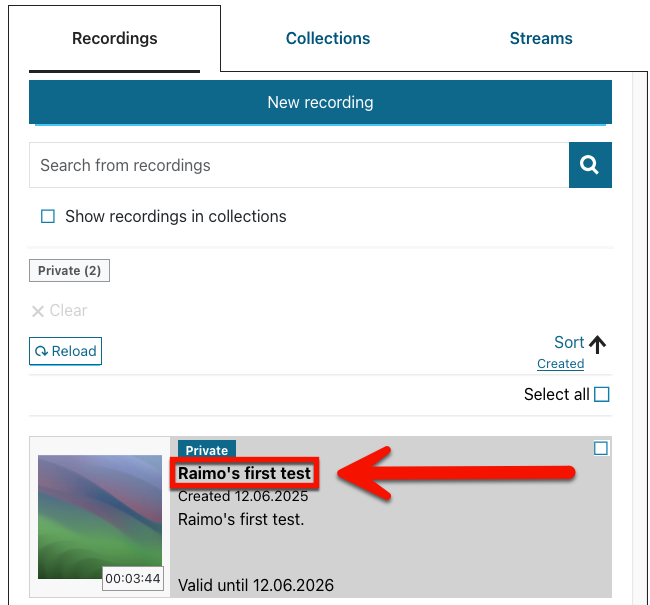
- You can find the recordings you have deleted under the Recordings tab. Open the (1) Recordings tab. Select the (2) Deleted tag to see a list of all the recordings you have deleted. Under the description of the recording, you can see (3) the date after which the video can no longer be recovered. Click (4) Restore to restore the recording.
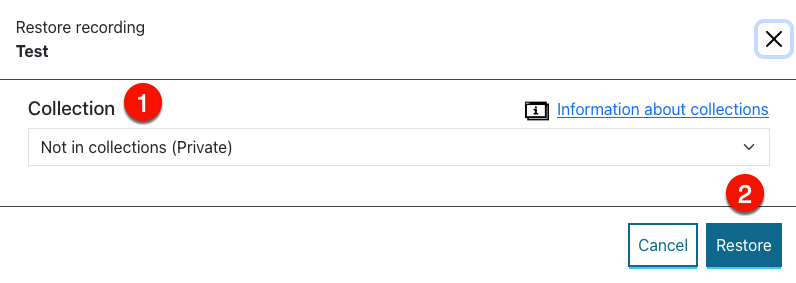
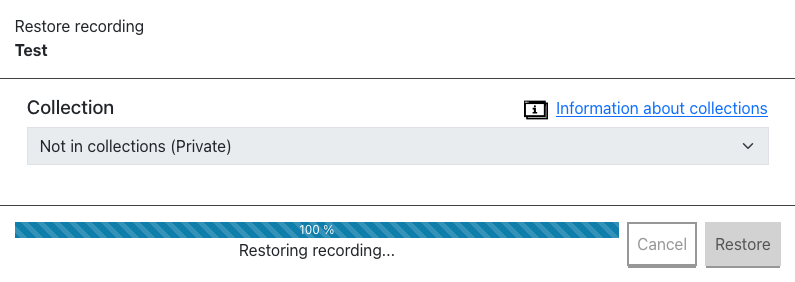
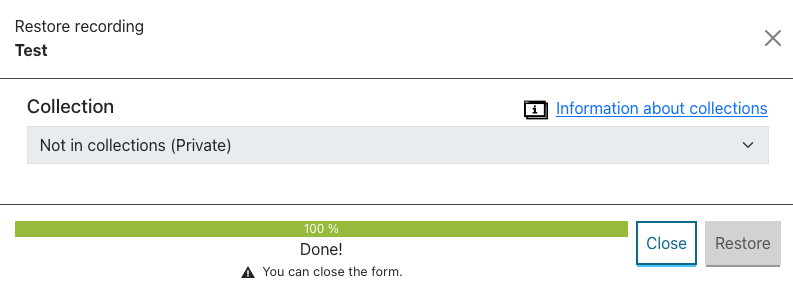
- In the Restore recording box that opens, you can select the (1) collection to which you want to restore the recording. Once you have selected the desired collection for the recording, click the (2) Restore button.
- The progress bar at the bottom of the screen allows you to follow the progress of the recovery. You will be notified when you can close the box, and the bar will turn green once recovery is complete.
Sharing a recording: ID, link and embedding code
Before you can publish a recording, it must be added to a collection. The sharing of recordings is affected by the visibility settings of the collection to which you have moved your recordings. In the Visibility of collections section of the instructions, make sure that you have correctly set the visibility settings for the collection from which you want to share recordings.
The recordings you upload to Unitube Uploader have their own unique identifiers, links and embedding codes that you can use to share the recordings.
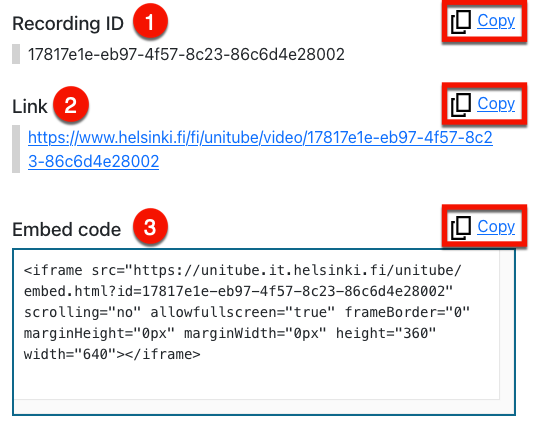
- To access the recording ID, link and embedding code, open the recording information box by clicking its name in either the Recordings or Collections tab.
- You can copy the recording (1) ID, (2) link or (3) embedding code to the clipboard by clicking the Copy button on each row. Please note that the embedding code will not work if the collection containing the recording is not set to allow sharing and embedding via links or completely public in Visibility.
Collections, sharing them and administrator rights
If you have previously used Unitube Uploader, the collections will work in the new Unitube Uploader in the same way as series before.
Collections are like folders: you can use them to organise your recordings based on the topic, target audience or course, for example. To publish a recording, you must add it to a collection. The visibility and administrator rights of recordings are also determined based on the collections. You can select a collection for which you have administrator rights. You can manage collections by going to the Collections tab in Unitube Uploader. Before you can publish a recording, it must be added to a collection.
Creating a new collection
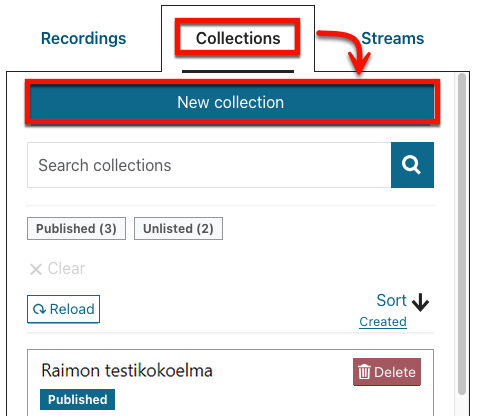
- To start creating a new collection, click the New collection button under the Collections tab.
- Carefully fill in the collection details in the New collection box that opens.
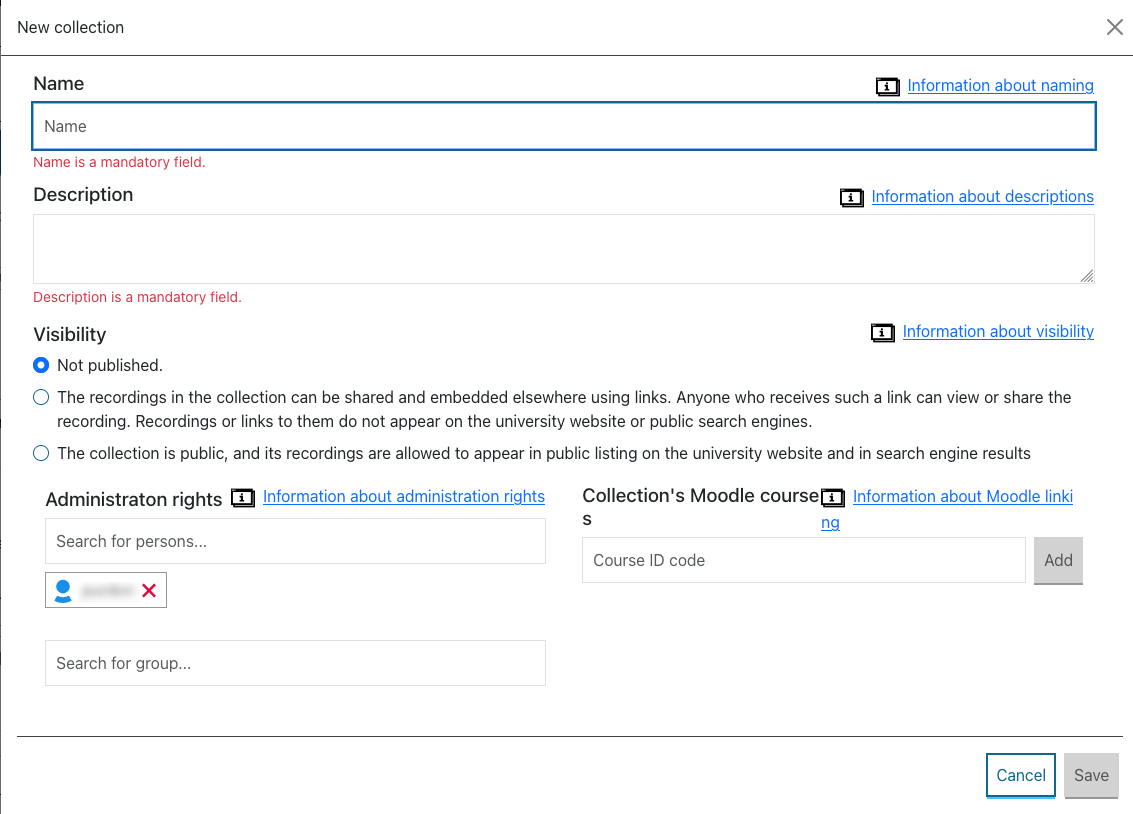
- Under Visibility, you can choose where and how the videos can be used and viewed. You can read more about visibility settings and Moodle connectivity under Visibility of collections in these instructions.
- Under Administrator rights, you can set your collection’s administrator rights for either individuals or IAM groups. For more information, see Collection administrator rights in these instructions.
Moving a recording to a collection and removing it from the collection
You can add a recording to a collection while uploading a new recording to Unitube or you can look up the recording you want to transfer in the Recordings tab and click its name.
- To open the recording information box, locate it under the Recordings tab and click its name. In the information box, select Collection. Click the drop-down menu and select the collection to which you want to move the recording. Please note that, after this, the visibility of the recording will depend on the visibility settings of the collection you selected.
- You can remove a recording from a collection from this same box by setting its collection as Not in collections.

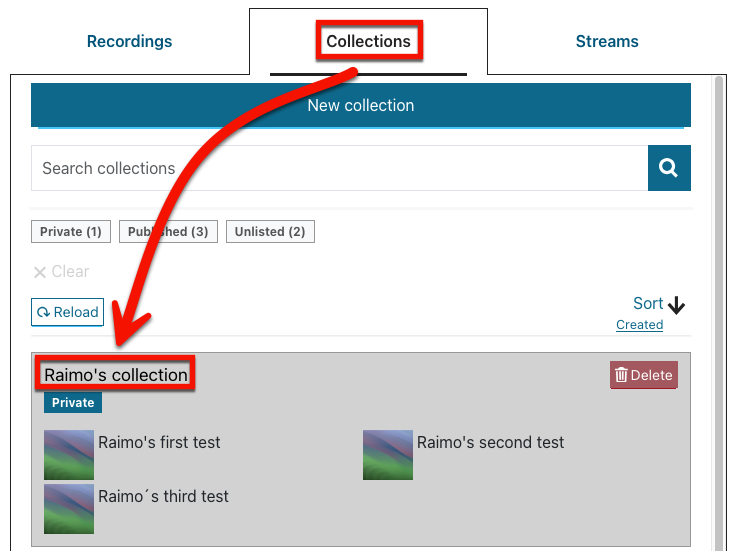
- To delete several recordings from the same collection at once or to move them to another collection, click the Collections tab and find the collection from which you want to delete recordings. Click the name of the collection.
- In the collection settings menu that opens, select the recordings that you want to move or delete. Under the name of the recording, (1) select the recordings you want to delete or move, or alternatively press the topmost button of the row to select all recordings.
- Select (2) Move to move the recordings to another collection.
- Select (3) Delete to delete the recordings.

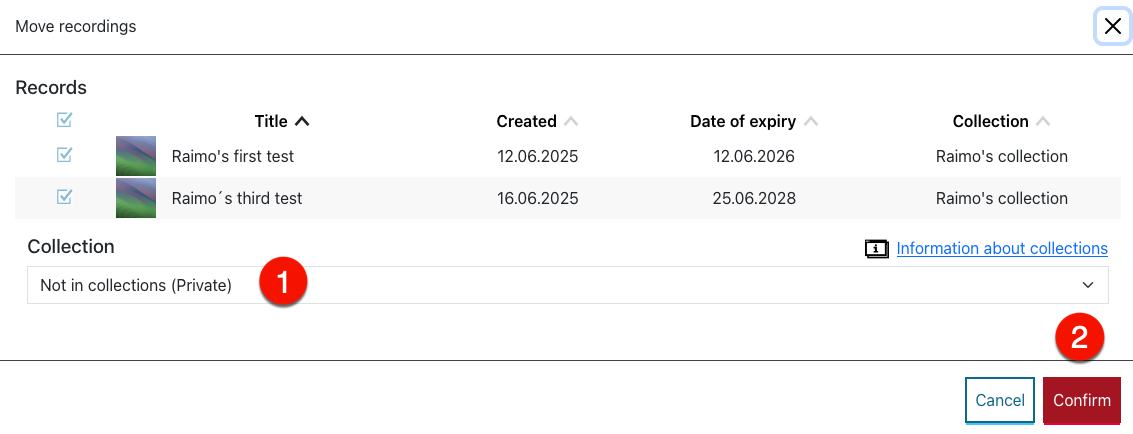
- If you want to move recordings to another collection, select Move and, in the window that opens, (1) select the collection to which you want to move the recordings. Finally, click (2) Confirm.
- If, on the other hand, you want to delete recordings, please make sure that you have selected the correct recordings to be deleted in the collection settings menu that opens. Click Confirm once you have selected the desired recordings.
Visibility of collections and Moodle connectivity
It is recommended to use the handy link sharing option for sharing recordings also in Moodle use. It is easier and smoother in terms of functionality than making use of the Moodle connectivity for recordings and is therefore the most convenient way to share recordings.
When you create a new collection, you can choose where and how the videos can be used. You can also later change the visibility settings of a collection by clicking the Collections tab and the name of the collection the visibility settings of which you want to change. In the window that opens, select Visibility.
- The option (1) Not published means that the videos in the collection are only visible to you and any other users who have administrator rights to the collection to which your recording has been added.
- The next option (2) means that the recordings in the collection do not appear in the listings of public search engines or the University of Helsinki’s website but can be shared and embedded using links. Please note that, if you choose this option, anyone who has the link can view videos moved to the collection.
- The bottom option (3) means that the collection is public and its recordings can be shown in the listings on the University’s website, search engine results and Unitube Viewer. You can also share the videos in your public collection on a single gallery page using the link found in the collection's details.

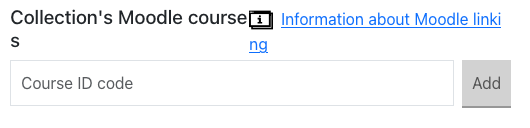
- If you would like to restrict the visibility of the recordings to a specific Moodle course or make it easier to share the contents of a collection on a course, you can connect the collection to the course by adding its Moodle ID here in Collection Moodle courses. In addition, you must enable the functionality in Moodle. A slightly simpler way is to restrict the collection’s recordings to only being visible via a link (or embedding): this way, it is not necessary to link the collection to Moodle.
More detailed instructions in Moodle
Collection administrator rights
Collection administrator rights can be assigned to individuals or IAM groups. You can grant administrator rights to collections when creating a collection under Administrator rights. You can also later change the administrator rights of a collection by clicking the Collections tab and the name of the collection the administrator rights of which you want to change. In the window that opens, select Administrator rights.
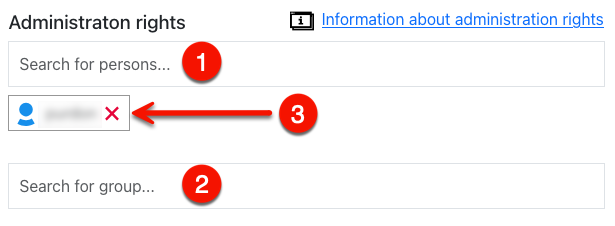
- Type at least four characters in the search field to begin the search. You can search for individual persons in field (1) and groups in field (2).
- You can remove administrator rights by clicking the red X next to the group or individual icon (3).
Validity of recordings and extending it
Validity period of recordings
- All videos have a validity period.
- Users must set a validity period of 6 months to 3 years for videos they upload.
- The default validity period for lecture hall recordings is 3 years.
- Those who are marked as collection administrators will receive reminders when the validity of videos in the collection is about to expire.
- You can extend the validity of all recordings in the collection you want in the same way as you would delete or move them. Click the Collections tab and find the collection from which you want to delete recordings. Click the name of the collection.
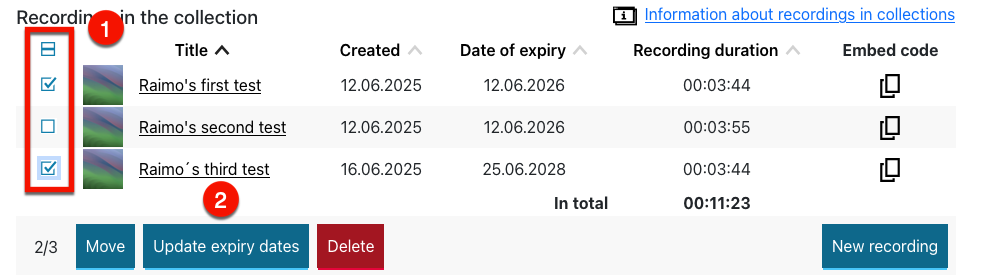
- Under the name of the recordings, select (1) the recordings for which you want to extend the validity.
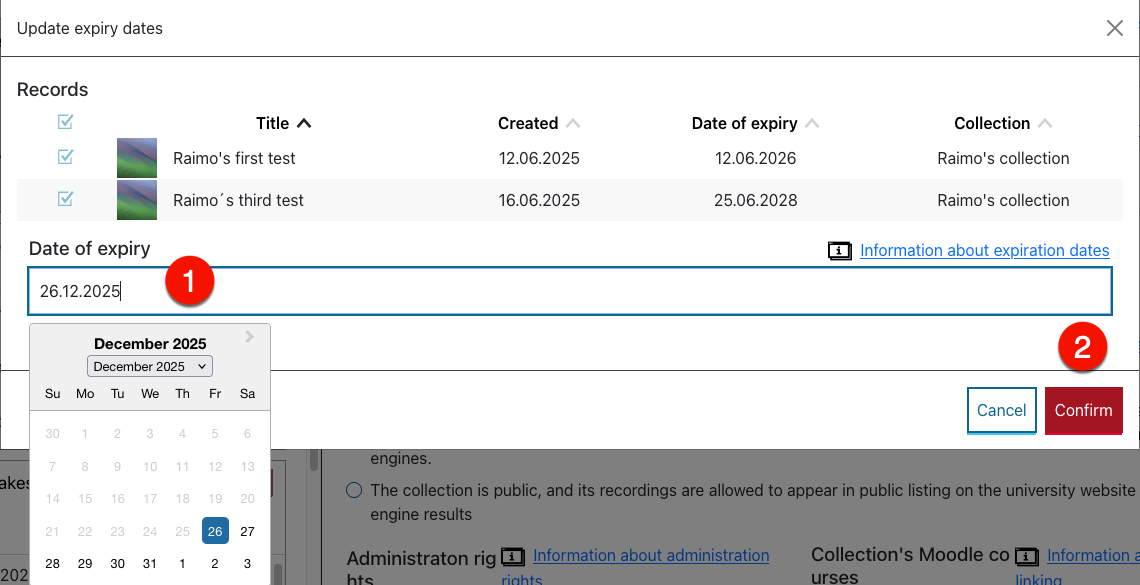
- Click (2) Update expiry dates to change the expiry dates of the selected recordings.
- Click (1) Date of expiry to select the desired expiry date for the recordings and press (2) Confirm to confirm the selection.
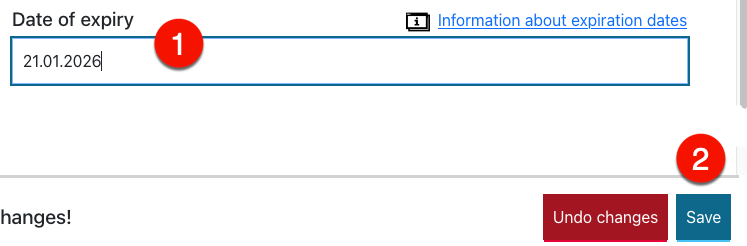
You can also change the expiry date of an individual recording by finding it in the Recordings tab and clicking the name of the recording to open its details. In the recording details, find (1) Date of expiry and click on the date row to open a calendar box where you can adjust the expiry date in the same way as for collection recordings. Finally, click (2) Save in the recording information box to save the new expiry date.
Automated captioning and translating captions
You can order automated captioning for a new or existing recording as a file from Microsoft’s Azure cloud service via Unitube Uploader. Currently, there are two alternative language models to choose from: the Microsoft ASR speech recognition model and the Whisper L based on the OpenAI language model. You can also order a translation into other languages directly from automated captioning. Unitube Uploader currently supports caption files in Finnish, Swedish and English.
When using the automated captioning service, you should remember that the artificial intelligence you choose does not always produce complete or perfect captions for your video. After the automatic generation of captions is completed, you should always check the captions and, if necessary, correct any errors in the transcription or timing with a suitable tool. Even if you have to make corrections to the automated captions, using the automated captioning service is faster than captioning manually from start to finish, as automated captioning provides a good starting point for your captions in any case. After correcting any errors, you can upload the edited caption file to Unitube Uploader as the captions file of your recording, replacing the captions file produced by the automated captioning service.
When loading a new recording, you can select automated captioning by selecting Add subtitles under New recording. If you add captions to an existing recording, find the desired recording in your recordings or collections, open the recording’s information box and find the same Add subtitles menu.
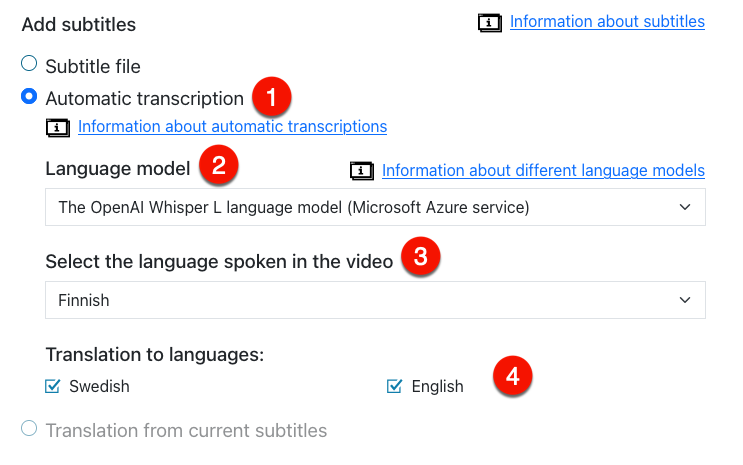
- Select (1) Automated transcription and then select under (2) Language model which language model you want to use for the automated captions. Then, select the language primarily spoken in your video (3) from the options Finnish, Swedish and English. Please note that the choice of language is important in order for the AI you choose to produce a sensible result!
- Under (4) Translation to languages, you can select the languages for which you want to produce an automatic translation of the video captions. After this, when loading a new recording, click Send, or when processing an old recording, click Save.
- You will be notified that automated captions are being processed. You can also see this in the tags of the recording. It usually takes about half an hour to an hour to add captions to a video – depending on the length of the video – so let the service run in peace. A caption file is created on the server regardless of whether you are on this page in your browser, so you can leave the page while waiting for the captions to complete. Please note that the service does not send a separate notification of the completion of the automated caption file, but you will know that the captioning is complete when the “Captions in progress” tag disappears.
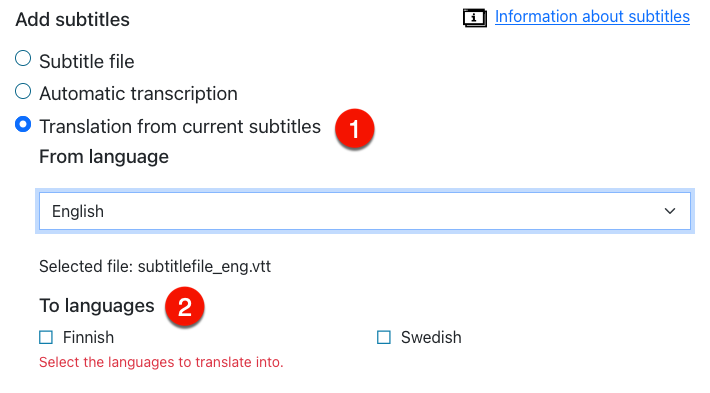
You can also generate an automatic translation for a caption file that already exists for the video. In this case, open the information box for the recording for which you want to have the caption file translated. Under Add subtitles, select (1) Translation from current subtitles and select which language you want to use as the translation template. Then, select (2) the languages for which you want to generate an automated translation. After this, select Save from the recording information box.
Is the subtitle file in your video marked as an archived subtitle?
Archived subtitle files are subtitles uploaded to Unitube before July 2025 that do not yet support multilingualism. They are still visible on the video player, but without language information. If you want to display the subtitle language in the video properties or order automatic translations of the subtitles into the base text, you must first convert the subtitles to the new format.
You can convert archived subtitles to the new type by pressing the button below. After this, you can also order automatic subtitles for other languages in the service. Currently, Unitube recognizes subtitles in Finnish, Swedish, and English.
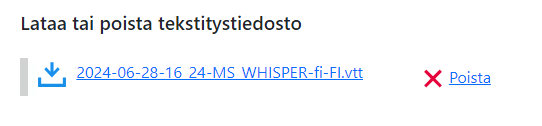
To edit a text file, you can download it to your computer from Download or delete caption file in the recording information. Click the name of the caption file to download it to your computer.
For example, you can use the Subtitle Edit program in the Software Center or the ScreenPal program to edit the caption file, following the instructions in the IT Helpdesk’s Adding captions to videos.
Please note that ScreenPal can only process .srt subtitle files, while the automatic captions file you download from Unitube is in .vtt format. You can convert your uploaded file to .srt by using services such as:
Once you have finished editing the caption file created by the automated captioning service with the program of your choice, save it to your computer and upload the caption file in .srt or .vtt format to Unitube Uploader in accordance with the separate Adding captions to videos instructions to replace the caption file created by the automated captioning service.
Advice and support for problems
If you encounter problems with Unitube Uploader or have any questions, you can send a message to the service e-mail address helpdesk@helsinki.fi.
Video visibility issues
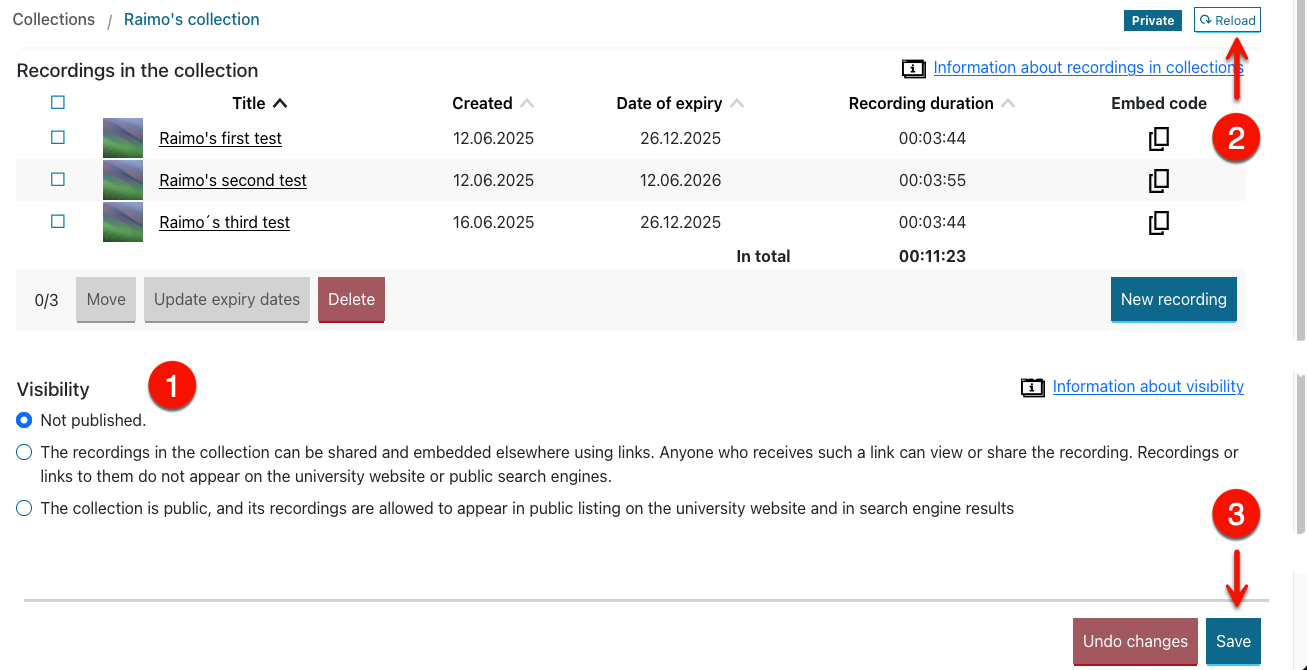
Can't see the video even though the collection is marked as public? You can fix visibility issues and many other issues by updating the collection metadata.
- In Unitube Uploader, open the Collections tab and click open the collection information.
- Go to (1) Visibility and change the collection information. Click (2) Reload and then (3) Save.
Video instruction
Give feedback
The instructions site of the University of Helsinki's IT Helpdesk helps you with IT-related issues related to your work. Let us know how we can improve our instructions. We greatly appreciate your feedback!
How would you improve these instructions?