
This guide brings together tips for organisers of various Zoom events. Most of these tips can also be applied to organising events on Teams.
Here you can find basic Zoom instructions.
See also the Zoom guide for teachers.
Quick help
Make sure you remember at least these
Before the event
- Define roles: organiser, presenter, technical manager, moderator.
- Collect the presentations and prepare the welcome and break slides.
- Check host and co-host permissions.
30 mins before
- Test the audio, video and screen sharing.
- Have your materials ready.
- Check on another device what the event looks like to participants.
- Close Outlook, Teams and any other programmes that may cause interference.
At the start of the event
- Start recording.
- Explain the question procedures to participants (Q&A/chat/microphone).
- Check that the audio, video and presentation are working.
During the event
- Stick to the schedule.
- The moderator monitors the chat/Q&A.
- The technical manager oversees the sound, video and recording.
At the end of the event
- Save the chat and questions if necessary.
- Check the recording.
- Bring the session to a clear close.
Detailed help
Roles and responsibilities
Plan in advance the roles that the event organisers will take on. The larger the event, the more people you should recruit to help. The roles on the organising side can be broadly divided into four categories for hybrid and remote events:
Organiser
- Things to remember before the event:
- Creating a Zoom room
- Event invitations
- possible Breakout rooms and their facilitators
- recruits everyone else
- ensures that everything runs smoothly during the event
- monitors adherence to the schedule
- guides participants to and from breaks on time
Presenter
- starts the event on time
- introduces the panellists
- moves the portable microphone to participants in the vicinity
Technical Manager
- sets up the presentation equipment
- monitors the functionality of the presentation equipment (if necessary, steps in – even in the middle of a presentation – to rectify the situation or shares presentations from their own computer via Zoom/Teams)
- monitors the functionality of Zoom/Teams (sits in the hall wearing headphones so they know how it sounds and looks to remote participants)
- handles the recording
Moderator
- monitors the Zoom/Teams chat
- reports questions from the chat live, if necessary
In addition to these four:
- Q&A respondents
- In addition to the moderator, a large event may feature individuals with co-host or panellist privileges who answer questions posed during the Q&A session •
- Panellists
- Panellists are the speakers appearing at the event
- are invited to Zoom in advance via the event settings, at which point they receive personalised invitation links to the event
- recording editor
In Zoom, the event creator is automatically granted host rights. In addition, it is advisable to grant co-host rights to the organiser, presenter, technical manager, moderators and Q&A respondents. For University of Helsinki staff and students, these rights can be granted in advance by adding them as alternate hosts, but for external participants, these rights can only be granted at the start of the meeting (although they can be invited in advance as panellists).
Other points to bear in mind during the planning stage
Zoom licences and accounts:
- On the University’s Zoom platform, both meetings and webinars can accommodate up to 500 participants.
- Zoom administration can be contacted to book a separate licence for webinars with either 1,000 or 3,000 participants, or for Zoom Events with 500 participants Read more about Zoom’s special licences.
- Think in advance whose account will be used on the presentation computer!
- Familiarise yourself in advance with Zoom’s features, such as automatic subtitles, and decide whether to use these features during the event.
- Create a guide on how to use these features!
Programme and presentations:
- Draw up a detailed programme outline for the event in advance and share it with all organisers
- Sharing presentations usually works best when the presenter (panelist) shares the presentation from their own computer. However, in case of any problems, it is advisable for at least one organiser to have the presentation downloaded so that they can take over the presentation if necessary.
- Please ensure you receive the presenters’ presentations in good time.
- PLEASE NOTE! Presentations must be submitted to the simultaneous interpreters well in advance!
- Create a ‘Welcome’ slide at the start of the event, showing the programme and other important information such as Zoom instructions or links (QR code) to other resources. Also create a slide that can be shown during a break.
Polls (surveys):
- Polls can be set up for the event in advance. Read more about polls.
Breakout rooms (small group rooms):
- You can also set up breakout rooms in advance for the event, but in this case, members must be added manually. If you use automatic group allocation, it will overwrite any group changes you may have made in advance.
- However, if you know in advance who is coming to the event, you can also add them to groups in advance (provided they are already Zoom users and are logged in).
- You can name manually created rooms and set a time limit for them (e.g. for a task).
- The use of breakout rooms, instructions for participants, and any facilitation of small groups should be planned carefully. Read more about Breakout rooms.
Event timeline
Before the meeting, in the event room
- Reserve at least half an hour for testing equipment and other preparatory tasks.
- Ask the presenters to be there at that time, 15–30 minutes before the event starts, and make sure their slides and equipment are working.
- Switch on the presentation computer, as well as the second computer used to monitor the remote side.
- Check from the second computer to see how the screen share appears in Zoom.
- Open all the materials on the presentation computer in advance. Ideally, you should save them to the hard drive of the presentation computer, as if the connection drops, a programme opened via the network may stop working.
- Open the ‘Welcome’, title or schedule slides in advance on the presentation computer and share them in the Zoom meeting.&
- Close Outlook, Teams and similar programmes on the presenter’s computer to ensure that nothing extra is accidentally displayed in the split-screen view.
- Ensure that the correct person is assigned the Host role and grant Co-Hostpermissions for anyone who might need them.
- You can also temporarily rename the presentation computer’s Zoom user as you wish (My Name → Event Name).
At the start of the event
- Make sure the audio is working and that both the video feed and the presentation are visible.
- Instruct participants regarding questions: whether questions should primarily be asked via the microphone or the chat function, and whether questions will be answered during the meeting or only at the end. The instructions should also briefly cover the meeting controls (microphone, video, chat, any polls).
- If you are recording the event, please remind participants of this again.&
- Start recording no later than 5 minutes before the event begins, so that you don’t forget.
- It’s a good idea to record the event using Zoom’s cloud recording feature. This way, any network disruptions will have a significantly smaller impact. Read more about cloud recording.
During the event
- If a chat function is enabled during the event, moderators will monitor it. At larger events, it is not advisable to keep the chat open to participants; instead, it is better to use the Q&A feature.
- The chat is only visible to hosts, panellists and interpreters.
- The presenter oversees the event, whether it is a hybrid or remote event. They take control of the stage or the event in accordance with the schedule.
- The organiser and presenter are responsible for the schedule!
- Make sure that during the break, the break information (timetable, instructions, etc.) is clearly visible to participants
At the end of the event
- Save the chat history, if it was in use.
- You can also enable automatic chat recording in Zoom’s settings.
- Share the results of any poll with the participants, if this has not already been done.
- If necessary, save the results as a screenshot for your own records.
- The results will be available in text format via the browser version of Zoom after the event
- End the meeting clearly.
Presentation materials
- The university provides templates in line with its visual identity, which can be found UnimaterialBank
- You can also create your own templates!
- Use effects sparingly. Effects use up your computer’s processing power and may not work well over a network.
- The guide may include, for example:
- Timetable
- Instructions
- Notice regarding recording
- Guidance on interpreting and using automatic subtitling
- Other tips
- • As well as PowerPoint, you may also use tools such as Howspace, Miro or Mentimeter
- Don’t use too many tools in a single session
- Check that your PowerPoint slides are working properly before the event begins
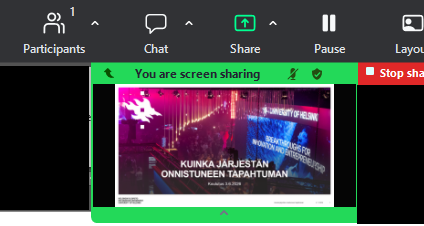
- Make sure you know what you’re sharing on Zoom
-
At the top of the Zoom control panel, there is a green bar/box where you can see what your share looks like
- If necessary, check on another computer to see how the layout looks
-
- If you are using only one computer for the presentations, it is advisable to merge the presentations into a single presentation and insert a “break”
- Remember to save the presentations on the other computer as well
- Remember the language versions if the event is university-wide
Premises and equipment
- Please ensure that video footage of the performers is also available where possible. The cameras in the halls are controlled via the hall control panel.
- In small venues, a table microphone such as the Jabra is perfectly adequate for capturing the voices of a few people.
- For larger events where there are several speakers in the same room, it is advisable to use a venue equipped with fixed audio-visual equipment.
- For example, In the University of Helsinki’s Unitube-enabled lecture theatres, it is possible to connect a computer to the room’s camera and microphone and to stream and record this video and audio feed from the computer via Zoom.
- Many of the university’s meeting rooms are equipped with fixed conference microphones and, for example, prism cameras.
- The equipment mentioned above usually works simply by plugging it in and selecting the correct video and audio source in Zoom.
Support for organising the event
- For questions relating to Zoom (technology, procedures, licences), please contact the Helpdesk, which will forward your enquiry to Zoom support if necessary.
- Support for organising events can be found on the the ‘Events and Conferences’ page on Flamma.
- Av-support provides guidance and support on using the equipment in event venues.
- You can purchase AV and streaming services from Unigrafia.
Video instruction
Give feedback
The instructions site of the University of Helsinki's IT Helpdesk helps you with IT-related issues related to your work. Let us know how we can improve our instructions. We greatly appreciate your feedback!
How would you improve these instructions?