
Zoom is a video communication service that allows all university students to create meeting rooms and participate in real-time via audio and video in meetings, seminars and conferences. Zoom is also suitable for distance learning. Zoom rooms created by university students can accommodate up to 500 simultaneous participants.
This guide provides instructions on how to use the Zoom client. Zoom can also be used with a Chrome browser without installing the app. The images in this detailed guide were taken from the Zoom app on a Windows 11 computer. When used on a browser and other operating systems, the view may be different, but for the most part the functionality is very similar.
You can participate in Zoom meetings either with a standalone app available for desktop and mobile devices or with a browser. On machines hosted by the University of Helsinki, the Zoom software is pre-installed.
The browser version of Zoom can be found at helsinki.zoom.us.
Use the browser version when preparing for a meeting and making changes to the default settings of the program. In browser mode, Zoom works best with the Chrome browser.
Use the Client version when attending meetings. Meetings will always open with the client program by default if it is installed on your machine.
Remember security!
The same security rules and guidelines apply to Zoom as to email, for example.
- Read more about security for video meetings in the separate Helpdesk Help.
- For more information and tips on security, see Flamma.
Apps for Zoom
We are exploring the possibility of security-enabling Zoom apps, but at this time (January 2026) we do not accept the addition of apps to Zoom.
Other available instructions
Quick help
Safe and secure meetings
Client software
Zoom is installed on Windows and Cubbli computers maintained by the University. For Mac computers, you can install the software yourself from the Managed Software Center (see separate instructions for installing Mac software).
Start Zoom by typing Zoom in the search box on your computer. Click on the program icon and the program will open.
Read more on the Detailed Help tab.
Browser access
Zoom works with the Chrome browser at https://helsinki.zoom.us. From the login page you can join meetings, start a meeting, edit your account settings and access Zoom's own help pages.
Creating a meeting and sending invitations
It's best to create a meeting in the browser, as the settings are more extensive there than in the app. It is easier to prepare in the browser:
- Pre-assign breakout room (Breakout Room pre-assign)
- Poll in advance
- Create a permanent room (Recurring meeting, Recurrence: No fixed time)
Joining a meeting
- If you have received an invitation by email, click on the link in the message
OR - open Zoom in your Chrome browser at https://helsinki.zoom.us.
- Click Join.
- Enter the meeting room number in the Meeting ID or Personal Link Name field.
- Click Join.
Starting the meeting (as host)
- open Zoom in the Chrome browser at https://helsinki.zoom.us
- Click Host.
- Zoom will ask if you want to start the meeting in the app or in the browser. Click Join from browser.
- The meeting room will open.
- Click the green Meeting information button at the top right of the page to get the meeting ID and other information.
- Invite participants to the meeting by clicking the Participants icon and the Invite button in the window that opens.
Customizing your account settings
- open Zoom in Chrome browser at https://helsinki.zoom.us.
- Click Sign in.
- You can change some of your account settings by clicking Settings. Some of the settings are defined by the administrator and cannot be changed.
See the detailed instructions tab for instructions with pics.
Detailed help
Table of contents
- Zoom on university machines
- Zoom for home and mobile
- Installing Zoom client on your home computer (Windows)
- Log in at
- Creating a meeting
- Zoom security features
- Sending an invitation
- Leaving the meeting
- Personal permanent room
- Breakout rooms
- Focus mode
- Create notes from the meeting using the Notes tool
- Zoom special licences
- Saving the meeting
- Local recording
- Cloud recording
- Collecting the list of participants
- Screen sharing
- Whiteboard
- Simultaneous interpreting
- Zoom settings
- Zoom profile settings
- Checklist for Zoom meeting organisers
- Advice and problem situations
- Zoom version used by the university
Zoom on university machines
Zoom client software is installed on Windows and Cubbli computers in the university's central administration. For Mac computers, you can install the software yourself from the Managed Software Center (see the separate general guide to installing Mac software).
Zoom for home and mobile
You can download the Zoom client, browser extensions and other add-ons for home computers and mobile devices from the Zoom website at https://zoom.us/download.
Installing Zoom client on your home computer (Windows)
Installing the installer
- Download the installer from https://zoom.us/download.
- Click the download button (Download (64-bit)).
- Save the installer to your computer. Click Save File.
- Select the save folder. Normally, files are saved in the Downloads folder. Click Save.
-
Once the program has been downloaded to your computer, the browser will indicate this. Open the drop-down menu (1) and click Open Containing Folder (2).
-
- Two-click the installation file ZoomInstaller.exe.
- Wait for the installation to complete. Zoom is now installed on your machine.
- Just follow the instructions at the beginning of this guide under Sign in.

Upgrading your software
- Be sure to check for updates from time to time. Update the application like this: Click on your profile picture in the top right corner of the app, open the menu and click Check for updates.
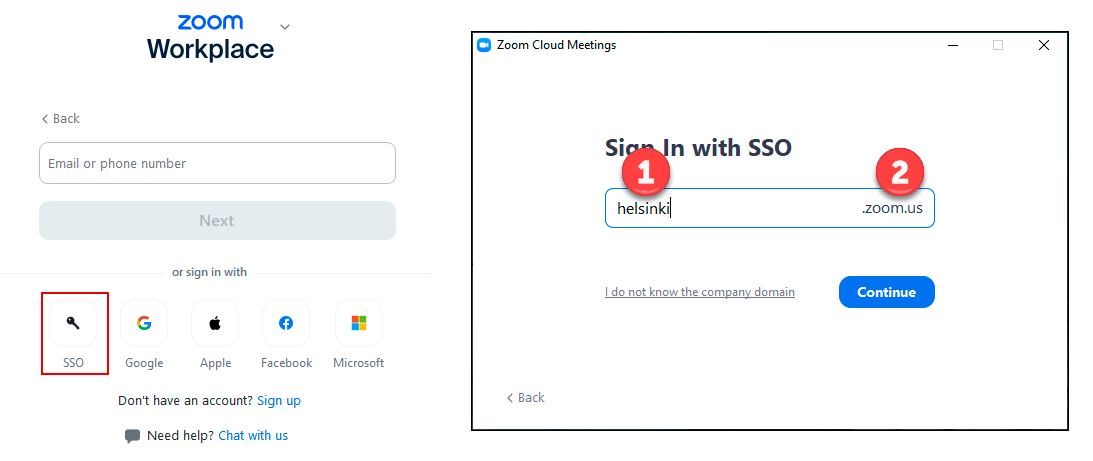
Log in at
NB! When you log in to Zoom for the first time, make sure that your @helsinki.fi email address is activated and working (you can log in to your email and send and receive emails). Zoom will send a confirmation message to your email and if your inbox is not receiving messages, your account will be locked.
Make sure the address starts with helsinki (1) and ends with .zoom.us (2). Click Continue.
Read more about the University of Helsinki's login service in the separate help.
Creating a meeting
It's best to create the meeting in your browser (Chrome), as all the important settings are then available. You can also create a meeting directly in Outlook Calendar, but there will be fewer configuration options.
Creating a scheduled meeting
Log in to Zoom at helsinki.zoom.us.
Meetings tab has a link to schedule a meeting: click Schedule a Meeting.
In the window that opens from the link, you can fine-tune the details of the meeting:
- Topic - Give your meeting a descriptive title.
- + Add Description - You can give a more detailed description of your meeting.
- When - Select the date from the calendar and the time from the drop-down menu.
- Duration - Duration in hours and minutes.
- Time Zone - The time zone in which the meeting will take place. The default is (GMT +2:00 ) Helsinki.
- Recurring meeting - Recurrence. Check the box if you want to create a recurring or permanent meeting. When selecting a recurring meeting you can select:
- Recurrence - How often the meeting will recur; daily, weekly, monthly or permanently (No fixed time). With the No fixed time setting, the meeting is always valid for one year from the last time it was used.
- Repeat every - How often the meeting repeats.
- End date - You can select the end date or the number of times it repeats.
- Invitees - You can invite participants to the meeting in advance.
- Registration - Whether participants need to register for the meeting before joining.
- Template - If you have created templates with the meeting settings you use most often, you can select them here.
- Whiteboard - You can attach a whiteboard you created earlier to your meeting in advance.
- Docs - You can attach files to your meeting in advance.
- Security features - Zoom meetings must use at least one of the following security features: access code, waiting room or mandatory login.
- Video - You can specify whether the host or attendee video is on or off by default.
- Audio - You can specify the audio settings for the meeting.
- Options - Additional options for the meeting:
- Whether meeting participants can enter before the hosts.
- Whether to use the Q&A function.
- Whether to turn off the mics when entering.
- Do you pre-set the breakout room attendees.
- Do you automatically record the meeting.
- Alternative hosts - You can grant permissions here to other hosts by adding their email address. The one assigned as alternative host will be able to open the meeting on behalf of the actual host and will have co-host privileges in the meeting. The alternative host must be a member of the university Zoom, meaning they must have a Zoom account they are logged into.
- Interpretation - You can add and invite a person to interpret your meeting.
Once you have configured the meeting settings, click Save and the meeting will be created. You can still edit the meeting settings later.
Adding a meeting to your calendar
After saving, you will see the meeting settings and can add the meeting to your Outlook calendar from Add to > Outlook Calendar (.ics).
Or alternatively, you can copy the invitation from the Invite link by clicking the Copy the Link icon after the link:
You can view and edit upcoming meetings from the Upcoming Meetings tab on the Meetings page of the Zoom browser view.
Zoom security features
To secure your meetings, Zoom has three different security features, at least one of which must be selected when creating a meeting. By default, the Passcode is enabled, but you can also select the Waiting Room or Authentication, which is a mandatory login to Zoom. You can also select all security features.
A security feature can also be thought of as locking the meeting during the meeting, so that no new participants can join the meeting.
Even in larger team or workgroup meetings, it is a good idea to select mandatory login in addition to the password, so that meeting participants can be identified.the security features can be found in the meeting settings under Security.
Passcode
The meeting organiser can add a passcode to the meeting at the meeting creation stage or afterwards. The password is added by selecting Passcode. Zoom generates the passcode automatically, but you can also change it yourself.
As an option, the passcode is embedded in the meeting invitation link, so that clicking on the link will take you directly to the meeting. Even though the password is embedded in the invitation link, it limits the number of intruders who will try to hack into open Zoom meetings by guessing Meeting ID numbers.
You can change the embedding setting so that all participants need a password to enter the meeting.
- The setting can be changed from the Zoom browser settings
(https://helsinki.zoom.us/ > Sign in > Settings > Embed passcode in invite link for one-click join).
Waiting Room
When the Waiting Room is selected, meeting participants, except for the organizers (host and alternate host), enter the Waiting Room when joining the meeting. In the Waiting Room, participants cannot communicate with each other and cannot see the actual meeting room.
Participants will be admitted to the actual meeting once they have been accepted by the organisers. The meeting organizer can accept all those waiting in the waiting room at once to join the meeting.
- The waiting room settings can be changed in the Zoom browser version settings under Settings > Meetings > Security or during the meeting under Enable waiting room from the Host tools button on the bottom bar.
If you do not select any of the three security options when creating the meeting itself, Zoom will automatically add a waiting room to your meeting.
Attend as logged in (Authentication)
The meeting organizer can also specify whether to allow only users logged into Zoom to join the meeting (Require authentication to join). This setting is useful to remember, especially for internal meetings where you cannot verify the identity of everyone present.
You can choose to authenticate:
- Log in to Zoom with any account (Sign in to Zoom) or
- Log in only with the University of Helsinki account (Only HU members).
Registration
In addition to the security features mentioned above, you can secure your meeting by choosing to register for the meeting by providing your name and email address. However, this alone is not enough to secure your meeting.
Security during the meeting
Once the meeting has started, the organiser can lock the meeting, making it impossible for new participants to join. Locking is done by clicking on the Host tools button on the bottom bar of the meeting and selecting Lock meeting.
During the meeting, it is also possible to restrict participants' access to microphones and camera, screen sharing, chat, renaming and recording. The settings for this can be found in the bottom bar of the meeting by clicking on the Host tools button and selecting Participants. Click Suspend participant activities to deny participants all activities at once.
- The participant can be removed from the meeting by clicking on the three dots after the name and selecting Remove.
Sending an invitation
Sending an invitation from Outlook
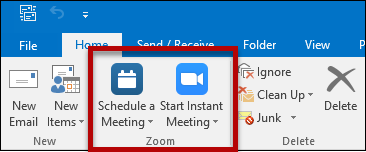
You can install the Zoom Outlook Plugin for Windows machines under the University's central administration from the Software Center. The plugin installs in the email and calendar toolbar. For home computers, you can install the plugin from zoom.us/download. This plugin should be enabled if you actively use Zoom.
You can make a meeting invitation (Schedule a Meeting) or start a meeting (Start Instant Meeting) by clicking on the relevant icon.
Sending an invitation from OWA
You can also install the Zoom plugin for OWA.
- Open the OWA calendar and click New event.
- Open the menu by clicking on the three dots and click Get Add-ins.
- Search for "Zoom" and click Zoom for Outlook.
- Click Add.
- Click Continue.
- The Zoom plugin can now be found in the top bar of OWA.

Sending an invitation from Zoom
Note! This is an alternative way.
We recommend creating the meeting in the browser (see instructions) because there are more settings there.You can also schedule the meeting and send the invitation to the participants in advance from Zoom. Launch Zoom from your own computer (Start > Zoom > Zoom).
Click Schedule.
In this example, the invitation is sent as an Outlook calendar invitation. Fill in the fields describing the meeting duration and properties, select Outlook Calendar and click Schedule.
Outlook Calendar opens. The information you filled in above is ready to go. Remember to add your participants! Click Send to send the invitation.
Adding participants to the meeting
When the meeting is already in progress, you can add new participants by clicking Participants and Invite at the bottom of the screen.
A new window will open. You can invite a participant from the predefined Contacts inside the university, from the Zoom system or by Email. At the bottom of the window you can copy all the information about the meeting (Copy invitation) or just the meeting link (Copy invite link).
Leaving the meeting
You can leave the meeting by clicking on End (host) or Leave meeting (participant) in the bottom right corner. The host can choose whether to end the meeting for all (End Meeting for All) or to leave and leave the meeting running (Leave Meeting).
NOTE! If you are the host of a meeting and want to leave the meeting running for others, first make one of the participants the new host. Click the three dots after the name of the next host in the list of participants and select Make host.
Personal permanent room
Zoom automatically creates a permanent personal room for you (Personal Meeting Room). The room has a permanent ID number and a link that never changes.
Clicking the New Meeting icon will open your permanent meeting room.
- Note the small arrow (1) next to the New Meeting text. The arrow will open a menu with Use My personal Meeting ID (PMI) selected by default. Below it is the permanent ID number of your room (2).
- If you do not wish to use your permanent room, uncheck the box and click New Meeting to start the meeting. A new meeting will start. under Invitation URL, you will see the address of the meeting.

Optionally, when scheduling a meeting, you can use your own permanent room or create a room for the meeting. Click Schedule > Advanced Options > Use Personal Meeting ID 123-456-7890. By default, your own room is not reserved, unlike above.
Breakout rooms
The meeting host and co-host can divide participants into separate rooms, for example for small group work.
Creating rooms before the meeting
The host can create rooms in advance before the meeting in the Zoom browser view in the meeting settings (https://helsinki.zoom.us/ > Sign in > Meetings > Meeting name and Edit > by opening the Options menu and clicking Breakout room pre-assign.
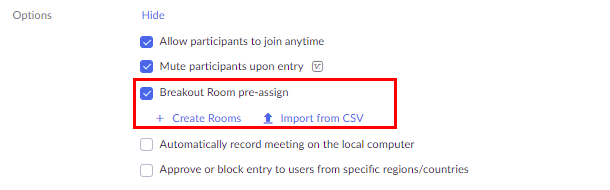
Create Rooms will open a window where:
- rooms can be created
- rooms can be renamed and participants can be assigned to rooms in advance*
- create rooms and participants from a CSV file (see Zoom's own help)

* Please note, however, that only users of the University of Helsinki Zoom account can be added to small groups in advance. They must also be logged into Zoom before joining the meeting so that Zoom can recognize them and assign them to groups. Non-HY Zoom users can only assign the host and co-host to groups during the meeting.
If pre-assigned groups do not immediately appear in the Breakout rooms window, you can try Recreate → Recover to pre-assigned rooms.
Creating rooms during the meeting
If breakout rooms do not want to be created in advance, the host can also create them during the meeting by selectingMore and Breakout Rooms.
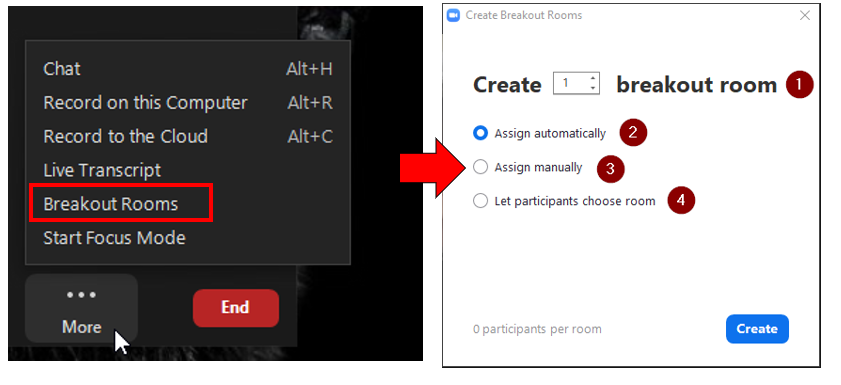
The drop-down dialog allows you to select:
- Number of rooms
- Whether Zoom automatically assigns participants to rooms
- Whether the host assigns participants to rooms themselves
- Whether participants can choose their rooms and move between rooms themselves
Breakout Rooms
Once rooms have been created, either in advance or during the meeting, the Breakout Rooms button opens the Breakout Rooms dialog box.

From the Breakout Rooms dialog box, you can:
<>
- Name and delete a room
- Add participants to rooms
- Recreate rooms
- Add new rooms
- Open rooms to participants
- Configure room settings
Host and co-host can freely change from room to room during small groups.
When recording, only the content of the primary room is recorded, regardless of which room the host is in. Participants can record events in their own room locally.
If a participant arrives late for a meeting, he/she will be redirected to the main room, except when the host has divided participants into groups in advance. In this case, the participant will be redirected directly to the small group, provided he/she is logged in to Zoom.
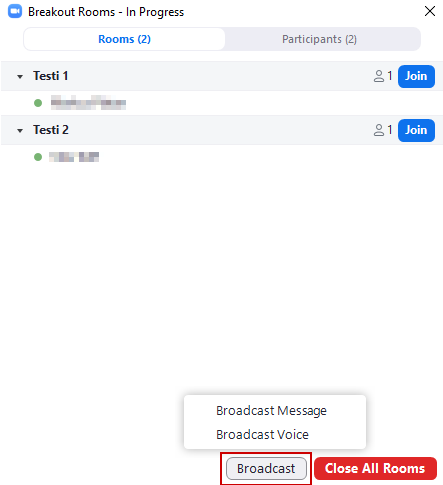
Broadcast
- The host can broadcast to all running breakout rooms at once, either by writing (Broadcast Message) or voicing (Broadcast Voice).
- The co-host (Co-host) can broadcast to rooms by typing only.
The Broadcast feature requires a desktop application version 5.11.9 or later for both host and listener to work. The broadcast function also works in the browser version of Zoom. Broadcast buttons can be found in the Breakout Rooms window.
Broadcast Message
Both host and co-host are able to broadcast written messages to all Breakout Rooms at once. Open the Breakout Rooms window, select Broadcast and Broadcast Message. Write your message and select Broadcast.
A text will appear at the top of the users' windows:

Broadcast Voice
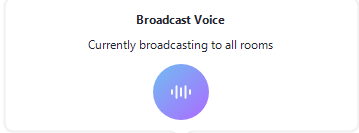
The host will be able to broadcast loudly to all Breakout Rooms at once. Open the Breakout Rooms window, select Broadcast and Broadcast Voice. Click on the Broadcast button:

Broadcast is on when the lines on the Broadcast button are moving:
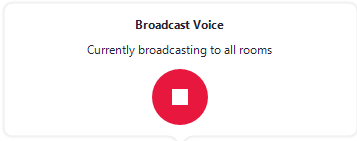
You can also press the B button on the keyboard, in which case the announcement (Broadcast) will be open to all rooms and the Broadcast Voice window will appear on the screen and the button lines will move. Note, however, that the button must be pressed throughout the announcement. That is, pressing the key while typing will not open the announcement.
An announcement can be paused by clicking on the same button:
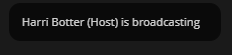
A notification appears at the top of the user windows when the host is announcing:
Focus mode
Zoom's Focus Mode offers the possibility to direct the attention of participants to the camera image or presentation of the host, co-host or spotlighted participant alone, if necessary. The meeting host must be using the desktop version of Zoom (version 5.7.3 and up) to start Focus Mode. The co-host can manage Focus Mode using the browser version of Zoom.
Focus Mode can be turned on and off during the meeting. When Focus Mode is turned on:
- host and co-host will still see participants' camera images and screen splits
- participants will only see hosts' camera images and their own camera image -
- hosts can put a participant in spotlight (spotlight), in which case that participant's camera image and screen split will be visible to all participants
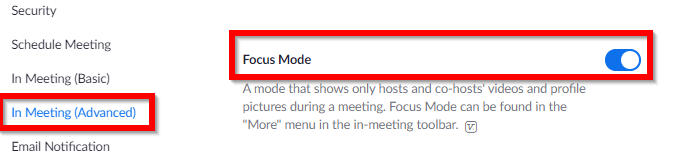
Focus Mode can be turned on from the Zoom settings. Log in to Zoom with your university credentials at https://helsinki.zoom.us/ and select Settings. Focus Mode can be found under In Meeting (Advanced) in the settings.
Focus Mode can be turned on by selecting More at the bottom of Zoom and clicking Start Focus Mode.

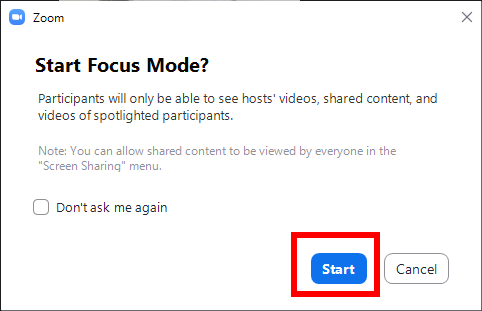
Zoom will then ask you if you want to start Focus Mode. Select Start:
After starting, Zoom will notify the host and participants that Focus Mode has been enabled.


Focus Mode can be turned off by selecting More and clicking Stop Focus Mode.

Create notes from the meeting using the Notes tool
Zoomin Notes function allows you to create a note, write notes, and share a note with others within Zoom. The Notes notebook works during the Zoom meeting as well as outside the meeting. Notes can be accessed from both the Zoom desktop application and the browser version of Zoom at https://helsinki.zoom.us/.
Note! Do not share sensitive data in Zoom Notes either.
To use the Notes feature, you must be logged in to Zoom.
Zoom Notes can be enabled from the Zoom settings. Log in to Zoom with your university credentials at https://helsinki.zoom.us/ and select Settings and Notes.

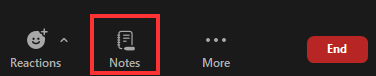
In a meeting, Notes can be turned on by selecting Notes at the bottom of Zoom.
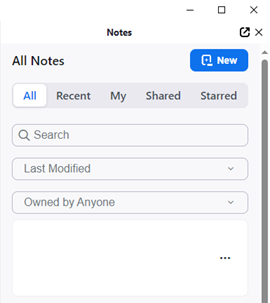
This will open the Notes menu on the right side of Zoom.
The menu offers the option to start a new note (New), as well as separate tabs for all notes you have (All), recent notes (Recent), my notes (My), shared notes (Shared) and stunning notes (Starred). You can also search for memos and browse them by Last Modified or Owned by (Owned by).
Selecting a new note (New) will open a new empty note for you. You can edit the text settings of your note and name your note.
You can share your note by clicking the white arrow on the blue background (Share Note).
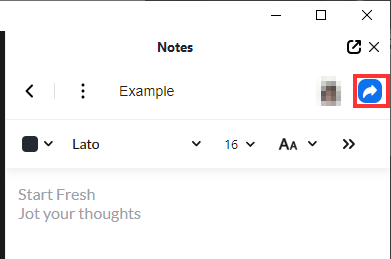
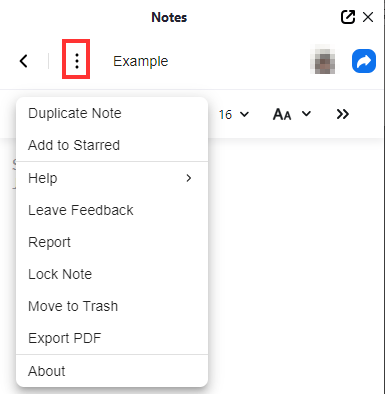
More settings can be found behind the three dots (More).
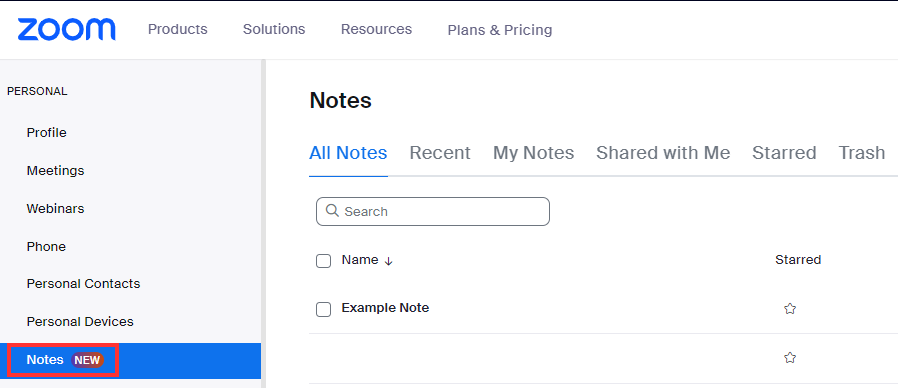
You can also find the memos you have in your browser version of Zoom. You can also edit and share your notes outside the meeting.
Zoom special licences
The University has a limited number of special licences available for larger Zoom meetings (1000-3000 people).
For more information on special Zoom licences, please see the separate instructions.
Saving the meeting
Recording a lecture or meeting is an easy and smart way to make your recordings available to others. It also saves time and effort from repetitive lectures, trainings or meetings.
The University of Helsinki's Zoom currently offers local recording and the NORDUnet cloud storage service.
If you want to cut, trim or add subtitles to your recordings, you can use ScreenPal.
Local recording
If you are recording on a local computer, please note that after the meeting has ended, the recording will be automatically converted to an mp4 file. For example, a recording of a lecture can take well over 15 minutes to create. This can be important if you are using shared computers.
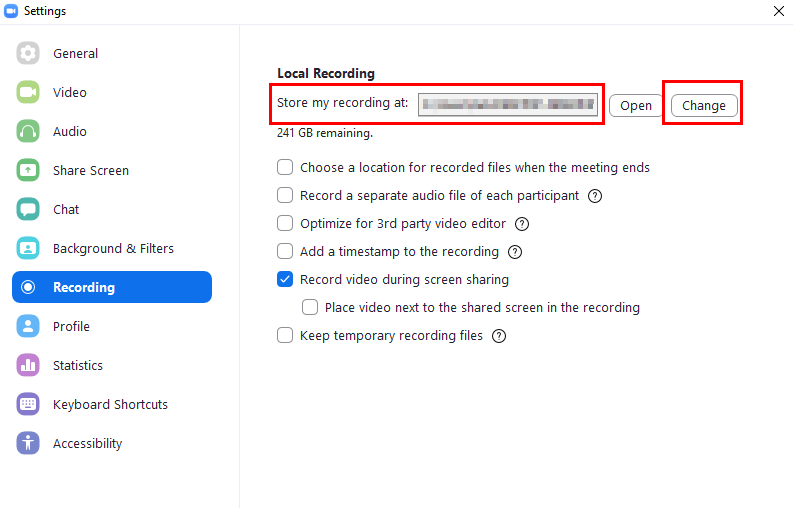
Always make sure you know which folder you are saving to. It is a good idea to change the recording location to your computer's hard drive, for example under the C drive (C:\ drive LocalData\username). You can change the default folder in the Zoom settings. This way, files are only saved on the hard disk of the computer and possible network problems are avoided. You will have to take care of backing up the videos yourself.
Periodic recording can only be used with the Zoom desktop application.
Cloud recording
The University of Helsinki uses NORDUnet's cloud recording service for Zoom events and meetings.
What to note about the cloud recording service:
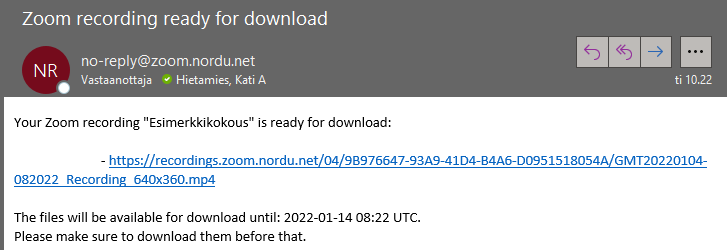
1. In NORDUnet's cloud recording a download link is sent to the meeting creator's email after the recording.
- If the email has not arrived by the next day, please check your spam folder.
- The email will be titled Zoom recording ready for download and the email sender will be no-reply@zoom.nordu.net
2. The recording will be stored on NORDUnet's Nordic server, where it should be downloaded within ten (10) days. The recording will be deleted from the server after 10 days and cannot be restored.
3. The recording must be uploaded to your computer, after which it can be edited or uploaded to the platform of your choice (Unitube, YouTube)
Access
Sign up for Zoom at https://helsinki.zoom.us/. Click Sign in. Go to the Recording tab of the Settings tab. Enable cloud recording under Cloud recording:

Settings for cloud recording
Enabling cloud recording opens the cloud recording settings menu:
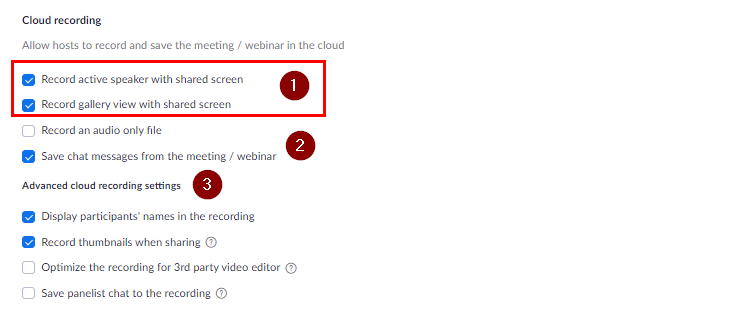
The recommended settings are:
1. It is important to select either Record active speaker with shared screen, Record gallery view with shared screen or both. If these are not selected, no image will be recorded at all.
- Record active speaker with shared screen and Record gallery view with shared screen: more on.
2. However, you can choose to record audio only (Record an audio only file)or record chat only (Save chat messages from meeting / webinar).
- Record an audio only file off
- Save chat messages from the meeting / webinar on.
3. Other settings:
- Display participants' names in the recording: can choose whether to display participants' names in the recording - on
- Record thumbnails when sharing: whether to display a small thumbnail image of the speaker's video while sharing the screen - on
- Optimize the recording for 3rd party video editors: this setting will increase the file size and processing time - off, but if you have problems editing the recording you can try to turn it on
- Save panelist chat to the recording: show panelist chat during the meeting - off
Please note that all the above settings are enabled in the On-Prem Zoom cloud recording service of the University of Helsinki.
Using Cloud Recording
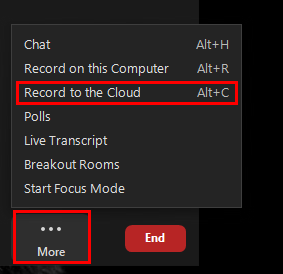
You can start cloud recording by clicking on the More menu in the Zoom meeting Record to the Cloud.
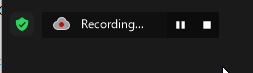
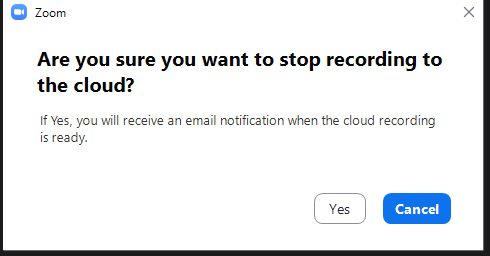
You can stop recording by clicking Stop Recording.
After this Zoom will notify you that you will receive an email when your recording is finished.
Downloading your cloud recording
You will receive an email from NORDUnet when your recording is complete. the email is titled Zoom recording ready for download and comes from no-reply(at)zoom.nordu.net. The email will state by which date the recording must be downloaded and after which the recording will be permanently deleted from the server.
Clicking on the link in the email will open a download page in your browser where you can download the recording to your computer for further processing.
Collecting the list of participants
You can get a list of Zoom meeting attendees by:
- Log in to Zoom using your browser at www.helsinki.fi/zoom.
-
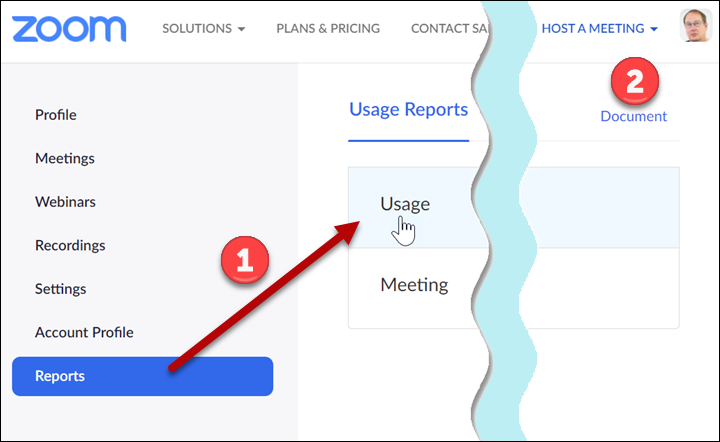
Click Reports > Usage (1). Clicking on Document (2) will open Zoom's own instructions.
-
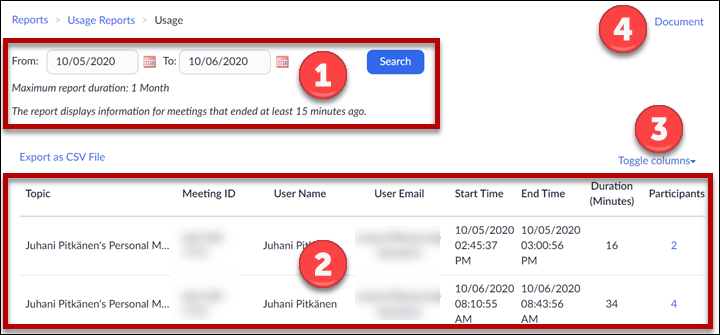
Click on (1) to select the time period for which you are retrieving participant data.
Please note that the list will only be updated 15 minutes after the end of the meeting and only data less than one month old will be available. In section (2) you will find information about the participants. Under Toggle columns (3) you can choose which information to display. The link Document (4) opens Zoom's own help file. -
Participants column number indicates the number of participants. Click on the number.
-
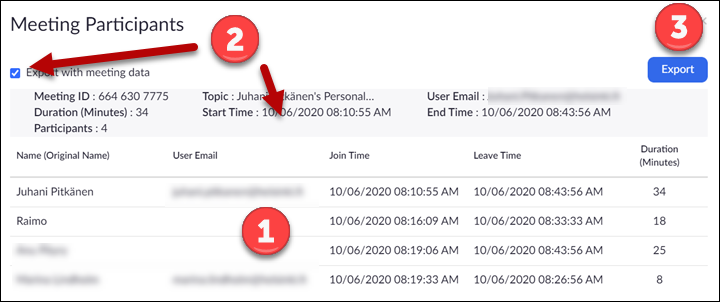
The participant list will open. Details of the participants can be found in section (1). Selecting Export with meeting data (2) will display basic information about the meeting. Click on Export (3) to export the data. The file is in csv format, you can open it for example with Excel or save it on your computer.

Screen sharing
You can share a screen or an open application for others to see.
- Click Share at the bottom of the screen.
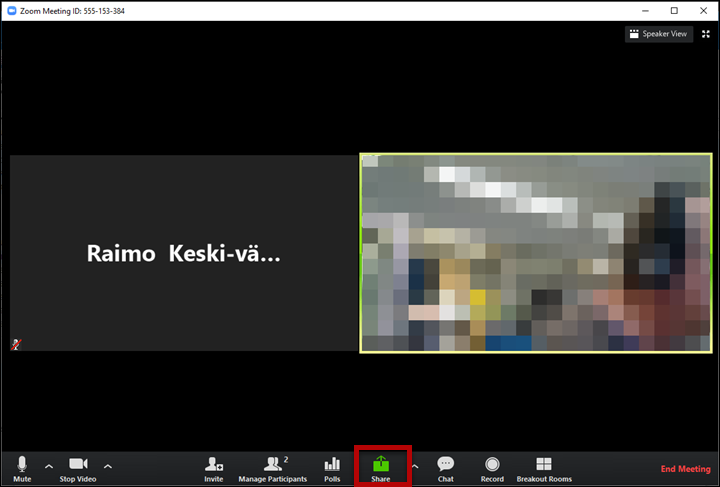
- From the pop-up window, you can choose to share either the whole screen (1) or one of the application windows (2). Select what you want to display and click Share (3).

- The green frame (1) indicates the application to share. At the top of the window are the sharing control buttons (2).
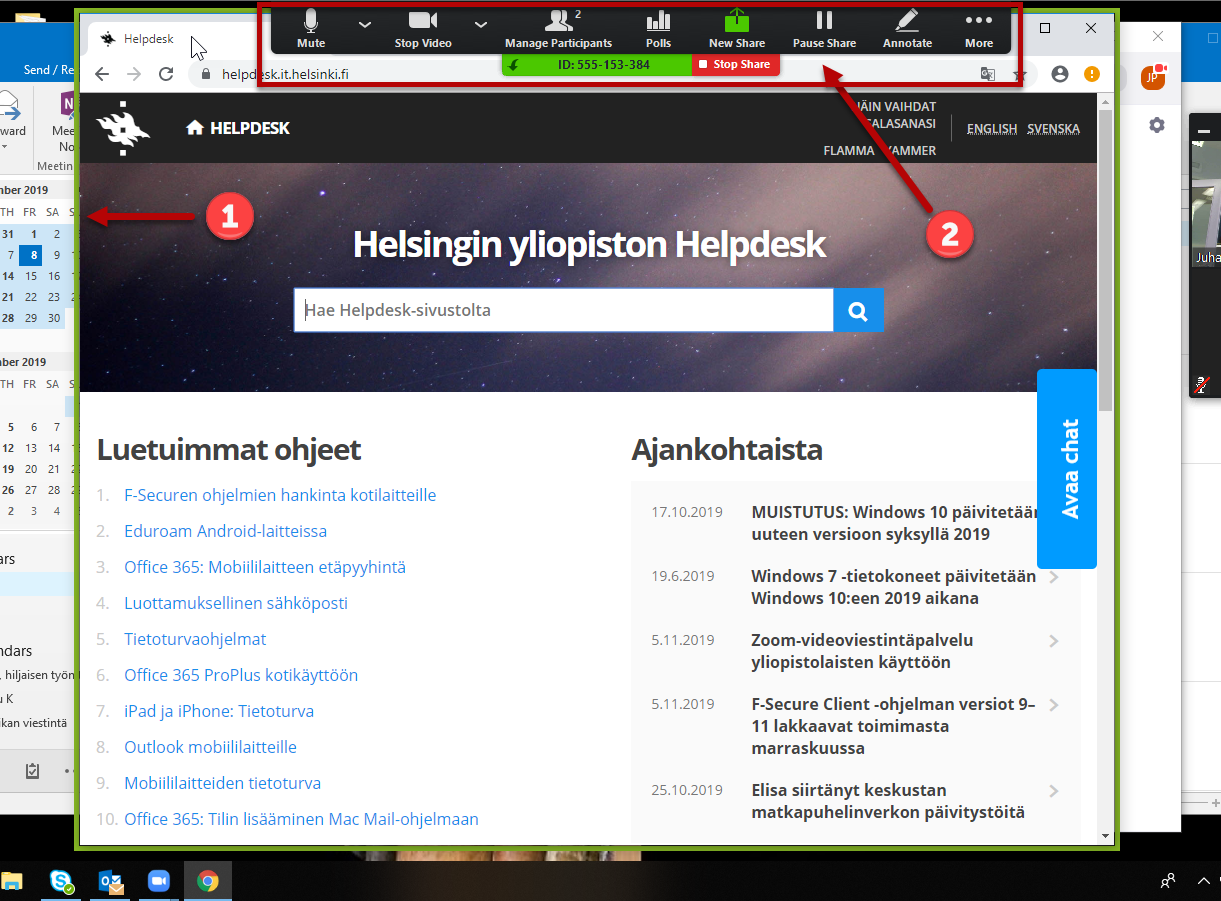
- Other participants will see the name of the active sharer at the top of the window.
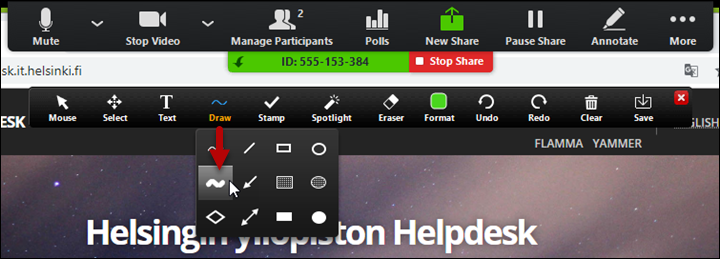
- You can add labels and highlights to the display. Click on Annotate. The toolbar will open.

- Other tools will open an even more detailed submenu.
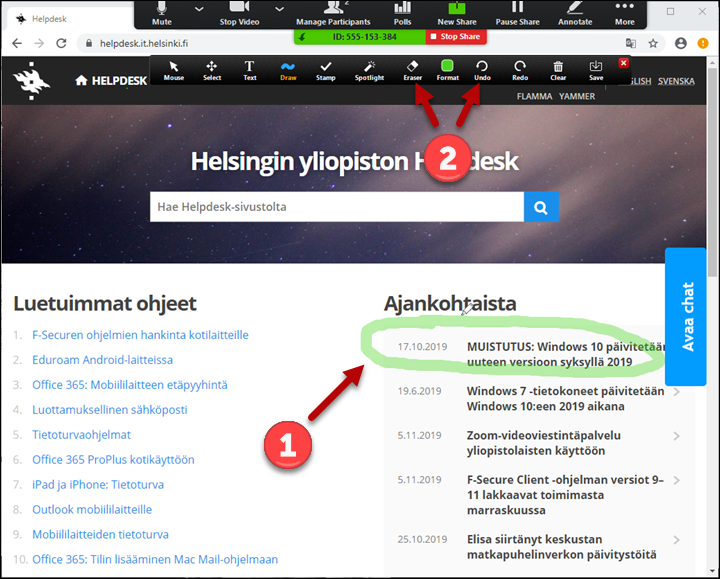
- You can delete the entries you have made (1) using the Eraser tool or by clicking on the Undo toolbar (2).
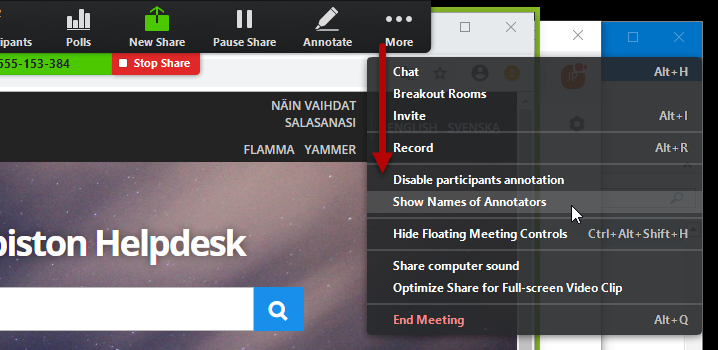
- More menu allows the host to allow (Allow participants to annotate) or disallow (Disable participants annotation) participants to annotate. He can also choose to show the name of the annotator (Show Names of Annotators) or not to show them (Hide Names of Annotators).
You can save a screenshot of the annotation in the middle of the presentation. In this example, Raimo Keski-vääntö (1) shares his browser window. Raimo has used green highlights to highlight the window (2).
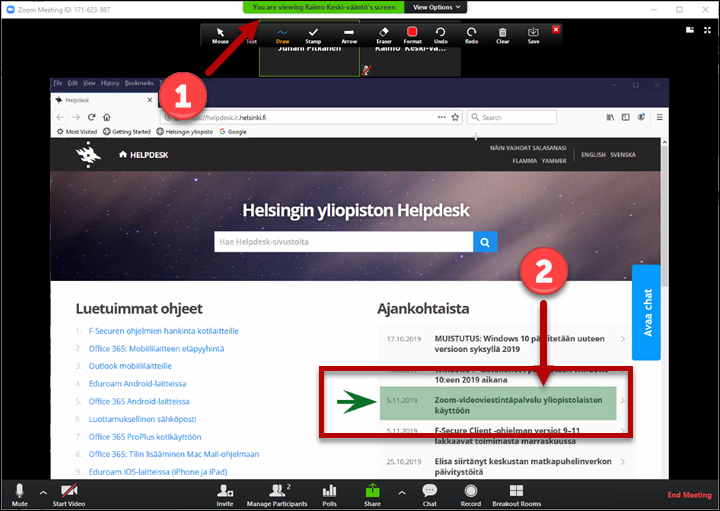
Click Save. The program will inform you that the screen capture image has been saved (Screen saved). To open the saved folder, click on Show in Folder.

The images are saved in the Documents > Zoom folder.

You can stop sharing by clicking Stop Share.

Whiteboard
Whiteboard allows you to engage participants.
Zoom offers two different types of whiteboard:
- In-Meeting Whiteboard, which is opened during the meeting, and
- Out-of-Meeting Whiteboard, which can be created before the meeting and distributed to other users in advance.
Setting up
The whiteboard settings can be found at helsinki.zoom.us. Log in to Zoom and go to the Whiteboard tab of the Settings page.
First you will find the In-Meeting whiteboard settings. Enable the whiteboard by clicking the enable button under Enable In-Meeting Whiteboard, if you do not have it automatically enabled. Note! If you want to save your whiteboard to your Zoom account, for example for further editing, select the option Allow whiteboards to be saved to cloud.
Activate the Out-of-Meeting Whiteboard from Enable Out-of-Meeting Whiteboard, if the whiteboard is not automatically enabled and select the appropriate settings for your whiteboard below.
There are other settings for your whiteboard under the Enable Whiteboard settings, from which you can always choose the settings that are appropriate for your situation.
Creating whiteboards
You can create new whiteboards by going to helsinki.zoom.us. Log in to Zoom and click on the Whiteboards menu on the left hand side. You'll find all the whiteboards you've created and shared, as well as a + New whiteboard button that you can click to create a new whiteboard.
When creating a new whiteboard, you can choose either a blank whiteboard, or one of the many Templates provided by Zoom. You can get a blank whiteboard by closing the Templates window.
Once you have created a whiteboard, you can name it as you wish from the top left corner of the whiteboard. The whiteboard is automatically named with the name of the whiteboard creator and the time of creation.
Whiteboards can be shared with other users by selecting the Share whiteboard arrow.

Whiteboards can also be made into Projects,where you can add multiple whiteboards and give others access to the entire project.
Use
You can access a whiteboard in a Zoom meeting by selecting ShareScreen, Documents and Whiteboard from the window that opens:


Simultaneous interpreting
In simultaneous interpretation, the interpreter translates the speaker's speech into another language in real time.
Up to 20 simultaneous interpreters can be assigned to a Zoom meeting.
Setting up
Simultaneous interpretation can be enabled in advance by selecting Interpretation in the meeting settings and choosing Enable language interpretation. The selection opens an email field where the interpreter's email address is added, as well as language menus to select the languages to be interpreted and to which:

After saving the settings, the interpreter will receive a personal email invitation to join the appointment. By clicking on the link, the interpreter will directly access the necessary features to join the meeting.
Use during the meeting
You can access the simultaneous interpretation for your appointment by clicking on the Interpretation button at the bottom of Zoom:

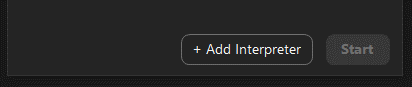
The button opens the Language interpretation window, at the bottom of which you can add a new interpreter (+ Add Interpreter).
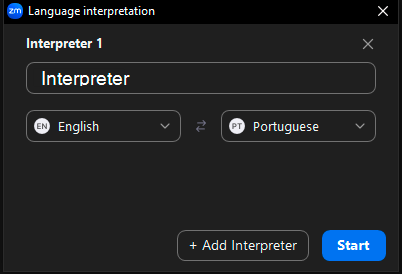
You can start the interpretation by entering the name of the interpreter in the search field, adding the interpreter and the languages to be interpreted and clicking Start.
Zoom settings
Zoom settings are managed from two different places. Most of the settings can be found in the browser version of Zoom at helsinki.zoom.us under Settings.
Some of the settings, however, such as the video background image selection, can be found in the desktop version of Zoom:
- Start Zoom.
- Click on your profile picture in the top right corner.
- Select Settings
Zoom profile settings
Adding your profile picture
Log in to Zoom at helsinki.zoom.us.
- Click Sign in.
- On the Profile tab, click on your profile picture.
- Click Change and Choose or Take photo.
- Select a photo and click Open.
- The full-size photo will open on the left. Crop the photo to fit.
- Click Save.
You can later delete the photo by clicking Delete.
Adding a personal pronoun
Log in to Zoom at helsinki.zoom.us.
- Click Sign in.
- On the Profile tab, click the Edit button next to your profile picture.
- Enter your pronoun in the Pronouns field.
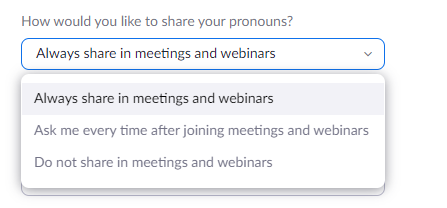
- You can choose how your pronouns are displayed in the Zoom conversations:
- (Always share in meetings and webinars),
- Ask me every time after joining meetings and webinars, or
- Do not share in meetings and webinars
- Click Save to save your selection.
Switching the date and time
Log in to Zoom at helsinki.zoom.us.
- Click Sign in. Go to the Profile tab.
Date
- Click the Edit button on the Date Format bar. You can select the format of the date you want by clicking on the drop-down menu to select the format you want.
- The common Finnish language recommendation is to use the format dd.mm.yyyy, for example 24.11.2021.
Time
Click the Edit button on the Time Format bar. To select 24-hour time, select Use 24-hour time.
Change wallpaper
You can use a virtual wallpaper or video in Zoom meetings. In this example, the background image is a photo you took, but you can also use a video as the background.
Log in to Zoom at helsinki.zoom.us.
- Click Sign in.
- Open Settings.
- Select In Meeting (Advanced) from the settings. Under Virtual background, drag the slider to the right.
- Start the Zoom client (Start > Zoom > Zoom).
- Click on your profile picture and select Settings from the menu that opens.
- Open the Video & effects menu and the Virtual backgrounds tab.
- To add your own background image, click the plus sign on the right.
- To use a previously uploaded image, the University Common Matters background images, or Zoom's default images, click the image you want.
- Now the background of your video will display the image you selected.
- You can change the background while the video conference is in progress by clicking the arrow next to the video camera at the bottom and selecting Video & effects.
Checklist for Zoom meeting organisers
Before the meeting
Plan roles and responsibilities
Plan in advance the roles that the meeting organisers will play, for example:
- event invitation sender
- event machine(s)
- chat attendant(s) - two people are recommended for large events!
- event chair / host and presenters
- possible breakout room manager
- possible breakout room facilitators
- meeting recorder
- scheduler (if different from presenter)
- possible recording editor
At the same time, agree who will host the meeting and who may need to co-host the meetinghost rights. At the very least, the person recording the meeting should have co-host rights. However, sharing content, for example, does not require co-host rights. A host can only be given co-host rights at the start of the meeting.
When creating a meeting, it is also possible to specify alternative hosts; they can start the meeting with host rights instead of the meeting creator.
Other things to consider during the planning phase
- It is a good idea to have the outline / script for the meeting in place and distributed to participants in advance.
- If the meeting is to be recorded, it is advisable to inform participants in advance.
- Experience has shown that sharing presentations works best from the presenters' own computers. In case of problems, it is also a good idea to have the presentations on the host's computer.
- If a shared space is reserved for the meeting organisers (e.g. a meeting room or classroom), depending on the roles of the organisers, it is worth considering who should participate from their own computers elsewhere and who should come to the meeting room. This is particularly important for potential facilitators of small groups, as it may be difficult for them to work in the same room.
- The recording and possible publication of the chat should be agreed and announced in advance.
Polls (polls)
- Polls, or polls, can be made in advance for the meeting.
Breakout rooms (small group rooms)
- Breakout rooms, or small group rooms, can also be made in advance for the meeting, but in this case members must be added manually. If you use automatic group assignment, it will override any group changes you make in advance.
- If you know in advance who is coming to the meeting, however, you can also add them to groups in advance (assuming they are already Zoom users).
- You can name the manually created rooms and set a time limit for them (e.g.
- Breakout rooms and how to instruct participants on how to use them, as well as any small group facilitation, should be carefully planned.
Before the meeting in the presentation or meeting room
- Allow half an hour to an hour to prepare. Test in advance the functionality of the technology in the room you have reserved, especially the microphones.
- Microphones and speakers off on everything except the presentation machine.
- Mobile phones on silent.
- Materials on the presentation machine(s) ready to be opened.
- Close Outlook, Teams and similar programs on the presentation machine so that nothing extra is accidentally shown on the screen.
- Make sure the right person is in the Host role and add Co-Host privileges for those who may need them.
Beginning of the meeting
- Make sure the audio is audible and the video and presentation are visible.
- Speak to participants about questions: whether to use mike or chat first, and whether to answer questions during the meeting or at the end of the meeting. Also briefly explain the meeting buttons (mike, video, chat, possible voting).
- Please make the meeting schedule visible to participants.
- If you save the event, remind them again.
During the meeting
Monitoring the chat; if questions are not addressed until the end of the presentation and the discussion is lively, it may be easiest for the chat monitor to pick up questions as they come in.
Record, provide instructions as needed.
Remember the schedule.
If you do not record the meeting, you should take a screenshot of the survey results during the meeting. The results can only be output after the meeting as a csv file.
At the end of the meeting
- Take down the chat.
- Distribute the results of any poll to participants if not done before. If necessary, take a screenshot of the results for yourself.
- Closing the meeting.
- The recording of the meeting, if any, will be converted to an mp4 file on the recorder's computer.
Other features to consider
Facilities and equipment
- Please make sure that video footage of the presenters is also available!
- For small venues and to capture the sound of a few people, a table microphone like Jabra is fine.
- For larger events with multiple speakers in the same room, it's a good idea to use one with fixed equipment.
- For example, Unitube enabled university lecture halls have the ability to connect a computer to the hall's camera and mike and relay and record this video and audio stream from the computer via Zoom.
- Many university meeting rooms are equipped with fixed meeting mics and e.g. prism cameras.
- The above equipment usually works simply by plugging in the device and selecting the correct image and sound source in Zoom.
Further guidance on meeting arrangements
Advice and problem situations
Zoom helpdesk
Pre-test the suitability of your hardware
go to https://zoom.us/test to pre-test the suitability of your equipment for Zoom meetings.
If the microphone test function does not start automatically, click the small arrow on the Mute key and select Test Speaker & Microphone...
Zoom version used by the university
The University of Helsinki uses On-Premise (On-Prem) Zoom provided by NORDUnet. The service is implemented in a secure way, with all video and audio traffic in the Nordic countries running on NORDUnet's own servers. Only the validation of the Zoom license is done via Zoom's own cloud service located in the EU.
You use HY's On-Prem Zoom when you are logged in to Zoom with your superuser ID via SSO (Single Sign On).
In NORDUnet's On-Prem Zoom, some of the functionality, such as cloud storage, is distinct from regular Zoom functionality.
HY's On-Prem Zoom |
Zoom |
|
Servers within the EU, so
|
Servers in the USA
|
|
Cloud storage The recording is stored on NORDUnet servers in the EU:in the EU
|
Cloud Storage
|
|
Transcription
|
Subtitling
|
|
Streaming
|
Streaming
|
|
Apps
|
Apps
|
Video instruction
Give feedback
The instructions site of the University of Helsinki's IT Helpdesk helps you with IT-related issues related to your work. Let us know how we can improve our instructions. We greatly appreciate your feedback!
How would you improve these instructions?