
GnuPG is an email encryption software which can be installed on university computers from the software portal.
Before you can start using GnuPG for signing e-mails, you have to create a private key, the core of your digital identity. There are several ways of creating a private key and its public counterpart. In this instruction, we do it using the Enigmail add-on for Thunderbird.
Quick help
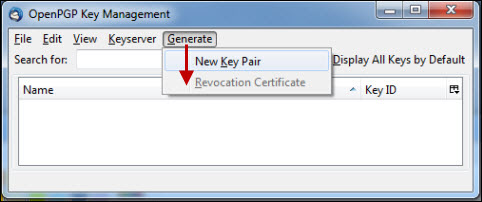
- Open OpenPGP > Key management > Generate > New keypair.
- Go to the Advanced tab.
- Select Key type.
- Select Key size for the private key.
- Create the key by clicking on Generate key.
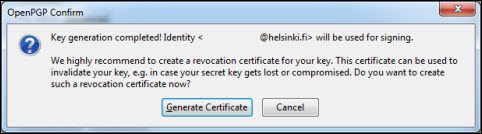
- Once the key has been generated, the program asks you to create a revocation certificate.
See Detailed Help tab for more instructions
Detailed help
Start creating a new key by opening OpenPGP > Key management > Generate > New keypair.
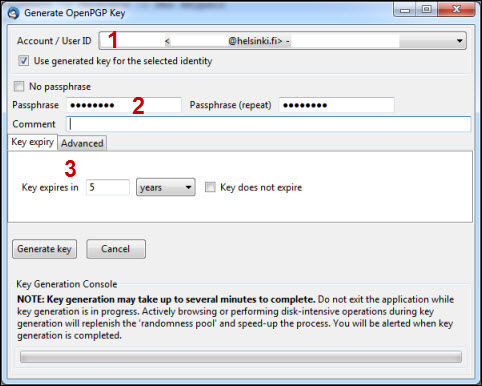
1) Choose the e-mail account that you want to connect your private key to (1).
2) Create a password for your key (2).
- A complex enough password protects you in the event that someone gets hold of your private key.
- A forgotten passphrase cannot be invalidated or dug out by means available to a private person, so you should pay special attention to its memorability.
- A good length is over 15 characters, including upper and lower case letters, numbers, and special characters.
3) If you want to create a fixed-term key, select a suitable validity period (3).
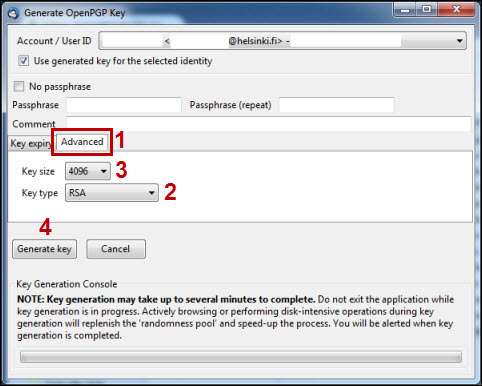
4) Go to the Advanced tab (1).
5) Select Key type (2). RSA has been the default for GnuPG for some time and the algorithm itself is well known.
6) Select Key size for the private key (3). The recommendation is 3072 bits or more. The longer the key is, the stronger the encryption.
7) Create the key by clicking on Generate key (4).
Once the key has been generated, the program asks you to create a revocation certificate. With the revocation certificate you can cancel your keys if they should fall into the wrong hands or become unusable for some reason. Under normal circumstances, the revocation certificate is not needed, so it is best to store it in a place from which it cannot disappear in the event of, for example, hardware failure, and from which it cannot be stolen. A suitable place is a bank safe deposit box or similar.
Immediately after creating the keys you should create back-up copies of your own keys.
Video instruction
Give feedback
The instructions site of the University of Helsinki's IT Helpdesk helps you with IT-related issues related to your work. Let us know how we can improve our instructions. We greatly appreciate your feedback!
How would you improve these instructions?