These instructions describe encrypting e-mail with Microsoft 365 Message Encryption (OME) at the University of Helsinki. You can only use OME encryption in Outlook and OWA (Outlook Web App).
Use these instructions to send a secure message from your Microsoft 365 account to others at the University, to another organisation, or even to a third party. This OME version cannot be used by a third party (= non-Microsoft 365 user), but there are other ways to establish a secure connection (more information in the Confidential e-mail instructions).
Note that not all communications have to be to encrypted. Further information is available on Flamma (E-mail processing instructions)
Notes
- For other service addresses, we recommend using the old Securemail service for the time being.
- Please note that the subject is not protected, so do not mention anything confidential in it.
- Encryption of attachment files: Only some file types (e.g. newer Office files, ordinary PDFs, text and image files) can be encrypted. For more detailed information, see Microsoft’s website.
Improvements to previous Securemail encryption
- It is now easier to read encrypted messages on mobile devices: with Outlook for Android/iOS, reading an encrypted message is as simple as opening a regular message (Outlook will still inform you when opening a message that is encrypted).
- In other e-mail applications, messages can be read by opening the attached HTML file and by logging in with your [O365 account], or by requesting a temporary security code to be sent via e-mail.
- There is no limit on how many times messages can be read, and they do not expire (anymore).
Quick help
See the Detailed help tab for illustrated instructions
Detailed help
Please note that the subject is not protected, so do not mention anything confidential in it.
Sending an encrypted message using Outlook Web App (OWA)
Log in Outlook Web App at www.helsinki.fi/office365
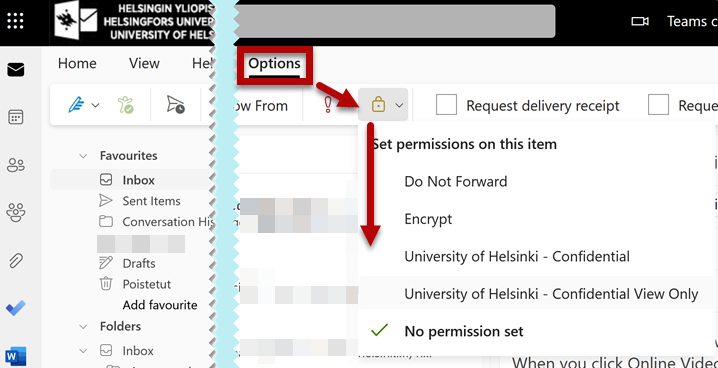
Click New email. Open the Options tab. Click the lock icon. In the new menu, select the level of encryption.
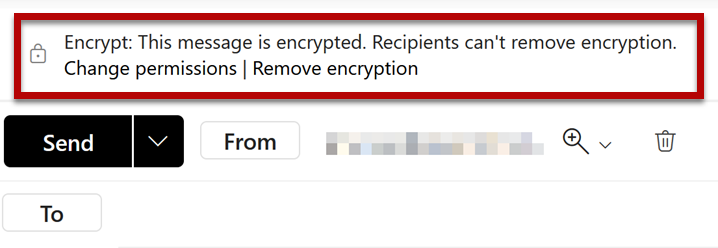
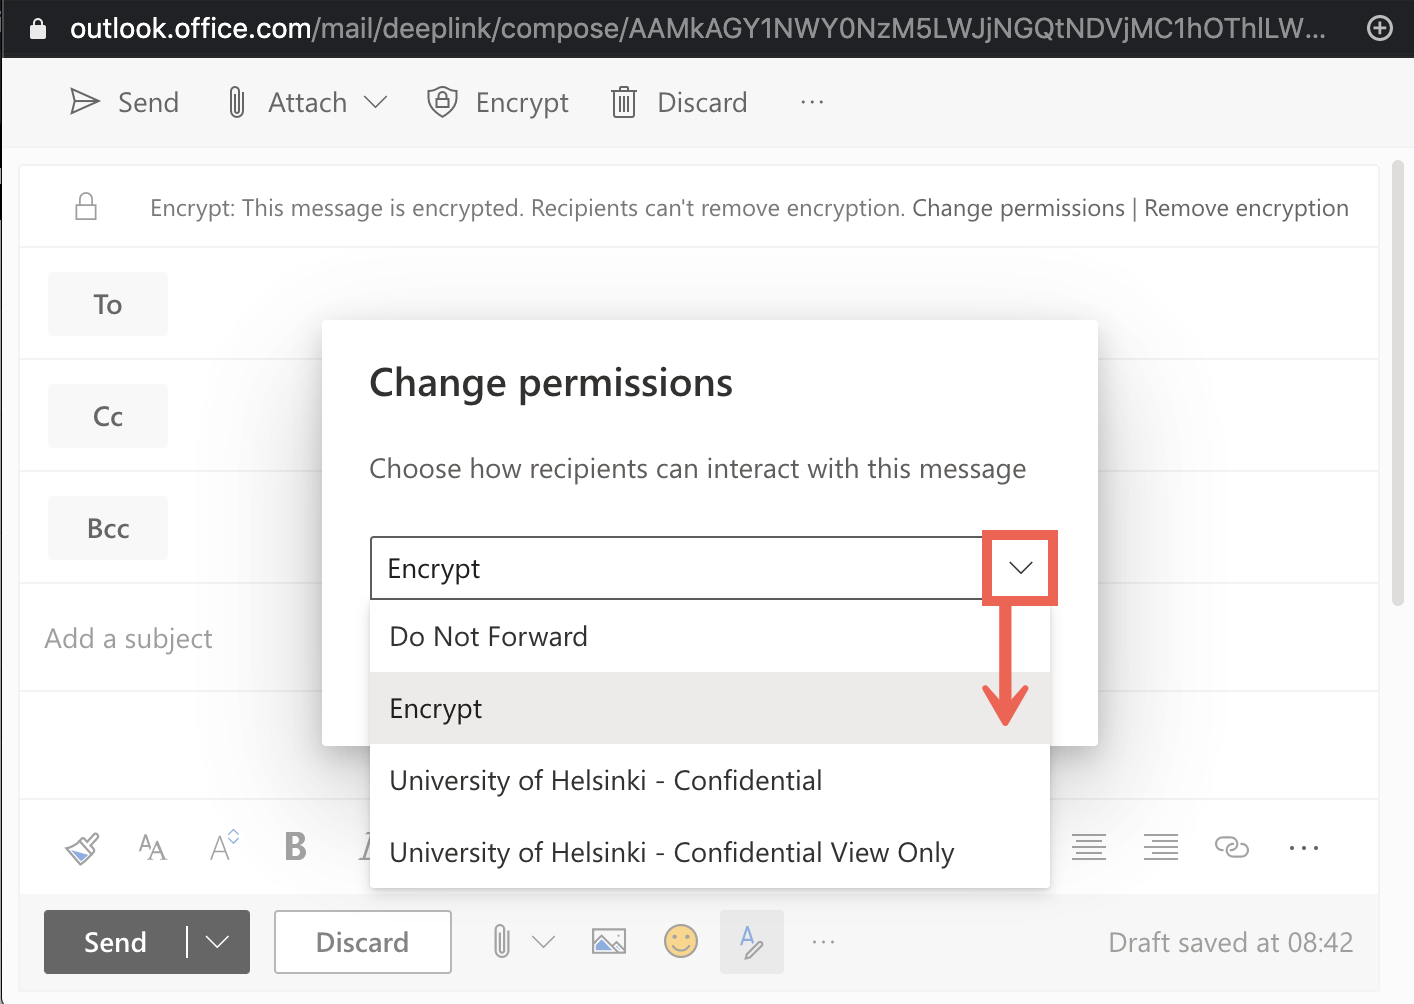
Once you have selected a level of encryption, you will see a closed lock icon in the message window and a brief description of the encryption. To change the settings, select Change permissions and remove the encryption by selecting Remove encryption.
Read more about the levels of encryption.
You can now write and send your message regularly.
Sending an encrypted e-mail in Outlook (Windows)
Sending an encrypted e-mail in Outlook (Mac)
If the Encrypt button does not appear in the Send message window, click the three dots icon and select Customise toolbar... Drag the Encrypt button so that you can see it.
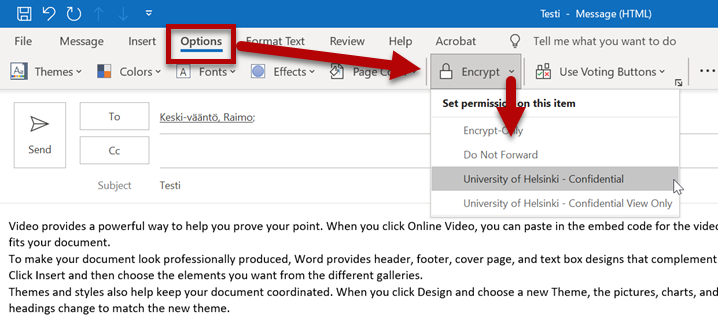
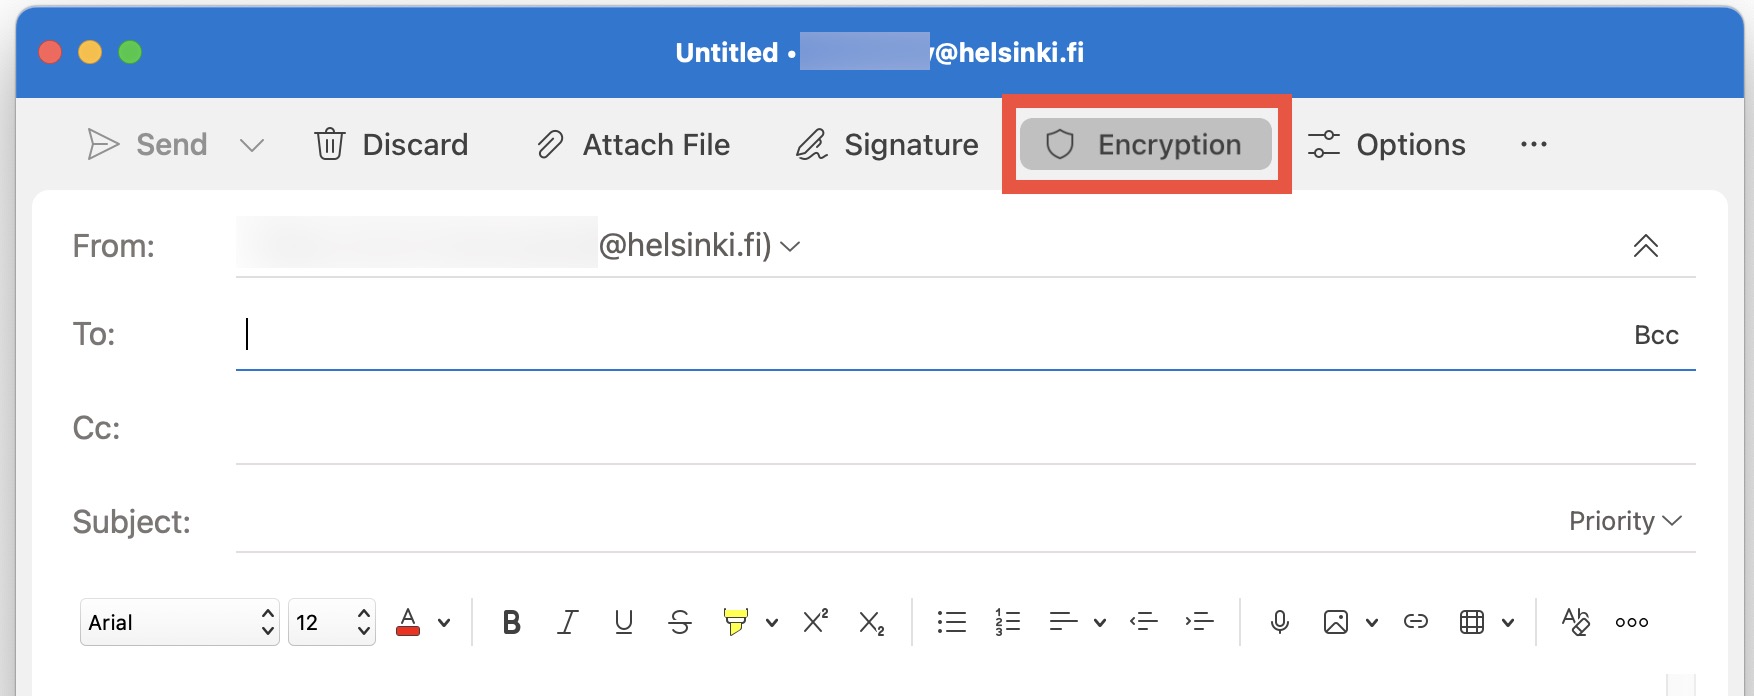
You can find the Encrypt button on the Options tab in an e-mail.
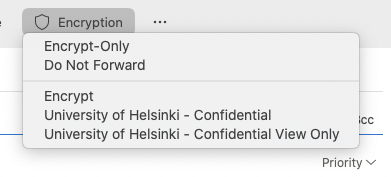
Click Encryption to select the required level of encryption from the menu that appears.
Read more about the levels of encryption.
After the first sign in, Outlook may still need a restart. After this, the program is ready for use.
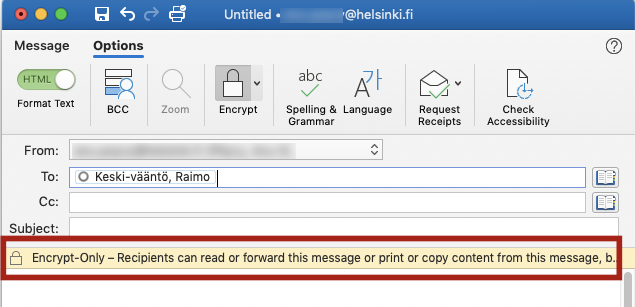
Once you have selected the level of encryption, you will see a yellow bar showing the selected level of encryption in the message window. You can change the settings by clicking the arrow next to the lock icon again.
You can now write and send your message regularly.
Sending an encrypted e-mail from centrally administered University Windows computers
Outlook 2016 is installed on the University's centrally administered Windows computers. To send secure email from Outlook 2016, type the string [S], [s], [PROTECTED], or [protected] in the Header field (Note, the difference from the old Deltagon system). The position of the string in the Header field does not matter. See the image below.
You can write and send your message regularly.
Receiving an encrypted message
Outlook
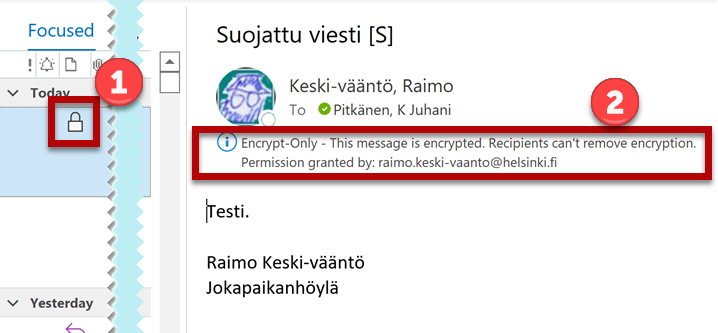
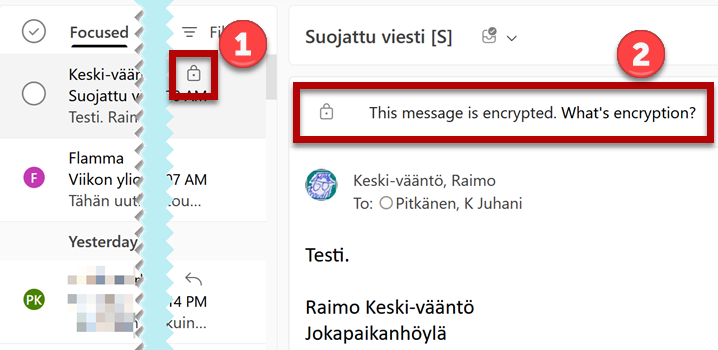
If the message is sent between two Microsoft 365 accounts (e.g. between two different organisations), the message can be read directly in Outlook. The protection can be seen as a lock icon (1) and a mention of an encrypted message at the top of the message field (2).
Outlook Web App (OWA)
If the message is sent between two Office 365 accounts (e.g. between two different organisations), the message can be read directly in OWA. The protection can be seen as a lock icon (1) and a mention of an encrypted message at the top of the message field (2).
Encrypted message to an external recipient
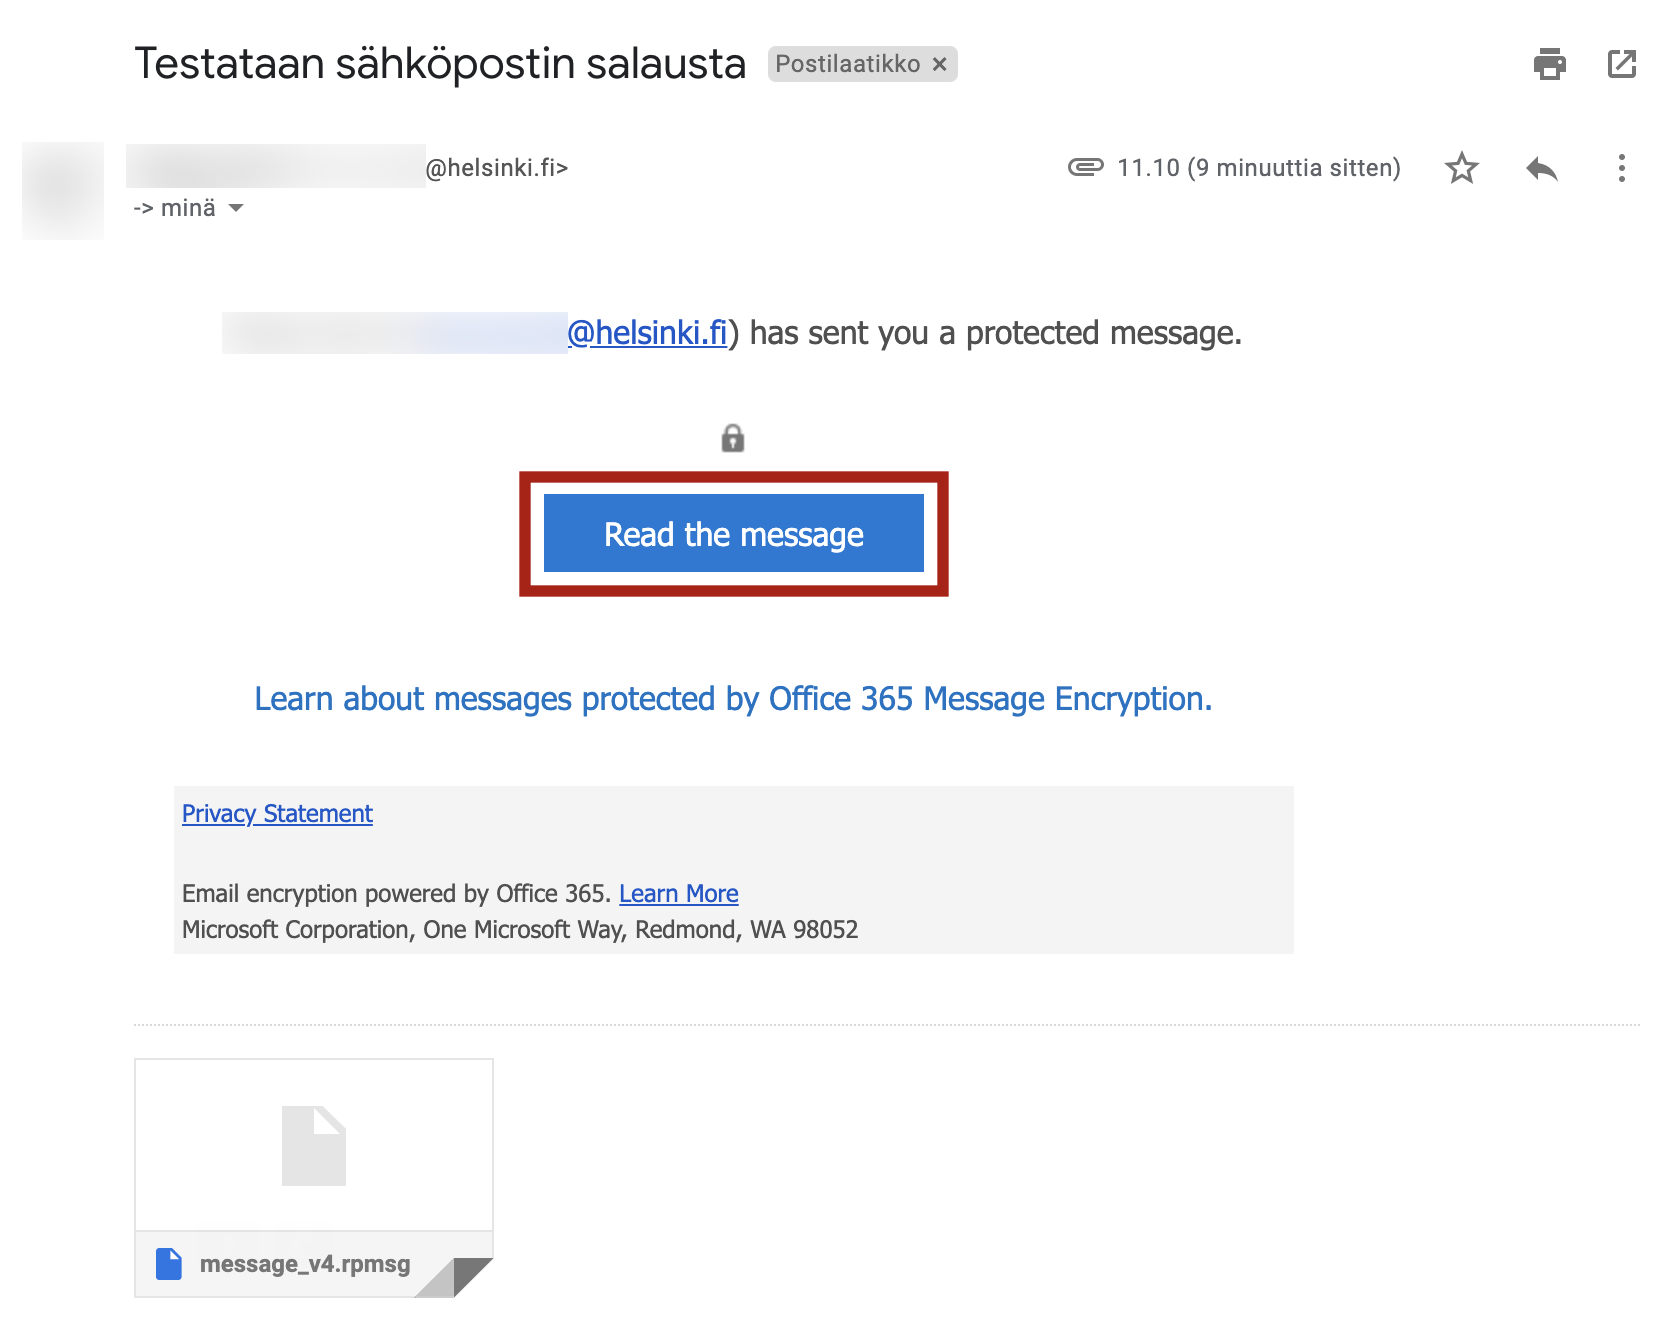
If the recipient does not have an Microsoft 365 or Microsoft account, they will be notified via e-mail about the encrypted message.
NB! The notice may be sorted into the junk mail folder.
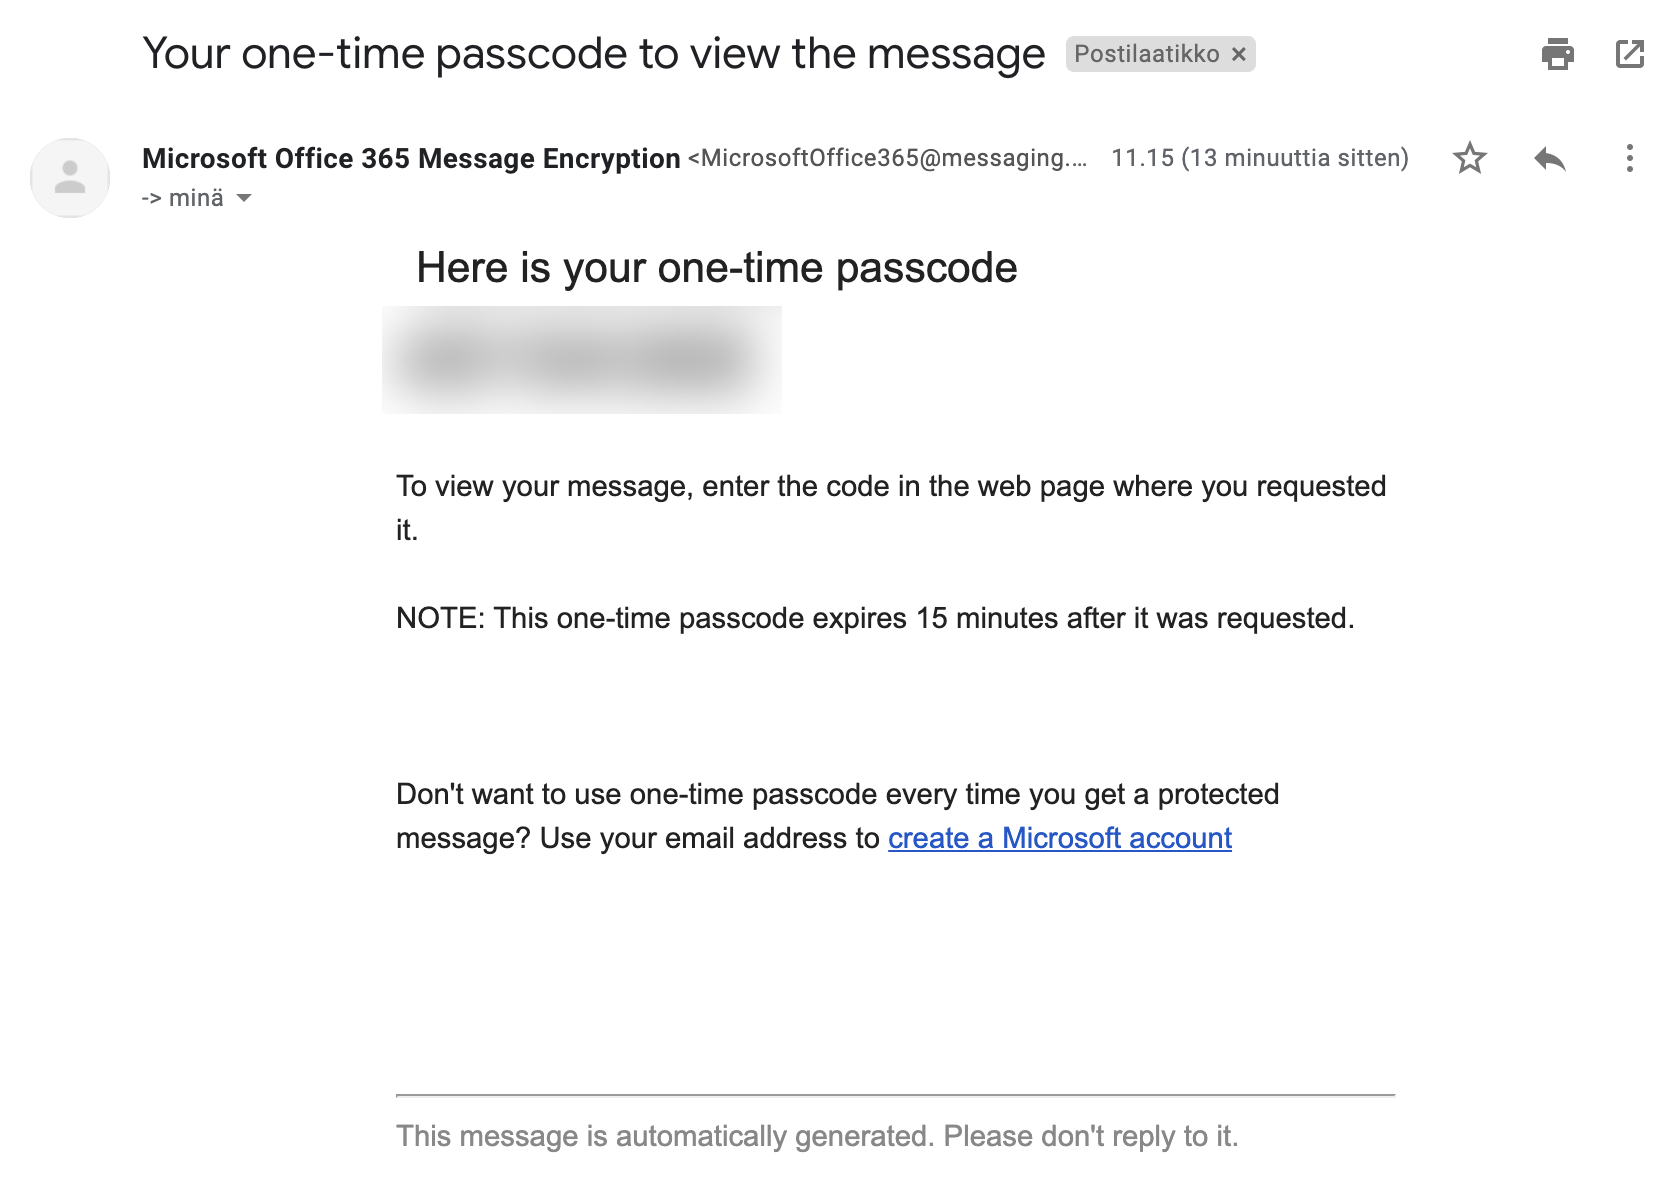
Clicking Read the message opens the following page in your browser (the screenshot has been taken in Gmail and might not be accurate in all e-mail systems).
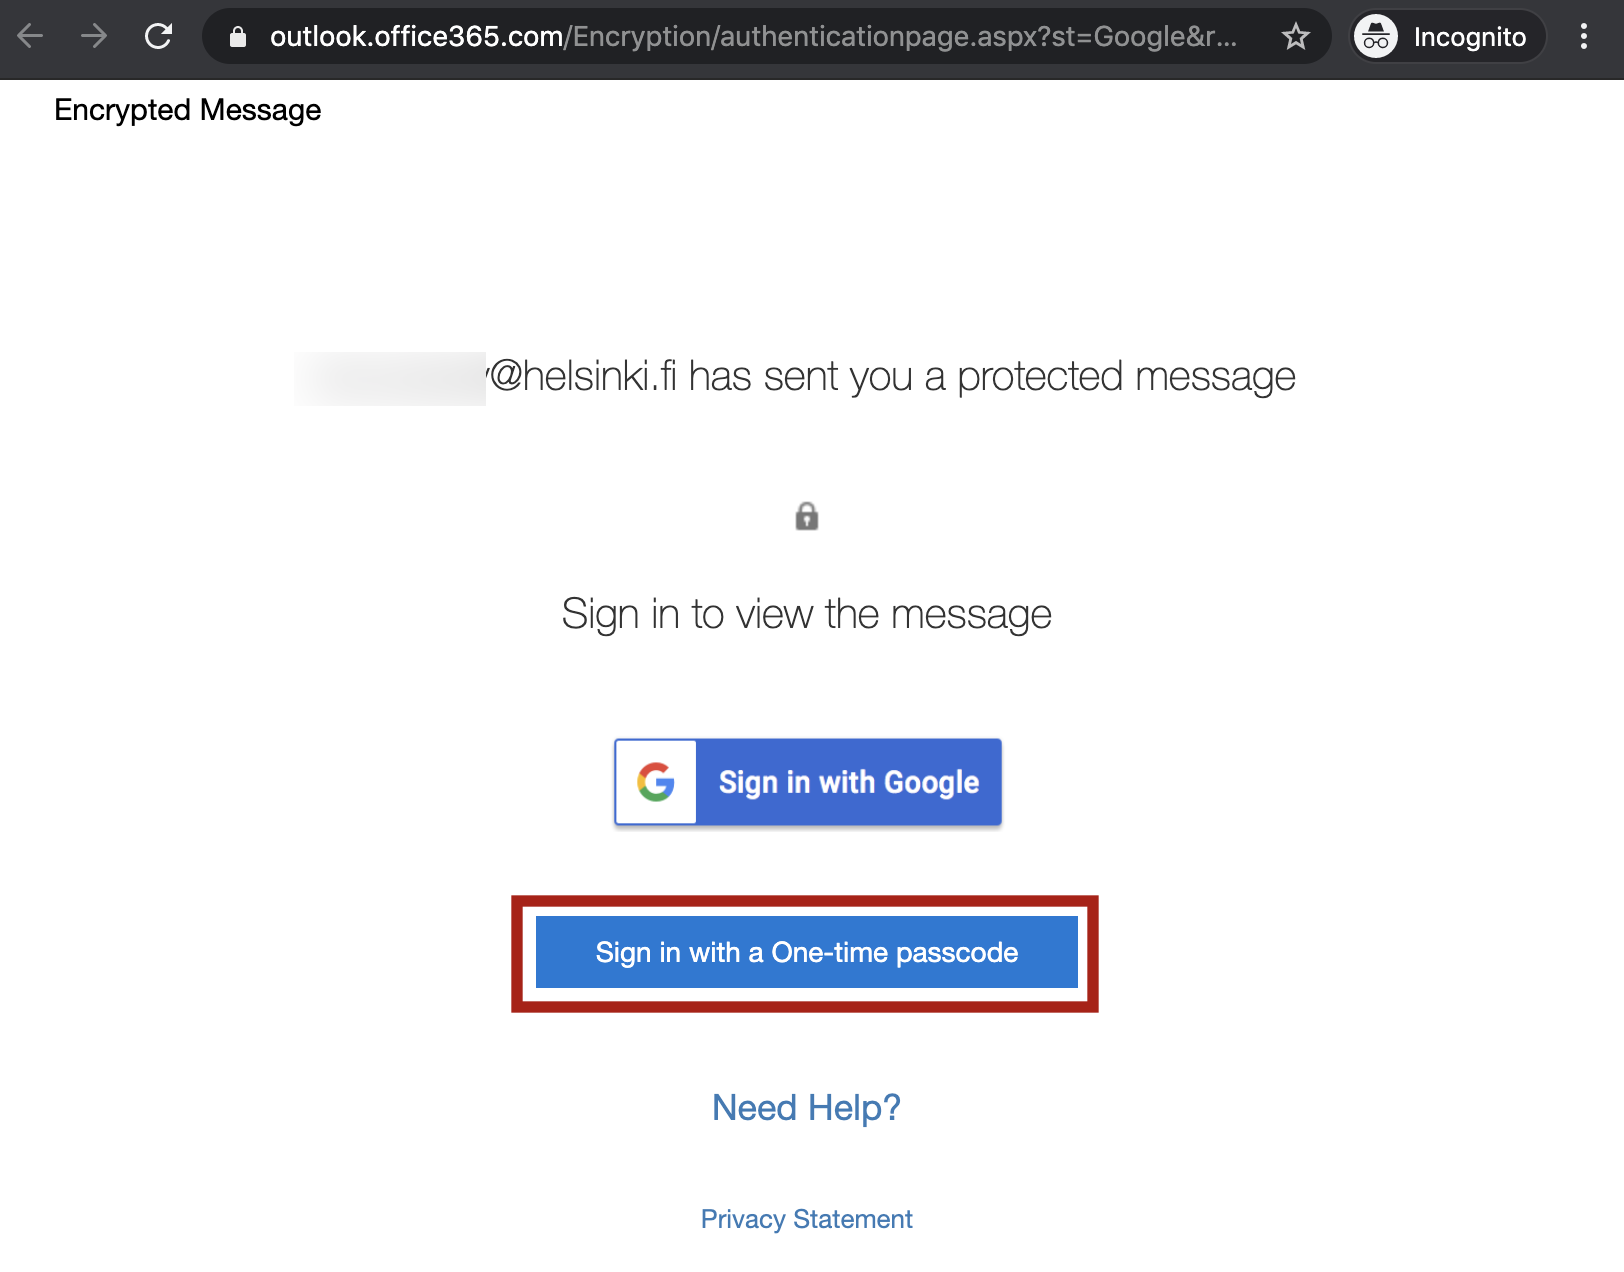
Click Sign in with a One-time passcode.
Make sure that the address is correct: The address will begin outlook.office365.com/encryption
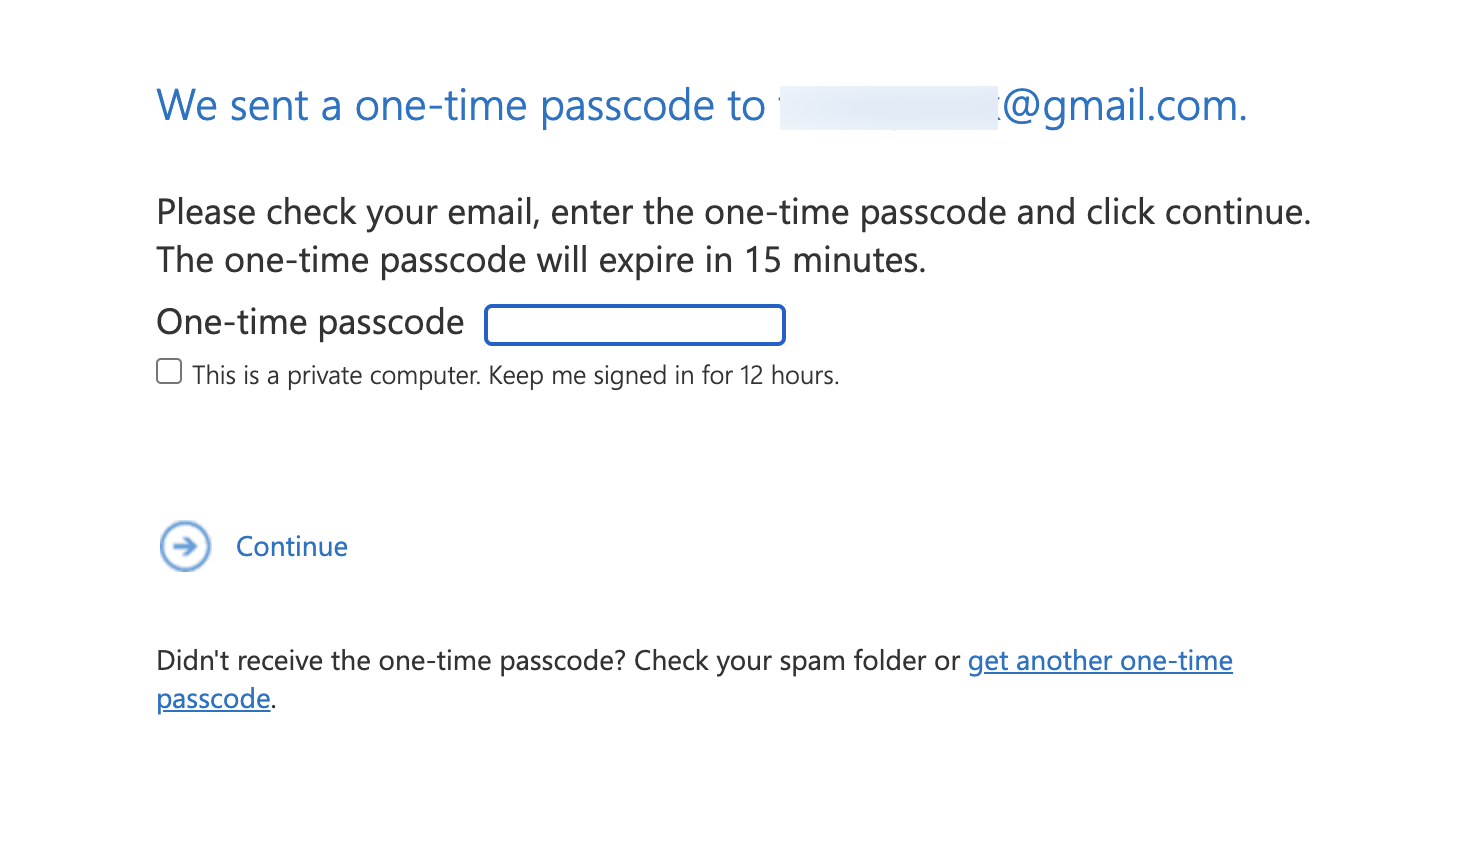
You will be loaded to the following page:
Return to your e-mail where you have received a message with a one-time passcode. If the message does not appear in the Inbox, check your junk mail. The message can be deleted after you have used the code. For security reasons, the code will only function for 15 minutes.
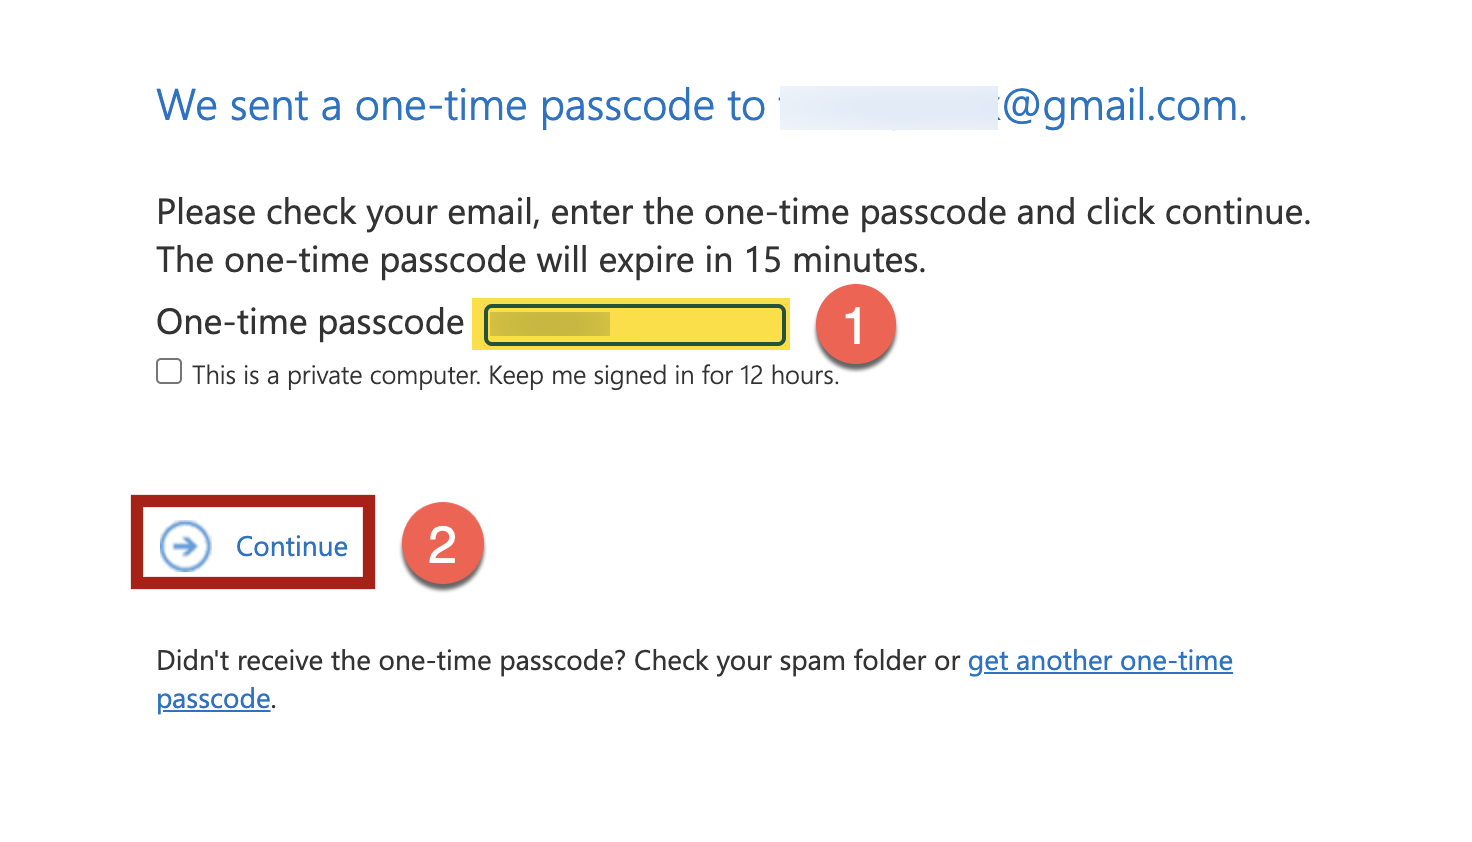
Copy the code and return to your browser. Paste the copied code into the box (1) and click Continue (2).
The message will now open. You can also reply to it by clicking Reply all.
Levels of protection
Encrypt-Only (normal)
The recipient can read, forward, print and copy the content of the message, but cannot remove the encryption. The sender of the message has full rights to the message and all its responses.
No message forwarding
The recipient can read the message, but cannot forward, print or copy the message. The sender of the message has full rights to the message and all its responses.
University of Helsinki - Confidential
The content of this message is only intended for internal (University) use. The content can be edited, but cannot be copied or printed.
- NB! Only for sending messages between University of Helsinki e-mail accounts.
University of Helsinki - Confidential (View Only)
The content of this message is only intended for internal (University) use. The content cannot be edited.
- NB! Only for sending messages between University of Helsinki e-mail accounts.
Video instruction
Give feedback
The instructions site of the University of Helsinki's IT Helpdesk helps you with IT-related issues related to your work. Let us know how we can improve our instructions. We greatly appreciate your feedback!
How would you improve these instructions?
