With PowerPoint Live, you can share a PowerPoint presentation so that the audience can watch the presentation on their own device. Additionally, with PowerPoint Live’s automatic subtitling, the people watching the presentation can read the subtitles in their preferred language.
Whether the automatic subtitles work properly and are linguistically correct depends heavily on the language you use, the subtitle language chosen by those watching and the microphone you use when presenting. For this reason, before you present, please make sure to test that your microphone and program settings have been set up according to this guide. If there are people watching the presentation who use automatic subtitles in a language other than the one you are speaking, it may be a good idea to point out that the automatic subtitles may not be word-for-word accurate.
Quick help
- Move the PowerPoint presentation to the desired folder in OneDrive.
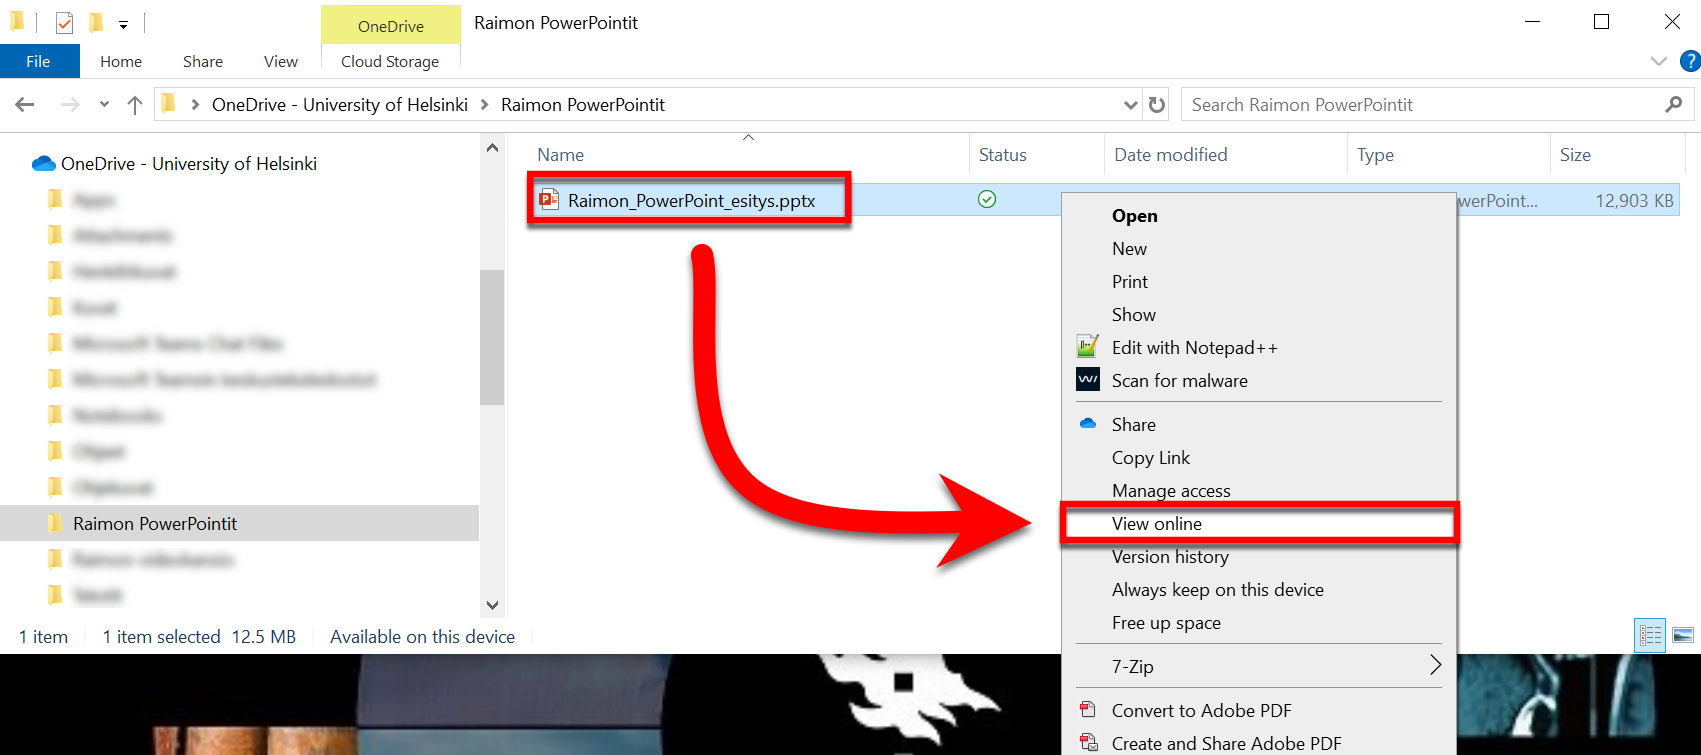
- Click View online to open the uploaded presentation in your browser.
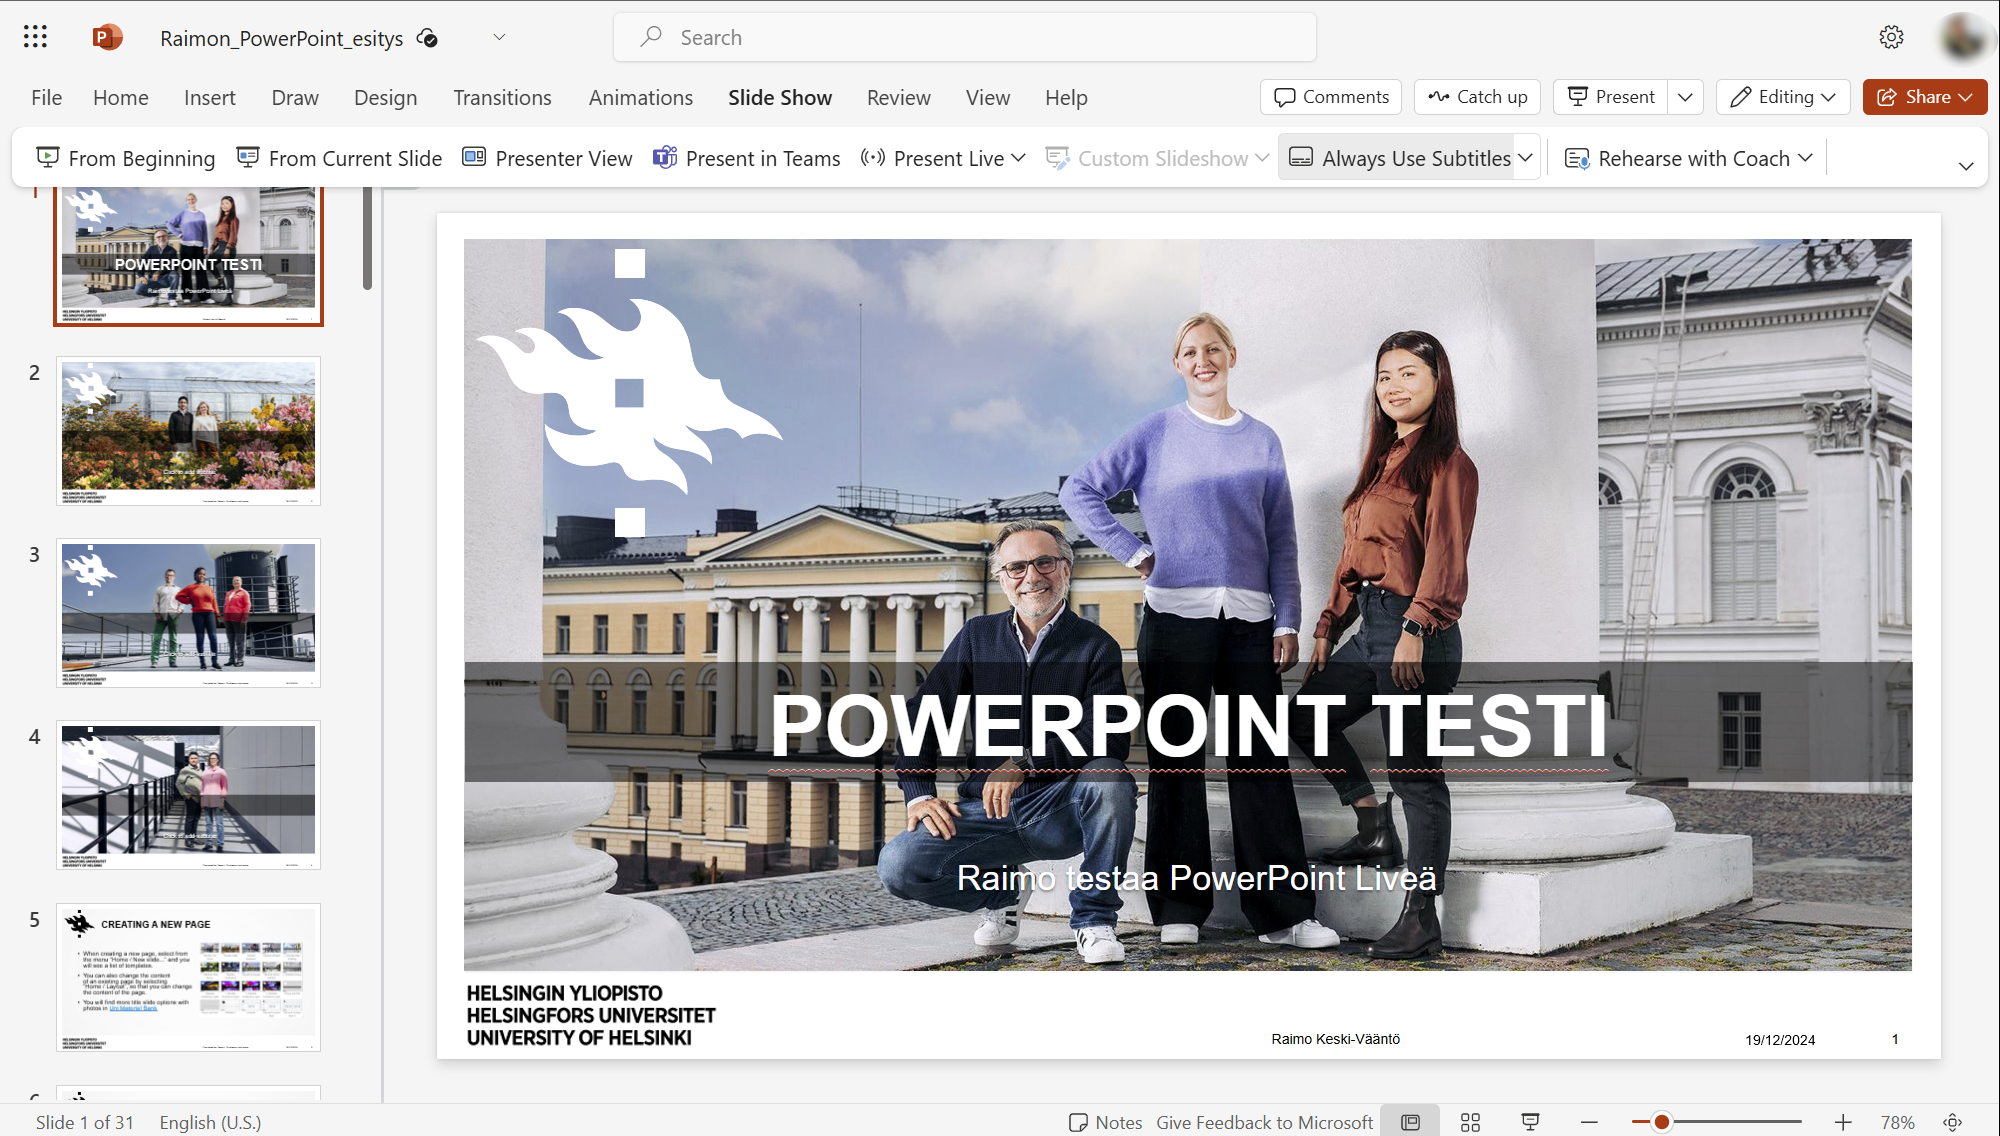
- Adjust the language and sound settings. The settings can be found under Slide Show > Present Live.
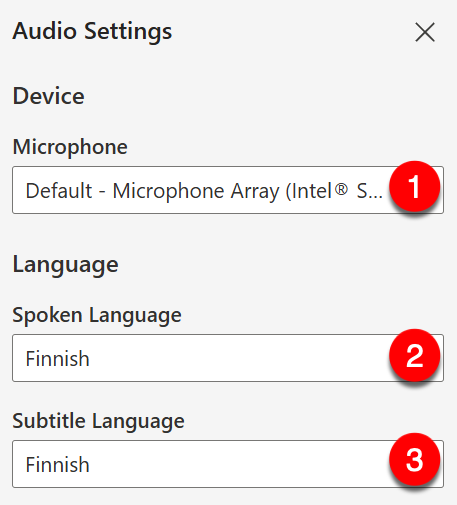
- Click Audio Settings to view the audio and microphone settings for the presentation.
- Select the microphone you will be using during your presentation, the language spoken during your presentation and the subtitle language you yourself will see in PowerPoint Live. Please note that those watching the presentation on their own device can change the subtitle language for themselves on their own device.
- Once you have set up the necessary language and sound settings for your presentation, click Present Live, and PowerPoint Live will start the presentation.
See the Detailed help tab for more detailed illustrated instructions
Detailed help
PowerPoint presentation and automatic subtitles in PowerPoint Live
- Move the PowerPoint presentation you want to share and generate automatic subtitles for in PowerPoint Live to the folder of your choice in OneDrive. Open the folder in Windows Explorer, (1) locate the PowerPoint file and right-click on it. In the menu that opens, (2) select View online, and the presentation will automatically open in the browser version of PowerPoint.
You can also open PowerPoint presentations by using OneDrive in your browser. In this case, find the presentation in OneDrive, (1) click the ... icon after its name, select Open and (2) click Open in browser. Continue following these instructions.
- Your PowerPoint presentation will now open in the browser version of PowerPoint.
- You can find the features of the PowerPoint Live presentation (1) by clicking Slide Show. By clicking on the down arrow of the Present Live button, you can select whether (2) Anyone or only users logged in to the University of Helsinki’s M365 services (Only people in your organisation) can watch your presentation. By default, we recommend selecting Anyone. Click (3) Audio Settings to display the audio and microphone settings for the presentation.
- From the sound settings menu that opens, (1) select the microphone you will be using during your presentation, (2) the language spoken during your presentation and (3) the PowerPoint Live subtitle language you yourself will see in PowerPoint Live. Please note that those watching the presentation on their own device can change the subtitle language for themselves on their own device.
The microphone you use and its settings have a significant impact on the quality of the automatic subtitles. So, please make sure that the microphone you are using picks up your voice loudly and clearly enough by checking the Windows sound settings. The more background noise your microphone picks up, the more inaccurate the subtitles will be. For this reason, it is strongly recommended to use a high-quality headset microphone when the automatic subtitling function is activated, instead of the laptop’s internal microphone, for example!
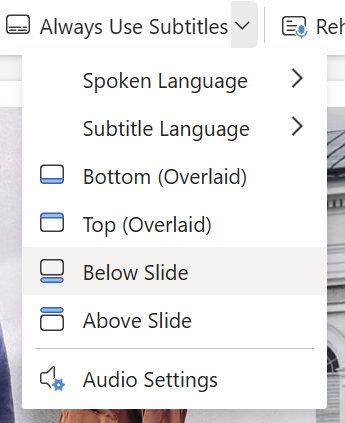
- Under Always Use Subtitles, you can also select the spoken language and the language for automatic subtitling and access the audio settings described above. In addition, when viewing the slide in presentation mode, you can choose whether you can see the open automatic subtitling transcription at the top (Top (Overlaid)) or at the bottom (Bottom (Overlaid)) of the slide or below (Below Slide) or above (Above Slide) the slide.
- Once you have set up the necessary language and sound settings for your presentation, click Present Live, and PowerPoint Live will start the presentation.
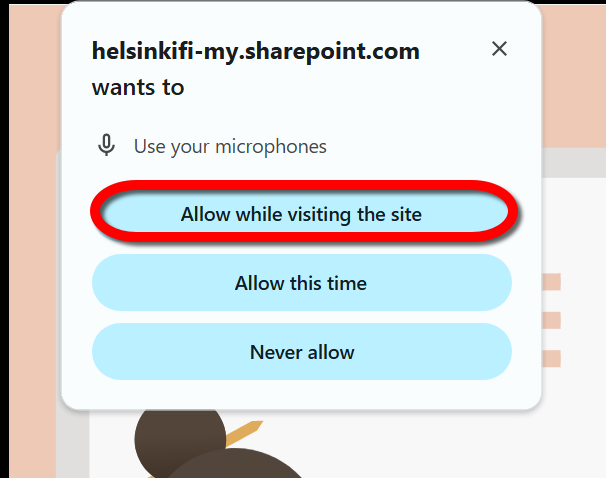
The first time you launch a PowerPoint Live presentation on your device, your browser will ask for permission to use your device’s microphone. Select the option Allow while visiting this site to give PowerPoint Live the right to always use your device’s microphone. Your device may ask for this permission again after you have updated your device, changed your browser or used a different microphone. Always give PowerPoint Live this permission. Otherwise, automatic subtitling will not work.
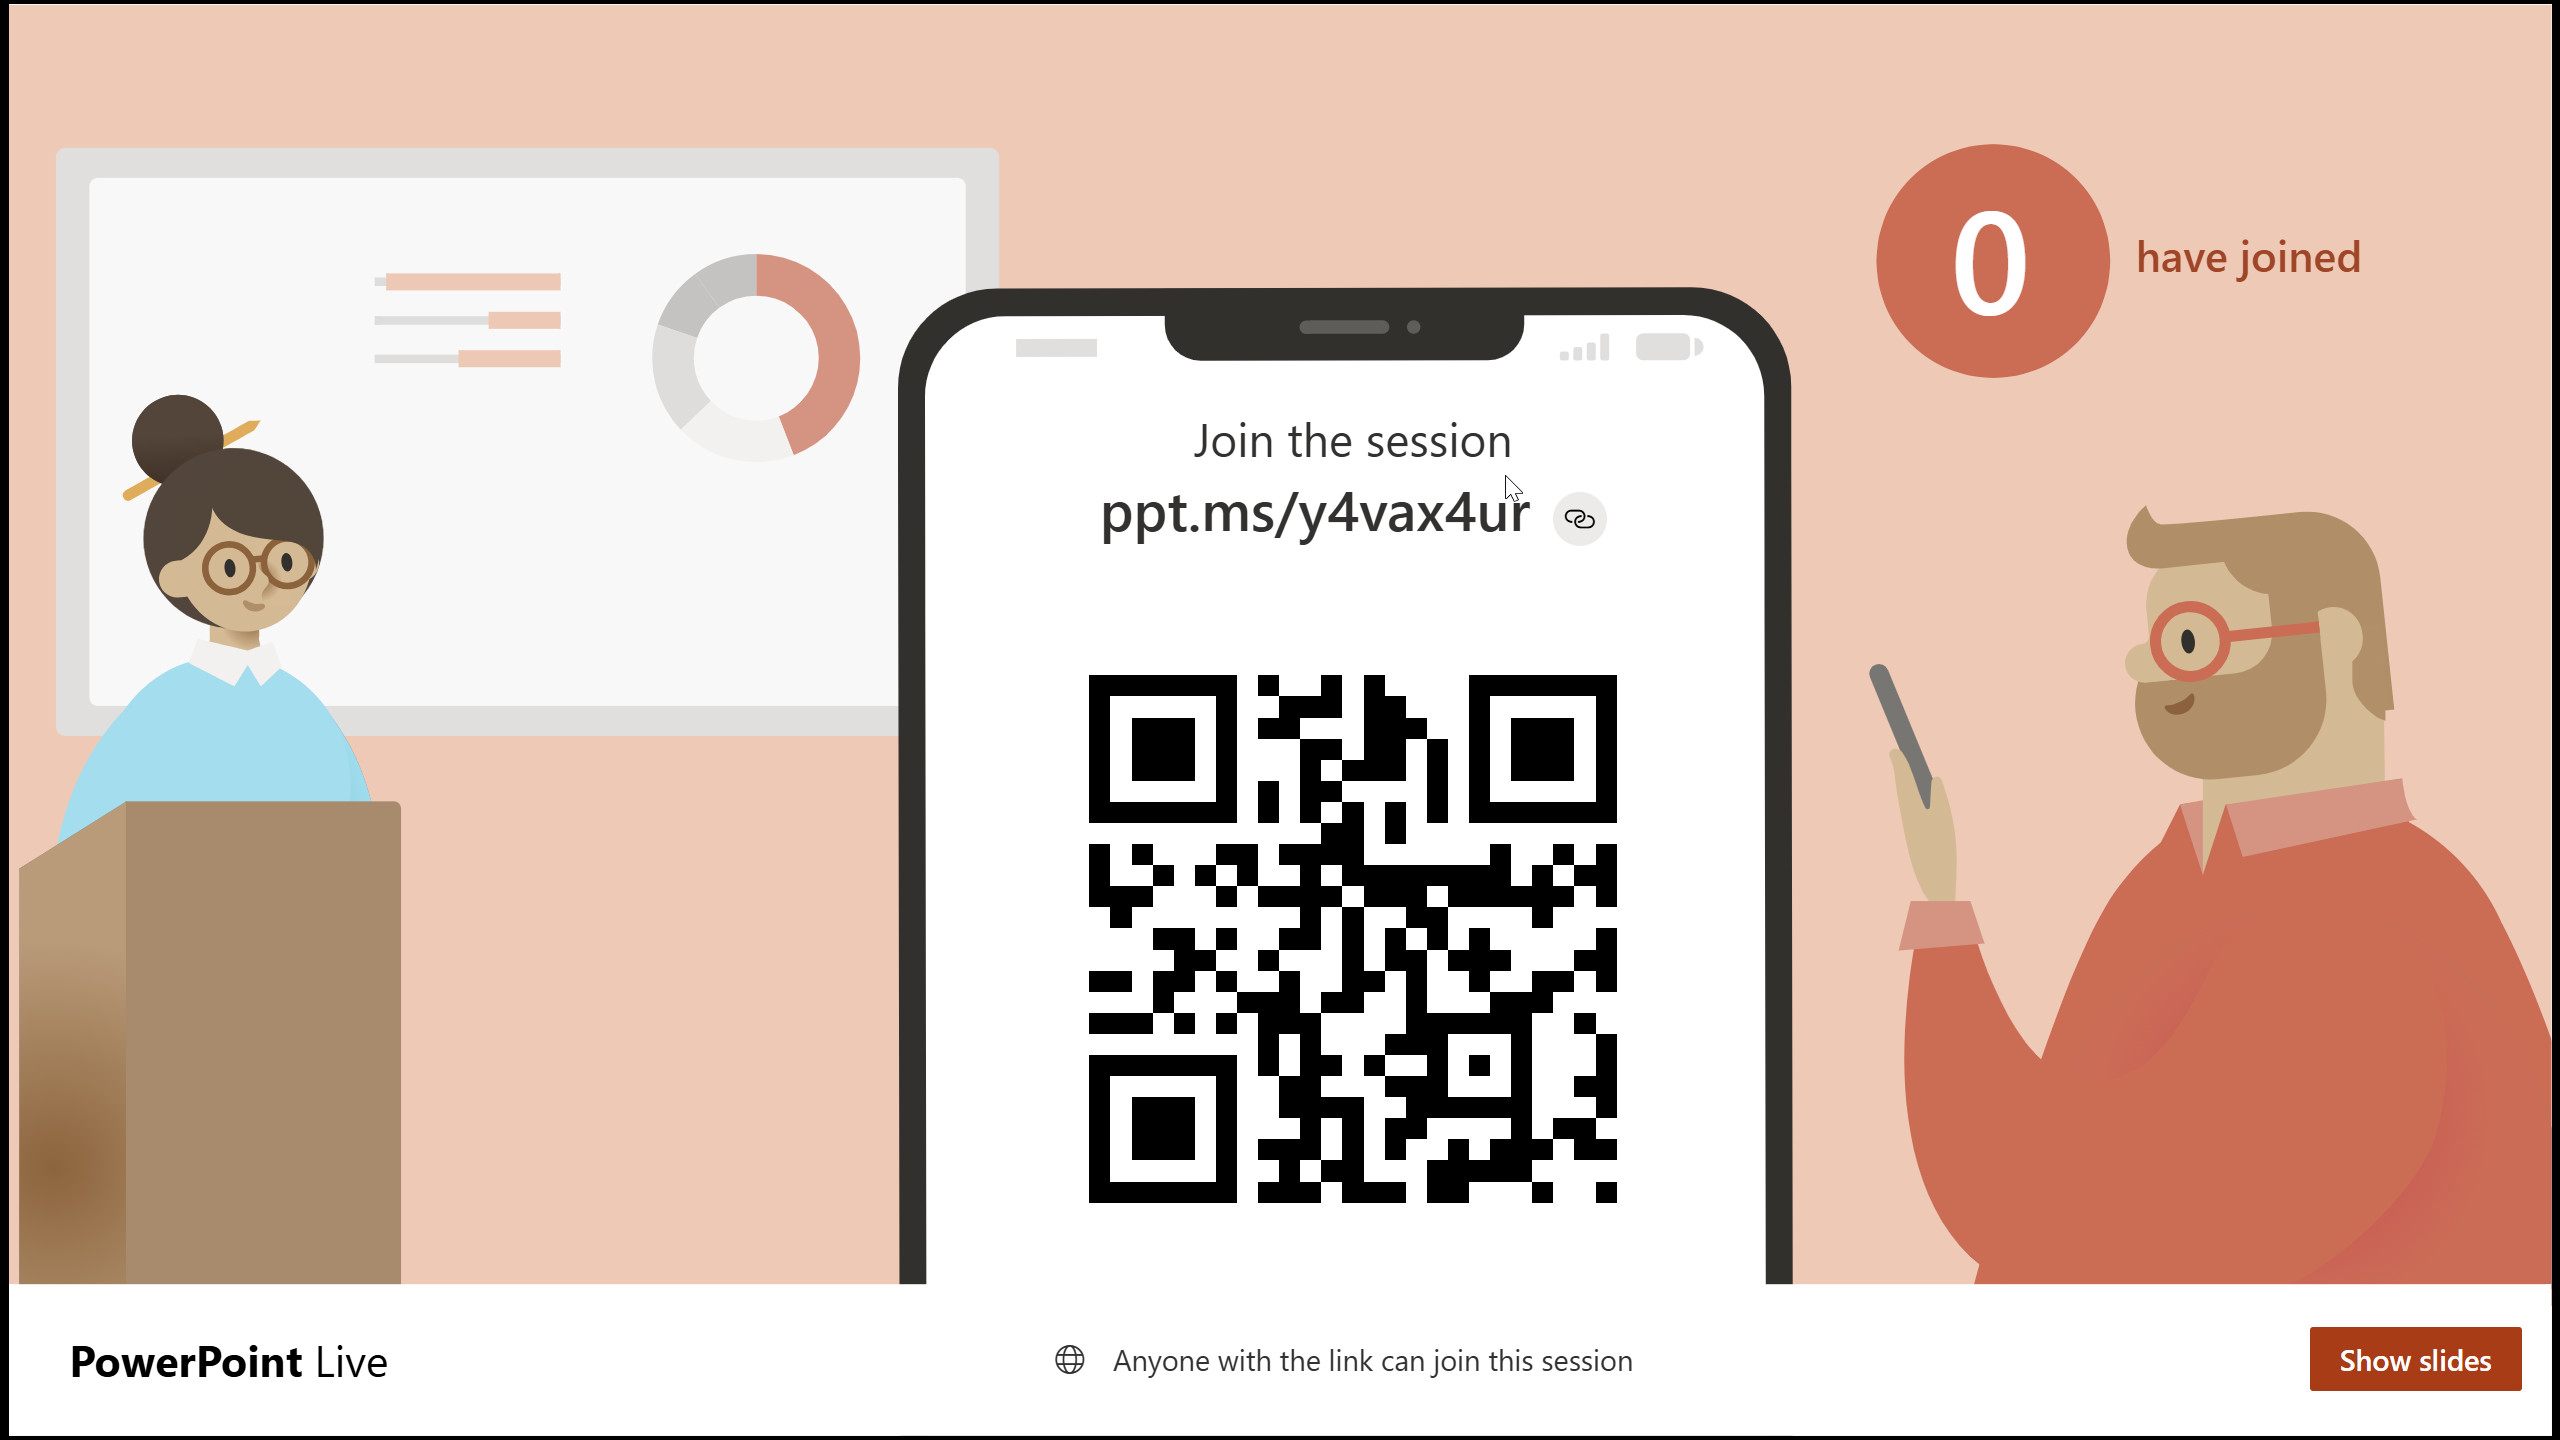
- The live presentation has now started and PowerPoint Live will generate a QR code and link at the beginning of the presentation through which the audience can start watching your presentation. There, you can also see how many viewers have joined your presentation (X have joined). To enter presentation mode, where you can see your own slides and automatic subtitles in your selected language, click Show slides.
- In presentation mode, you can see the current slide as the audience sees it real time as well as the automatic subtitles in the language of your choice in the selected position (in the example image, below the slide (Below Slide)).
- Click on the image to open the tool menu, where you can pause the presentation, for example.
Watching a presentation on your own device
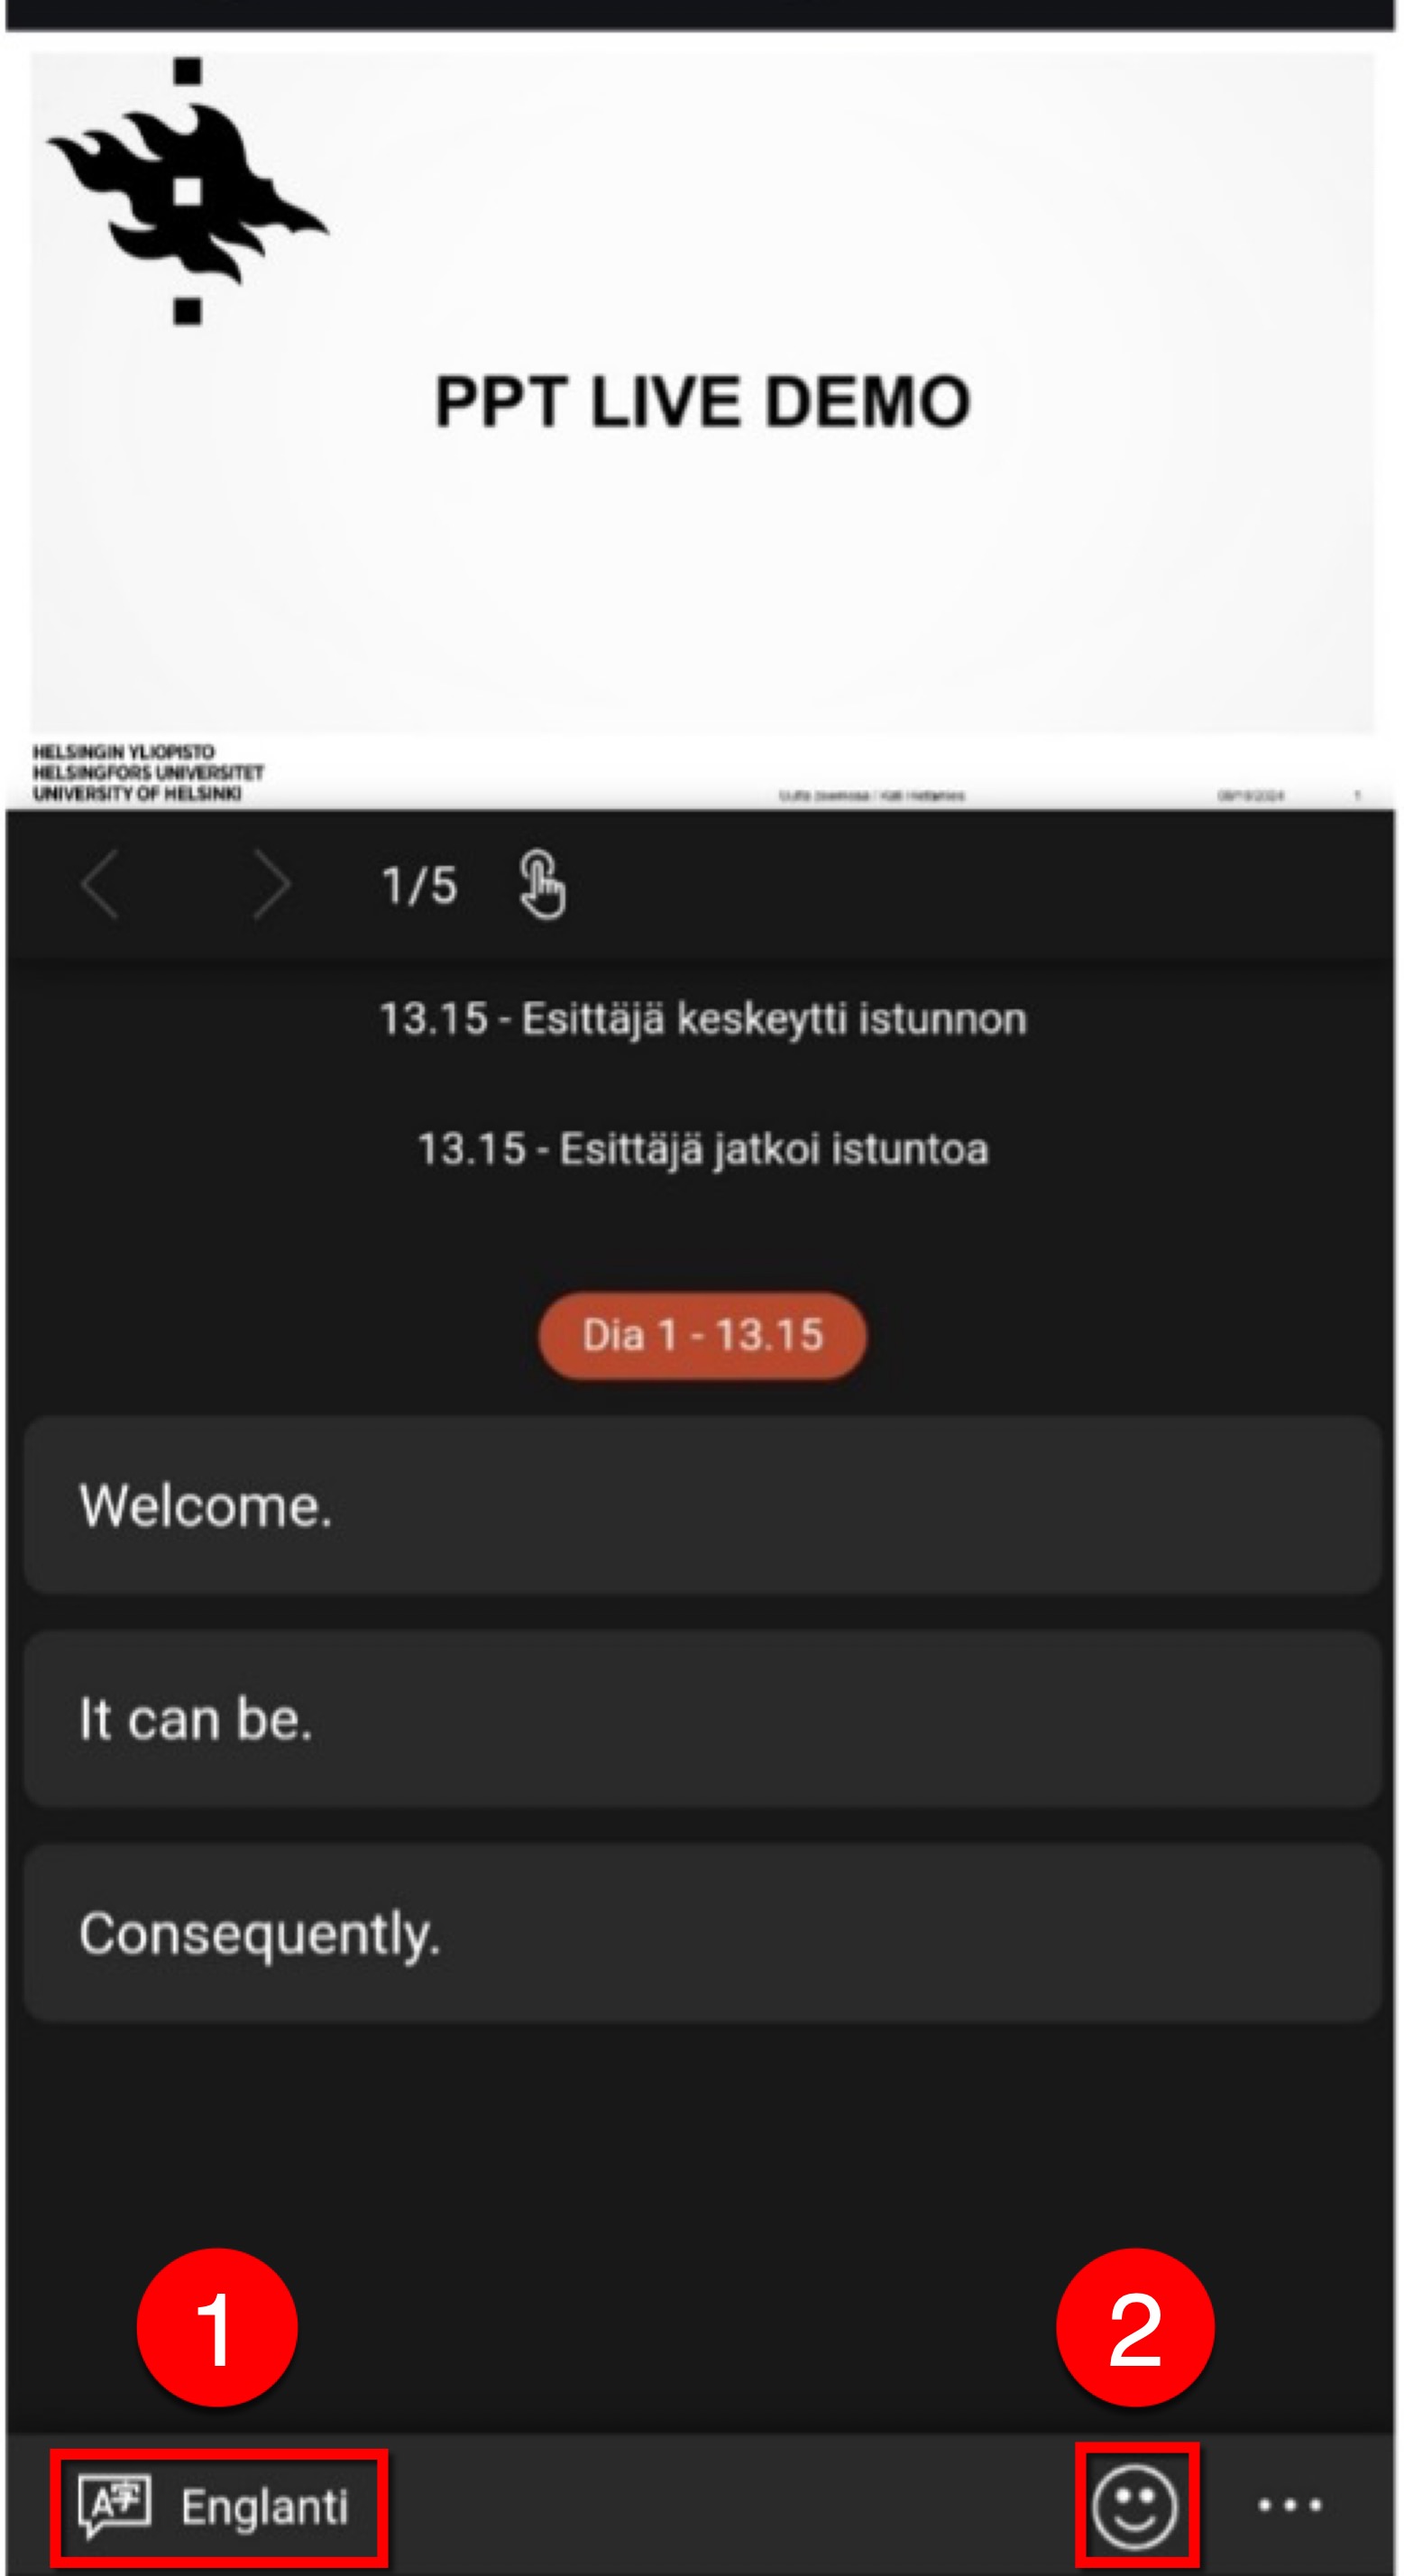
- To open the presentation, scan the QR code provided by the presenter on your device or type the link on your device. A page will open where you can see the presentation slides, the presentation status and the automatic subtitles. You can (1) select the language in which you want the subtitles to show on your own screen and (2) react to the presentation with emojis in real time during the presentation.
Video instruction
Give feedback
The instructions site of the University of Helsinki's IT Helpdesk helps you with IT-related issues related to your work. Let us know how we can improve our instructions. We greatly appreciate your feedback!
How would you improve these instructions?
