
These instructions describe how a user can independently deploy an Android mobile device that is covered by the centralised administration of the University of Helsinki. The texts shown on screen vary depending on the device and manufacturer and may therefore differ from the examples. However, the process is the same in the deployment of all Android devices. Follow the instructions on screen and read the manufacturer’s instructions if necessary. These instructions cover the most important steps of the process.
Deployment takes around 45–60 minutes, depending on the network connection used and the number of applications to be installed. Selections must be made during deployment, and waiting for several minutes may result in the process being aborted and needing to be restarted. Therefore, please allow sufficient time for the deployment of the new device.
Remember to adjust Microsoft Defender on your phone according to these instructions after finishing the deployment.
Quick help
- Make sure that the device has sufficient charge.
- Insert the SIM card into the card slot of the device. If the device has more than one card slot, insert the SIM card for your mobile subscription for work into the device’s SIM card slot 1. If you need instructions on how to install the SIM card, please check the device-specific instructions provided by the manufacturer of the device.
- If you also want to use the SIM card for your personal mobile subscription on the phone, you can install it in SIM card slot 2 if your mobile device has two SIM card slots.
- Turn on the device and enter the PIN code for the SIM card for your mobile subscription for work to start the automatic deployment process for the device.
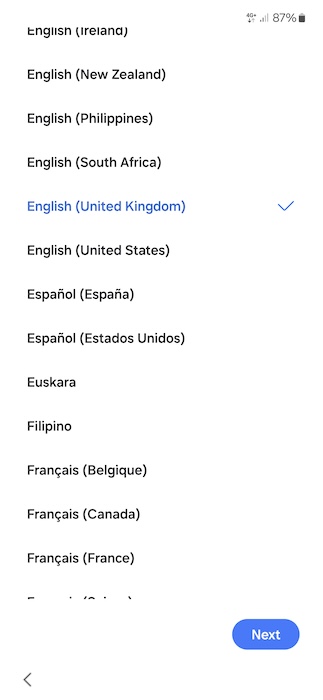
- Select Start to begin the deployment process. Select the language for the installation and the operating system. Click Next to continue.
- In the deployment process, you will be asked for permission to use mobile data or to select a Wi-Fi network. We recommend that you use mobile data for deployment by selecting Skip/Continue.
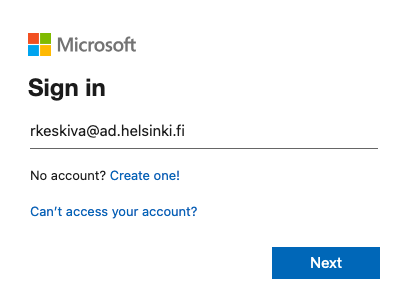
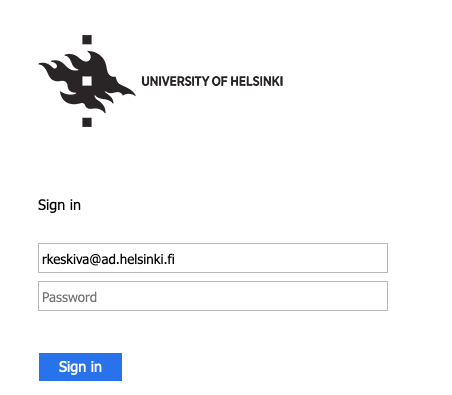
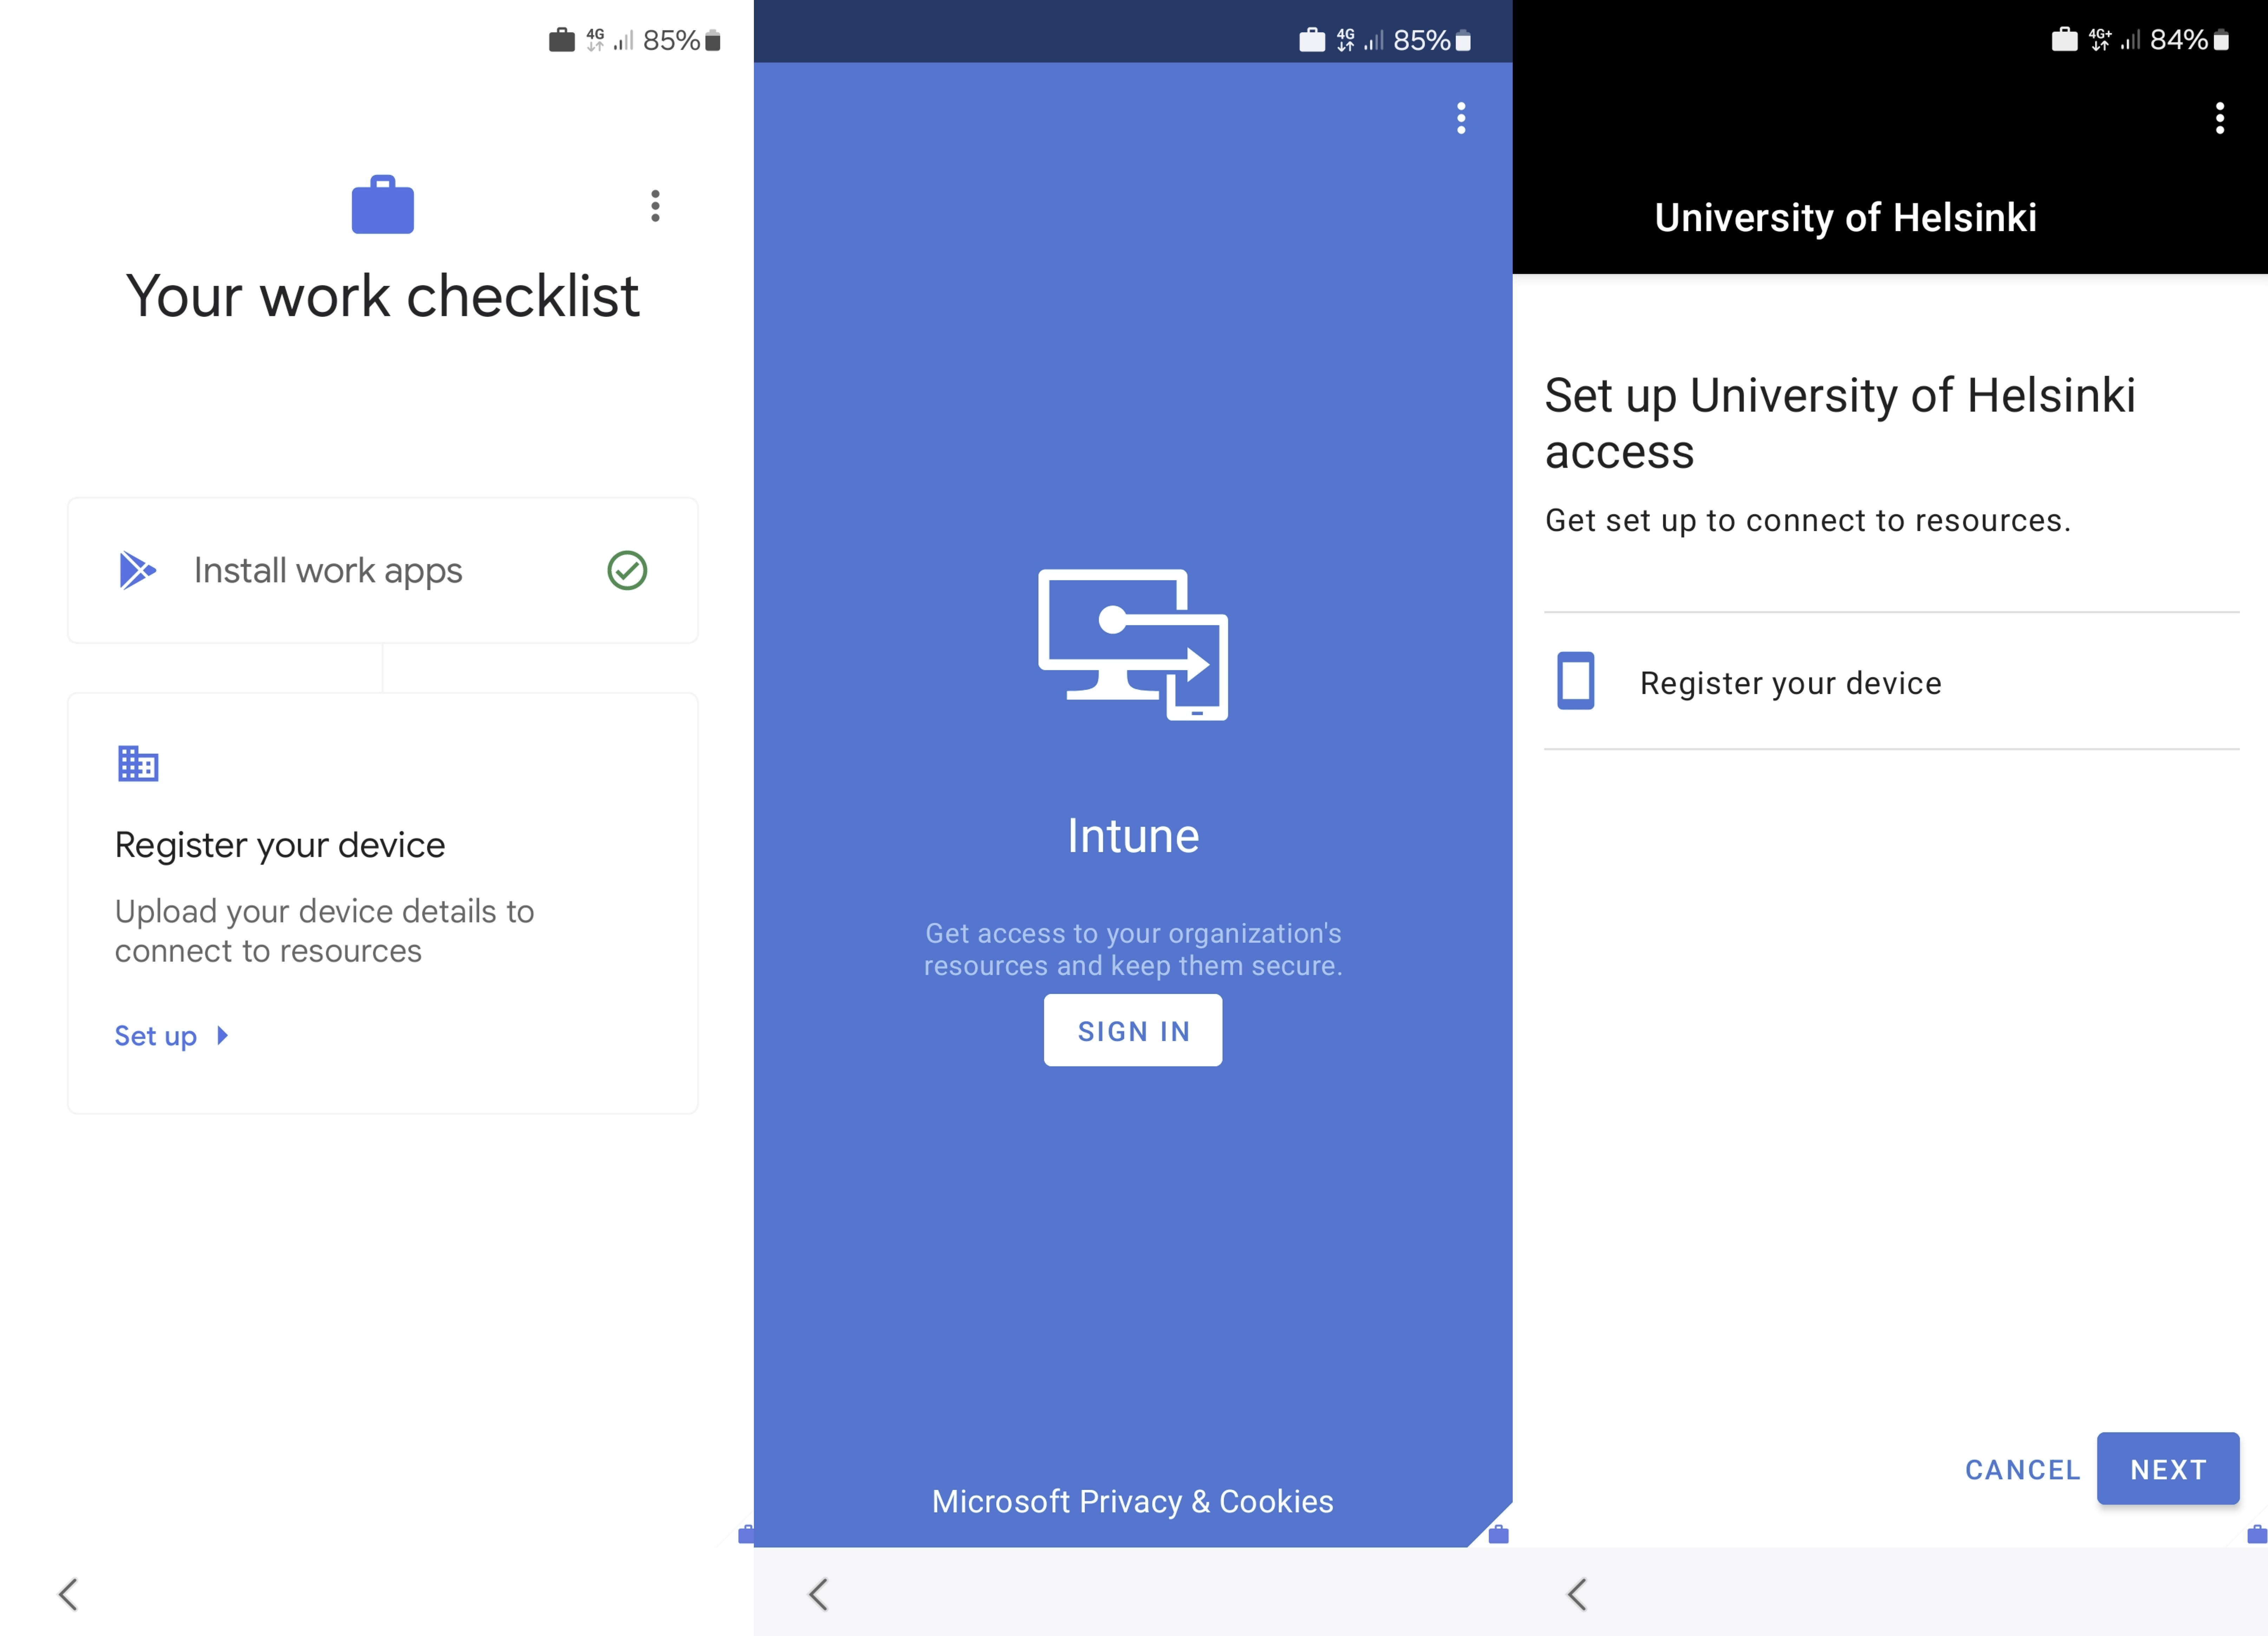
- During installation, a work profile is defined on the device and the connection between the user and the device is registered. Your work profile is connected to the device using the Microsoft 365 username format, which is username@ad.helsinki.fi (e.g. rkeskiva@ad.helsinki.fi). After this, select Next. Next, you will be taken to the University of Helsinki login page. Re-enter your username in the same format and select Sign in.
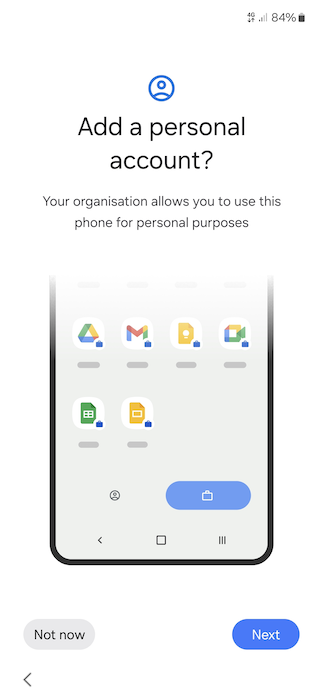
- A personal Google account can also be added to the phone during deployment. If you do not want to add a personal account to your phone, select Skip.
- Select PIN code as the screen lock method. Set an 8-digit PIN code for your device. You cannot use the same number consecutively.
Only you will know the eight-digit PIN code you have set for your device. The administrator will not be able to restore your phone if you don't remember your code. For this reason, be sure to not forget the code because otherwise the only way to use the phone again is to reset the phone to the factory settings.
- In the last step of the work account deployment, the device is registered and connected to the server. Select Register your device -> Set up. On the next screen, select Log in. Login uses the format username@ad.helsinki.fi. Click Log in again.
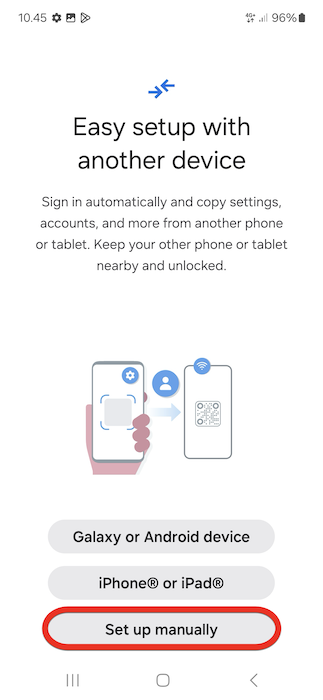
- The deployment process offers the opportunity to manually configure your phone’s settings, i.e. do everything from scratch or copy settings and accounts from another Android or iOS device, for example. When this is offered during the process, select Set up manually if you do not want to import settings from your old phone. If you want to import settings from your old device, follow the instructions on the device. A separate device manufacturer-specific application is used for the transfer.
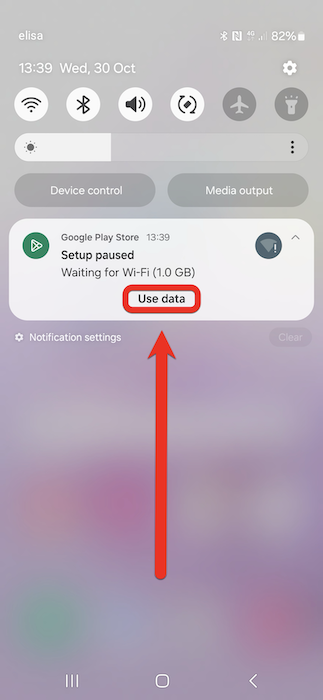
- When deploying using mobile data, you will need to separately allow programs to download using mobile data to complete the device deployment (or connect the phone to a Wi-Fi network):
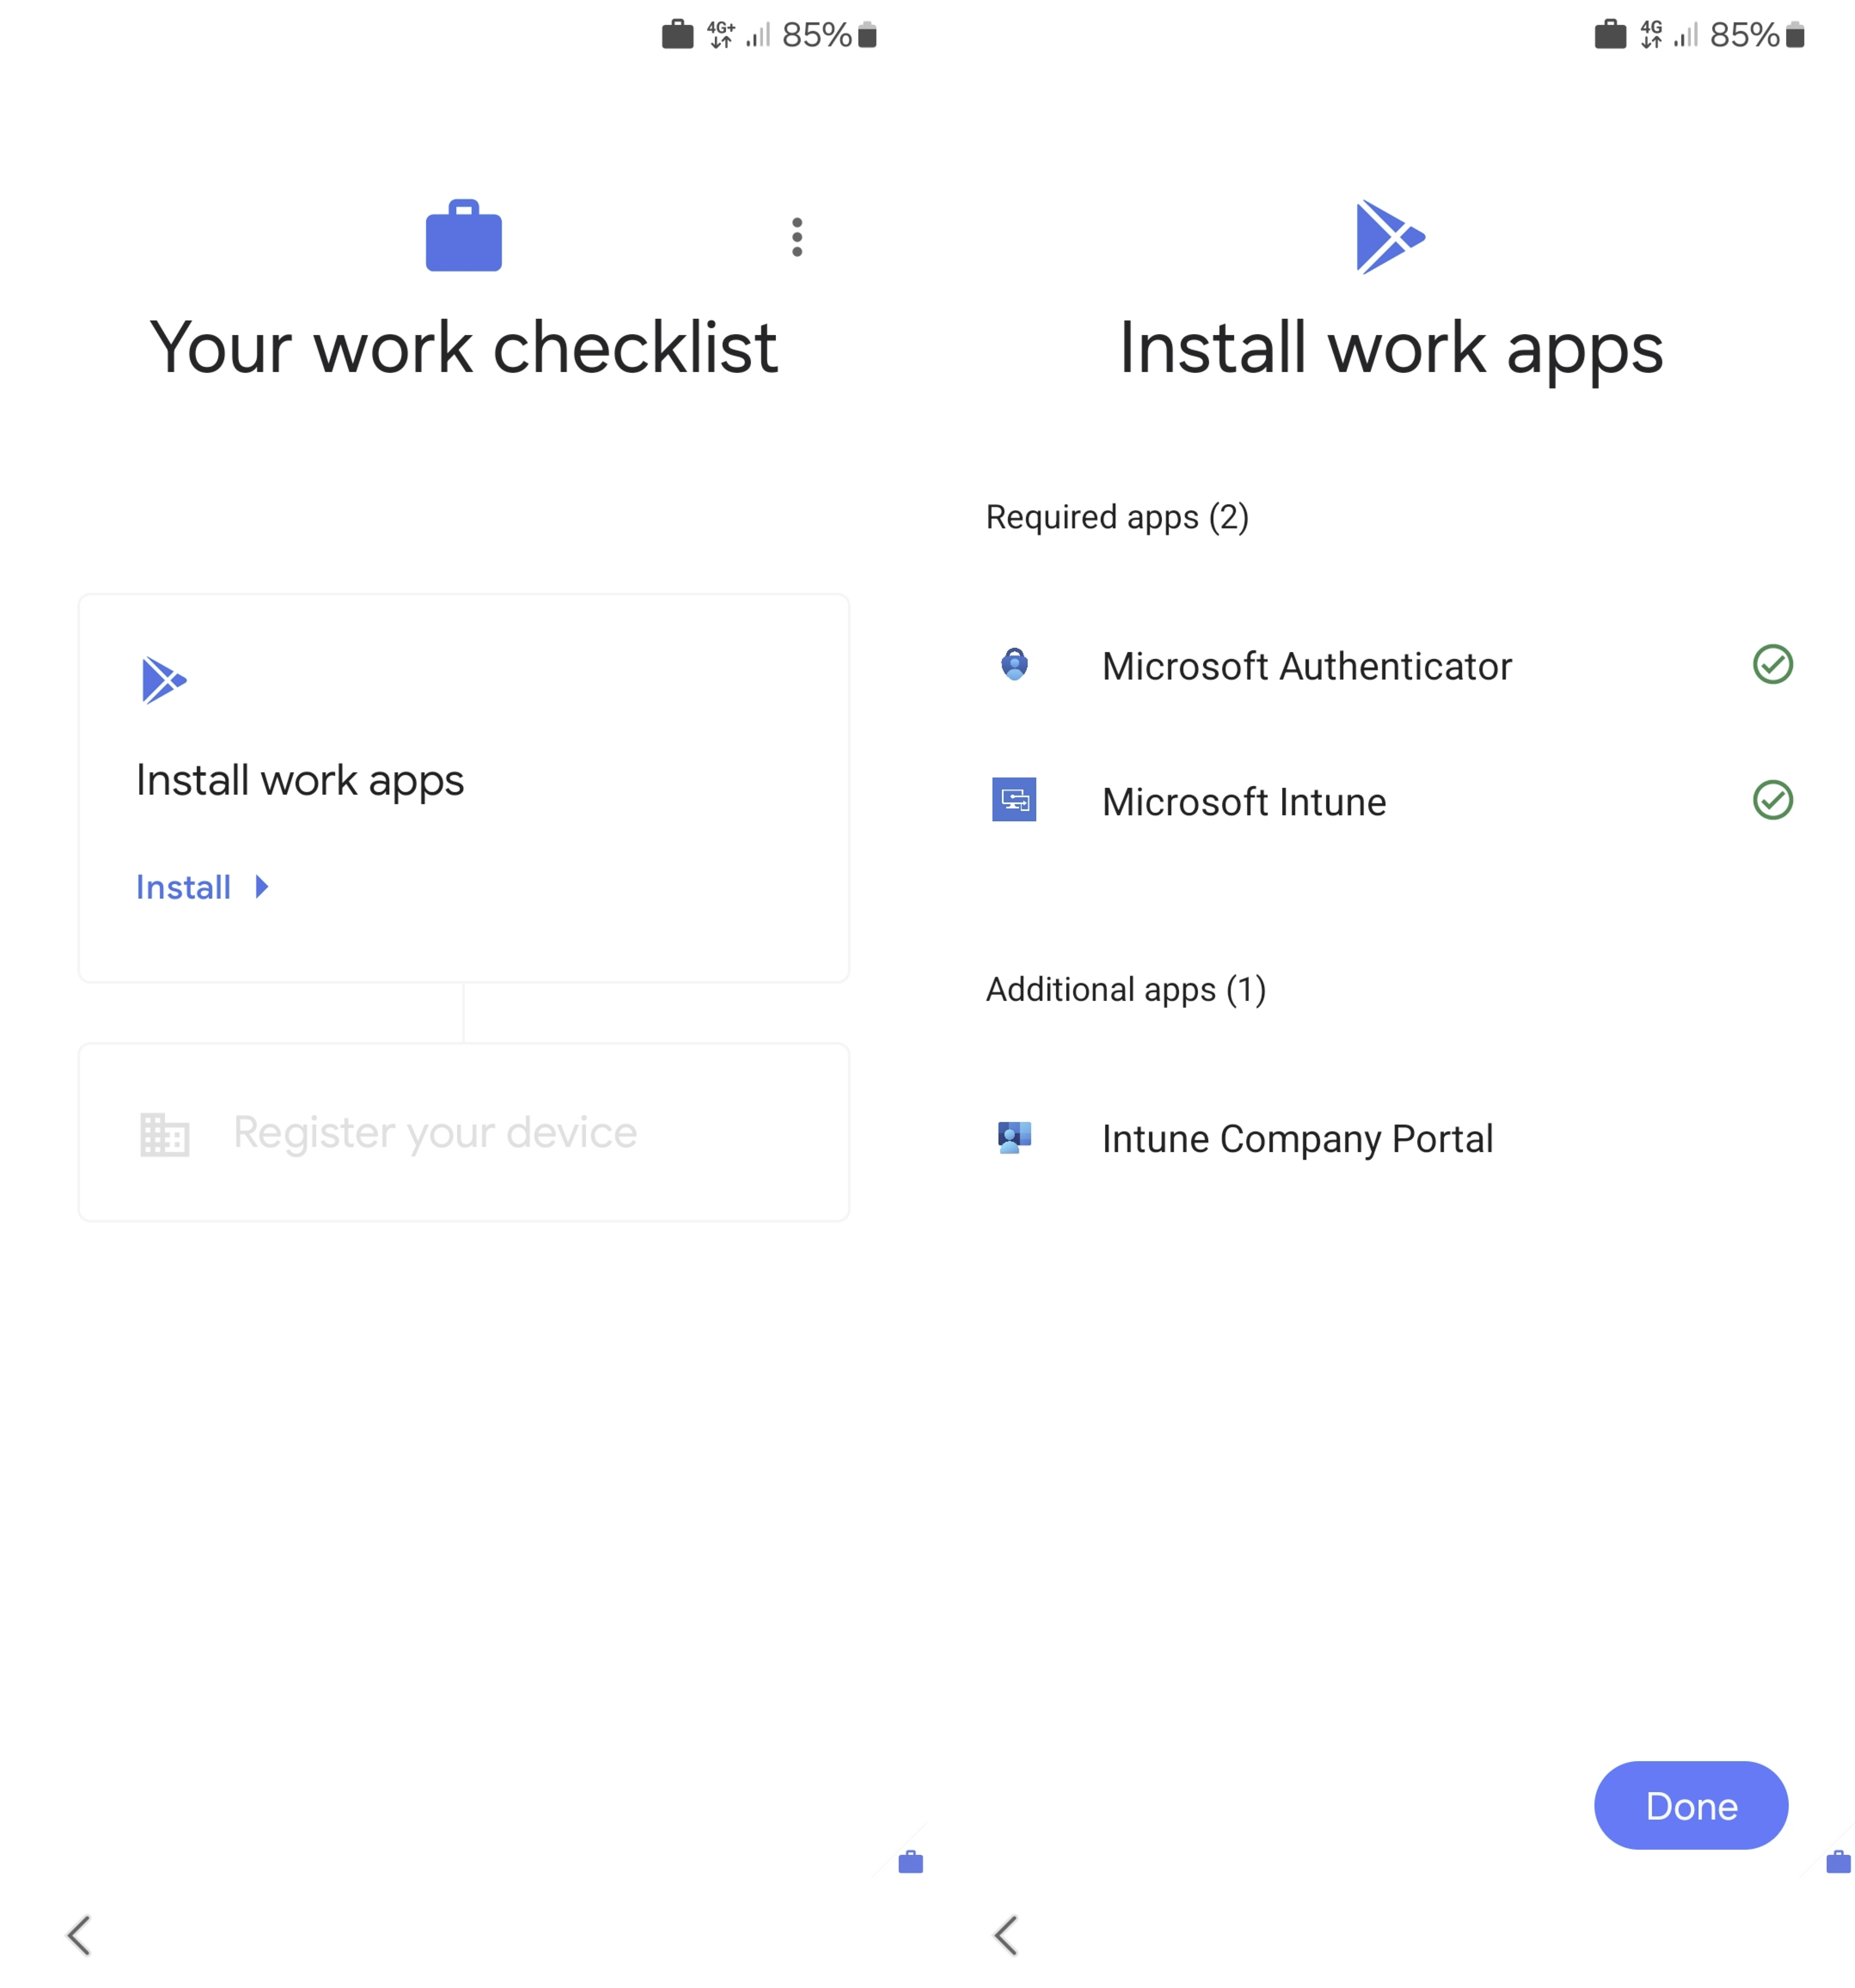
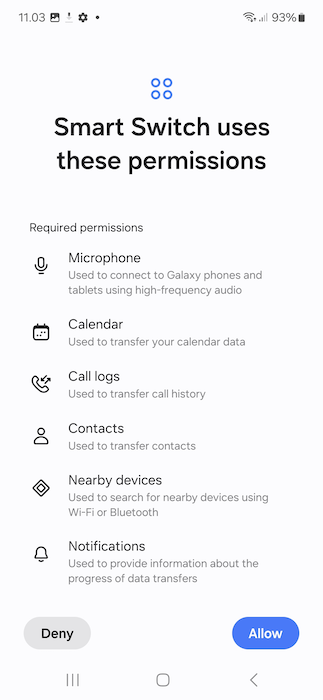
- After installation, the device’s application view has separate folders for personal and work applications. The work applications are distinguished by the small portfolio image in the lower right-hand corner of the application icon. The profiles are completely separate entities with different memory spaces. Their data and applications are separate and isolated from each other (e.g. contacts, call history, calendar, files). The work profile applications are installed using the University of Helsinki’s Google Play username, while the personal profile applications are installed via the user’s Google username. The same application can be installed on both profiles. In this case, they must be enabled separately and logged in to with the correct user account if the application requires login. When the application starts up, you need to select which profile the application is used on.
- Adjust Microsoft Defender on your phone according to these instructions after finishing the deployment.
Detailed help
Deployment of an Android mobile device
- Make sure that the device has sufficient charge.
- Insert the SIM card into the card slot of the device. If the device has more than one card slot, insert the card for your mobile subscription for work into the device’s SIM card slot 1. If you need instructions on how to install the SIM card, please check the device-specific instructions provided by the manufacturer with your device. Read more about using two SIM cards here.
The deployment process offers the opportunity to manually configure your phone’s settings, i.e. do everything from scratch or copy settings and accounts from another Android or iOS device, for example. When this is offered during the process, select Set up manually if you do not want to import settings from your old phone. If you want to import settings from your old device, read this and follow the instructions on your devices. A separate device manufacturer-specific application is used for the transfer.
A work account will be configured for your phone during deployment. You can also optionally add your personal account to the phone. The reason for separating the work account from the personal account on the phone is to keep both your employer’s information and your personal information safe by setting up the accounts separately. If you want to add your personal account, select Next on your phone when prompted. Instead, if you do not want to add your personal account, select Not now in this screen. Follow the instructions on the phone.
- Switch on the device and wait until the device asks for the SIM card’s PIN code. Turn on the device and enter the PIN code for your SIM card to start the automatic deployment process for the device.
- Select Start to begin the deployment process. At this stage, the language on screen does not yet matter, as the actual language selection is only made on the next screen.
- Next, select the language for the installation and the operating system. Click Next to continue.
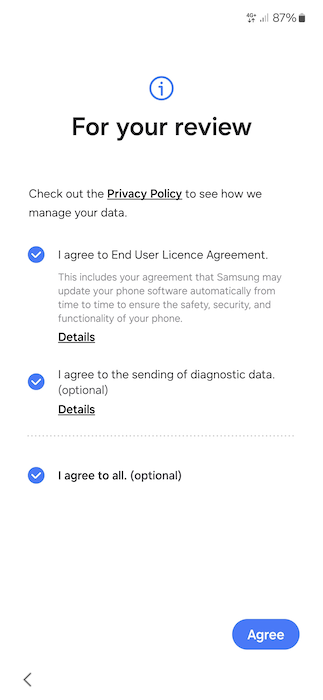
- After this, you will be asked to accept the mobile device use agreement and, if you wish, to give your consent to the transfer of diagnostic data. Finally, select Agree.
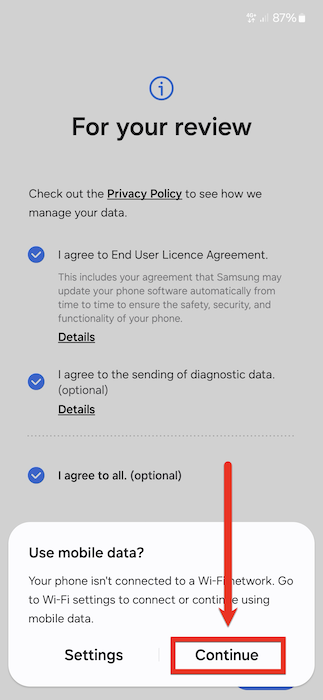
- Next, you will be asked to select a Wi-Fi or mobile data connection for the deployment process. In the mobile management deployment testing, it was found that the process is fastest and most reliable over a mobile data connection. For this reason, in these instructions, the installation is carried out over a mobile data connection, so select Continue next.
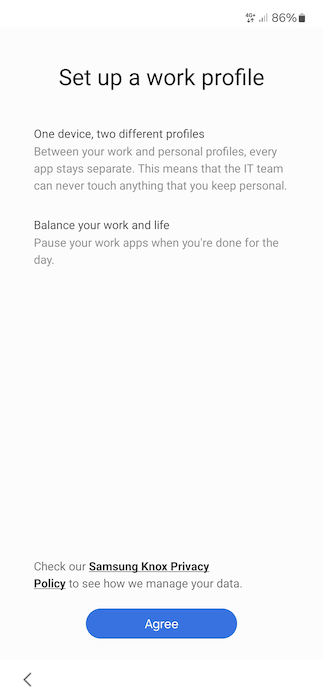
- During installation, a work profile is defined on the device and the connection between the user and the device is registered. The work profile utilises the device manufacturer’s security features. In Samsung phone installation as per the example, at the beginning of the work profile setup, the device will ask you to accept the Samsung Knox privacy policy. Select Agree to continue with the job profile setup.
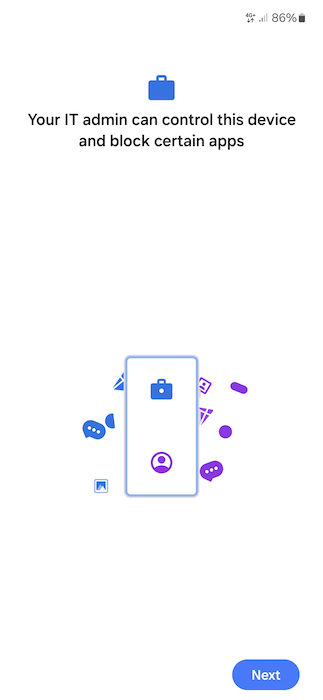
- The device will then indicate that it and its applications are under centralised management. Select Next and Continue.
- Your work profile is connected to the device using the Microsoft 365 username format, which is username@ad.helsinki.fi (e.g. rkeskiva@ad.helsinki.fi.) After this, select Next. You will then be taken to the University of Helsinki’s login page. Re-enter your username in the same format and select Sign in.
- Next, you will need to set the screen lock method. Select Set up. In the next screen, select PIN as the locking method.
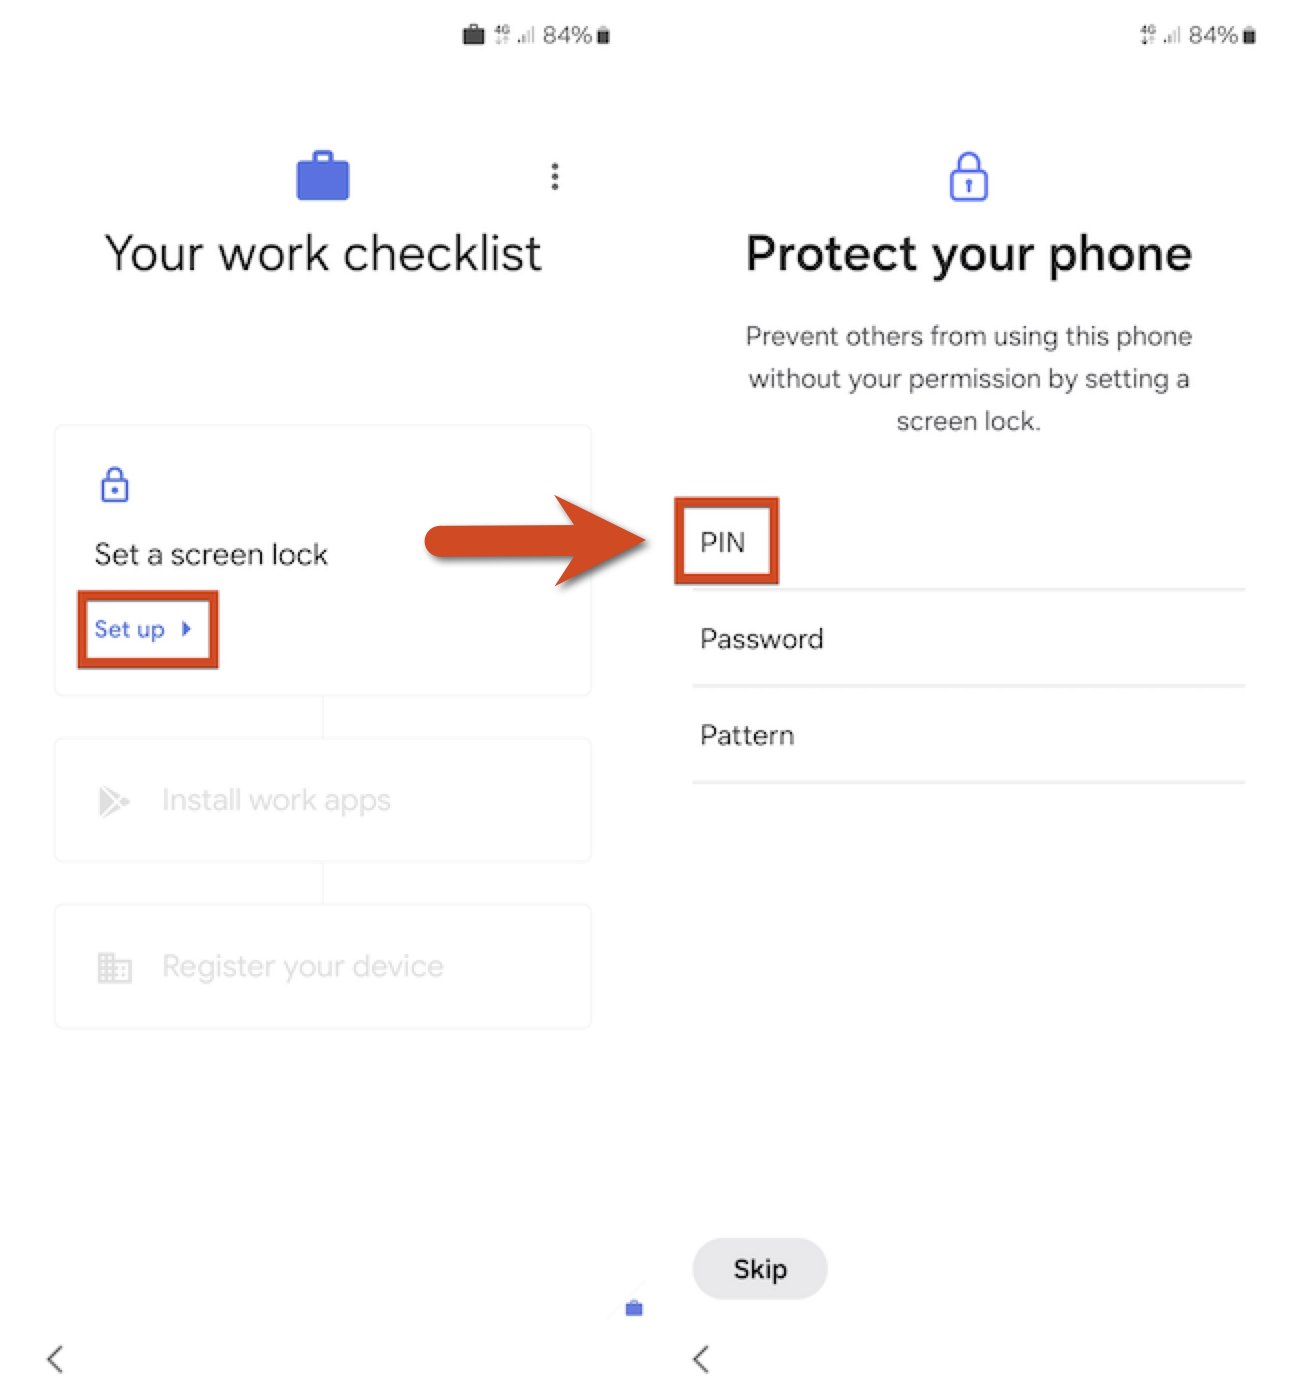
- Set an 8-digit PIN code for your device. You cannot use the same number consecutively. After entering the PIN, select Continue. Re-enter the PIN and select OK.
Only you will know the eight-digit PIN code you have set for your device. The administrator will not be able to restore your phone if you don't remember your code. For this reason, be sure to not forget the code because otherwise the only way to use the phone again is to reset the phone to the factory settings.
- In the next step, the work applications defined by the administration will be installed on your device. First, select Install. In the next screen, select Done.
- In the last step of the work account deployment, the device is registered and connected to the server. Select Set up. In the next screen, select Log in. The username in its Microsoft 365 format, i.e. username@ad.helsinki.fi, is used for logging in.
- When deploying using mobile data, you must separately allow the downloading of programs using mobile data by clicking Use data (or connect the phone to a Wi-Fi network) to complete the deployment. Otherwise, applications that are required will not be downloaded.

- Adjust Microsoft Defender on your phone according to these instructions after finishing the deployment.
Two SIM cards
If your phone supports two SIM cards, you can use both the SIM cards for your mobile subscription for work and your personal mobile subscription. You can deploy the phone using two SIM cards or add your personal SIM card later if you deploy the phone using only the SIM card for your mobile subscription for work.
Deployment using two SIM cards
- Insert the SIM card for your University of Helsinki mobile subscription into slot 1. Insert your personal SIM card into slot 2. Refer to your device manufacturer’s specific instructions for the location of the card slots and installation of SIM cards.
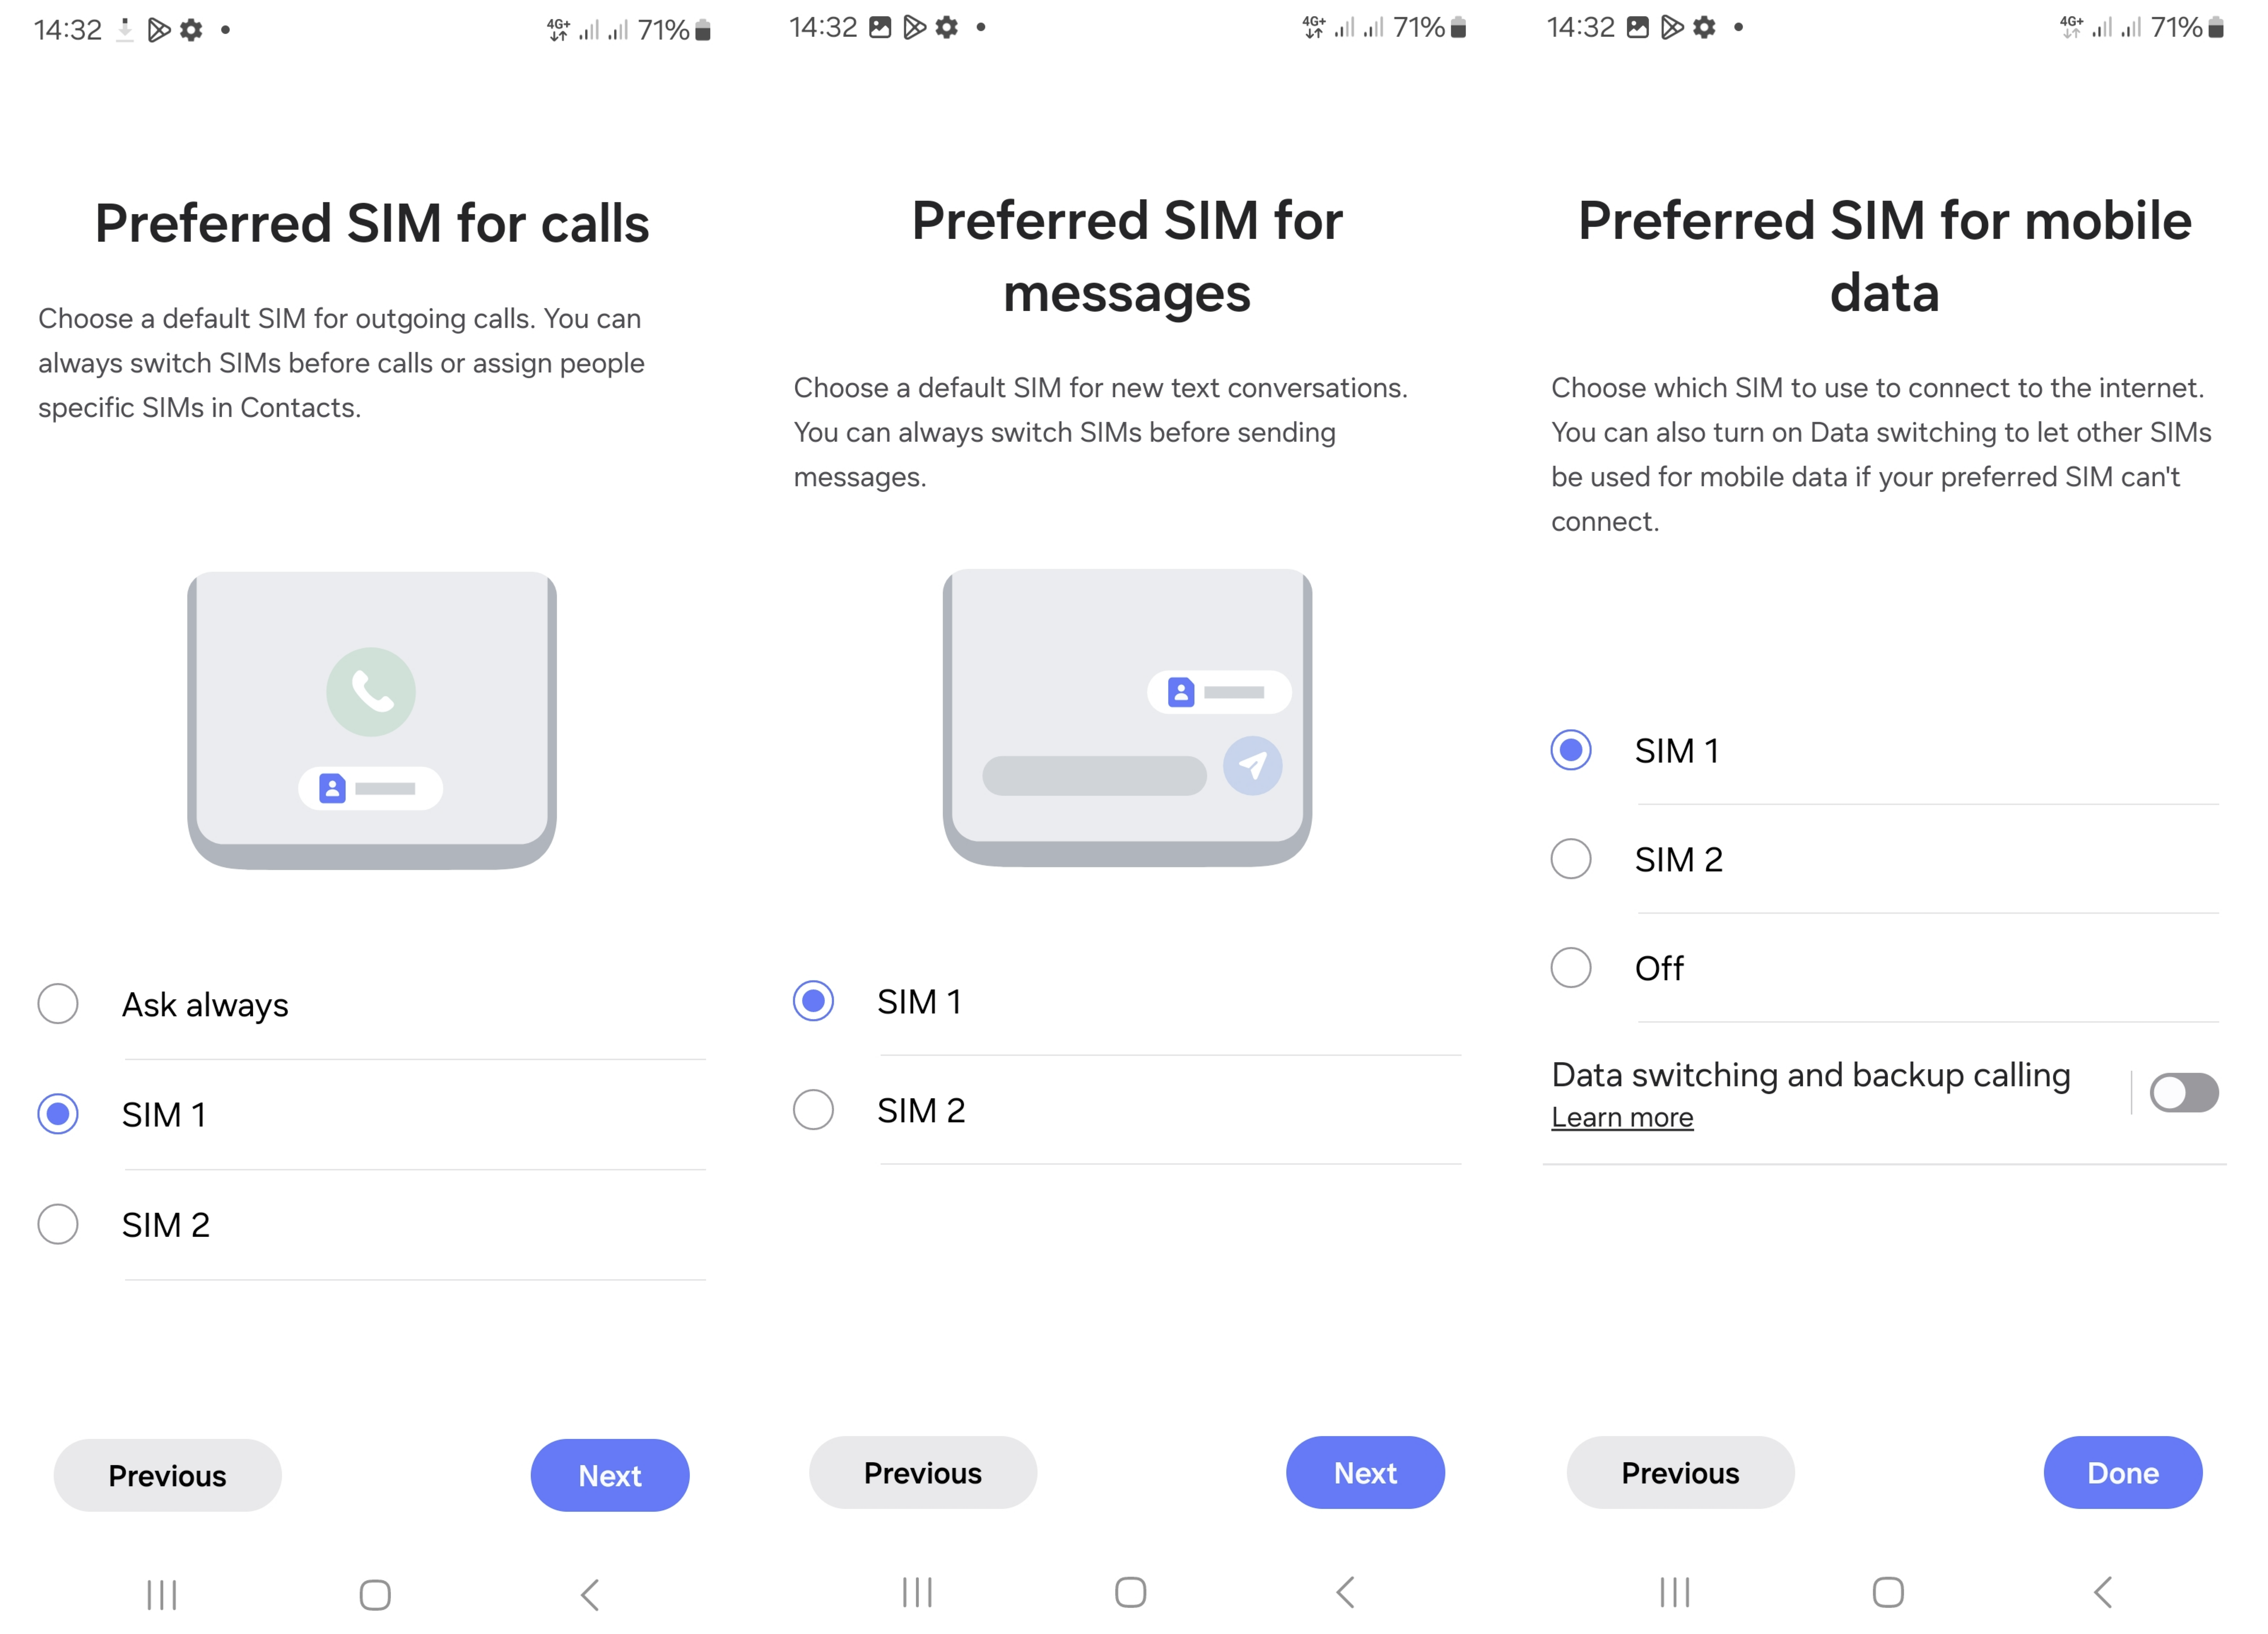
- If you deploy your phone using two SIM cards, your phone will suggest the following setup options during deployment. During the installation process, we recommend you name SIM 1 “Work” and SIM 2 “Personal”, for example, so that you know which card you are configuring when editing the settings for each. You can change the name of a SIM card by touching the pencil icon next to it.

- Next, the deployment process will ask you to select which SIM card to use by default for calls, messages and the use of mobile data. You can later also configure which SIM card is to be used for each call and contact.
Installing a second SIM card after deployment
- Turn off the phone. Insert the SIM card for your University of Helsinki mobile subscription into slot 1. Insert your personal SIM card into slot 2. Refer to your device manufacturer’s specific instructions for the location of the card slots and installation of SIM cards.
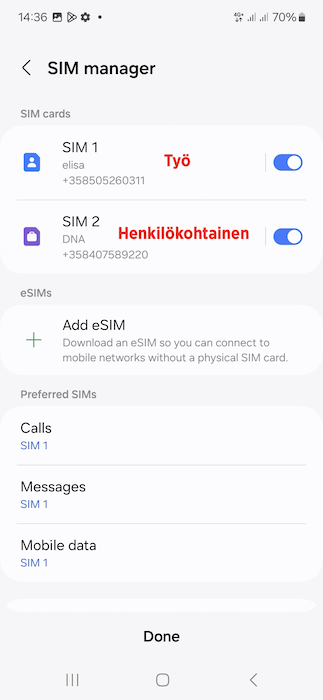
- Go to your phone’s SIM card settings. There, name SIM 1 “Work” and SIM 2 “Personal”, for example, so that you know which card you are configuring when editing the settings for each. Configure which SIM card is to be used by default for calls, messages and mobile data.
Importing data from an old device
During the installation process, you are offered the opportunity to import settings and data from an old device. This is offered at multiple stages of the device installation process. The process varies depending on the device, device manufacturer and operating system version. This guide includes an example case, but the steps or additional programs required may vary from case to case.
The transfer option is not available for all device combinations, and it may not be possible to transfer data from all applications. Always read the instructions provided by the device manufacturers and the software to be used for data transfer.
- In the example, data is transferred from an Apple phone to a new Samsung device to be deployed. In this case, you need to select iPhone or iPad when the installation process asks whether to configure the new device using an old one. The device will notify you that the Smart Switch app will be used for transfer. Tap Next to continue.
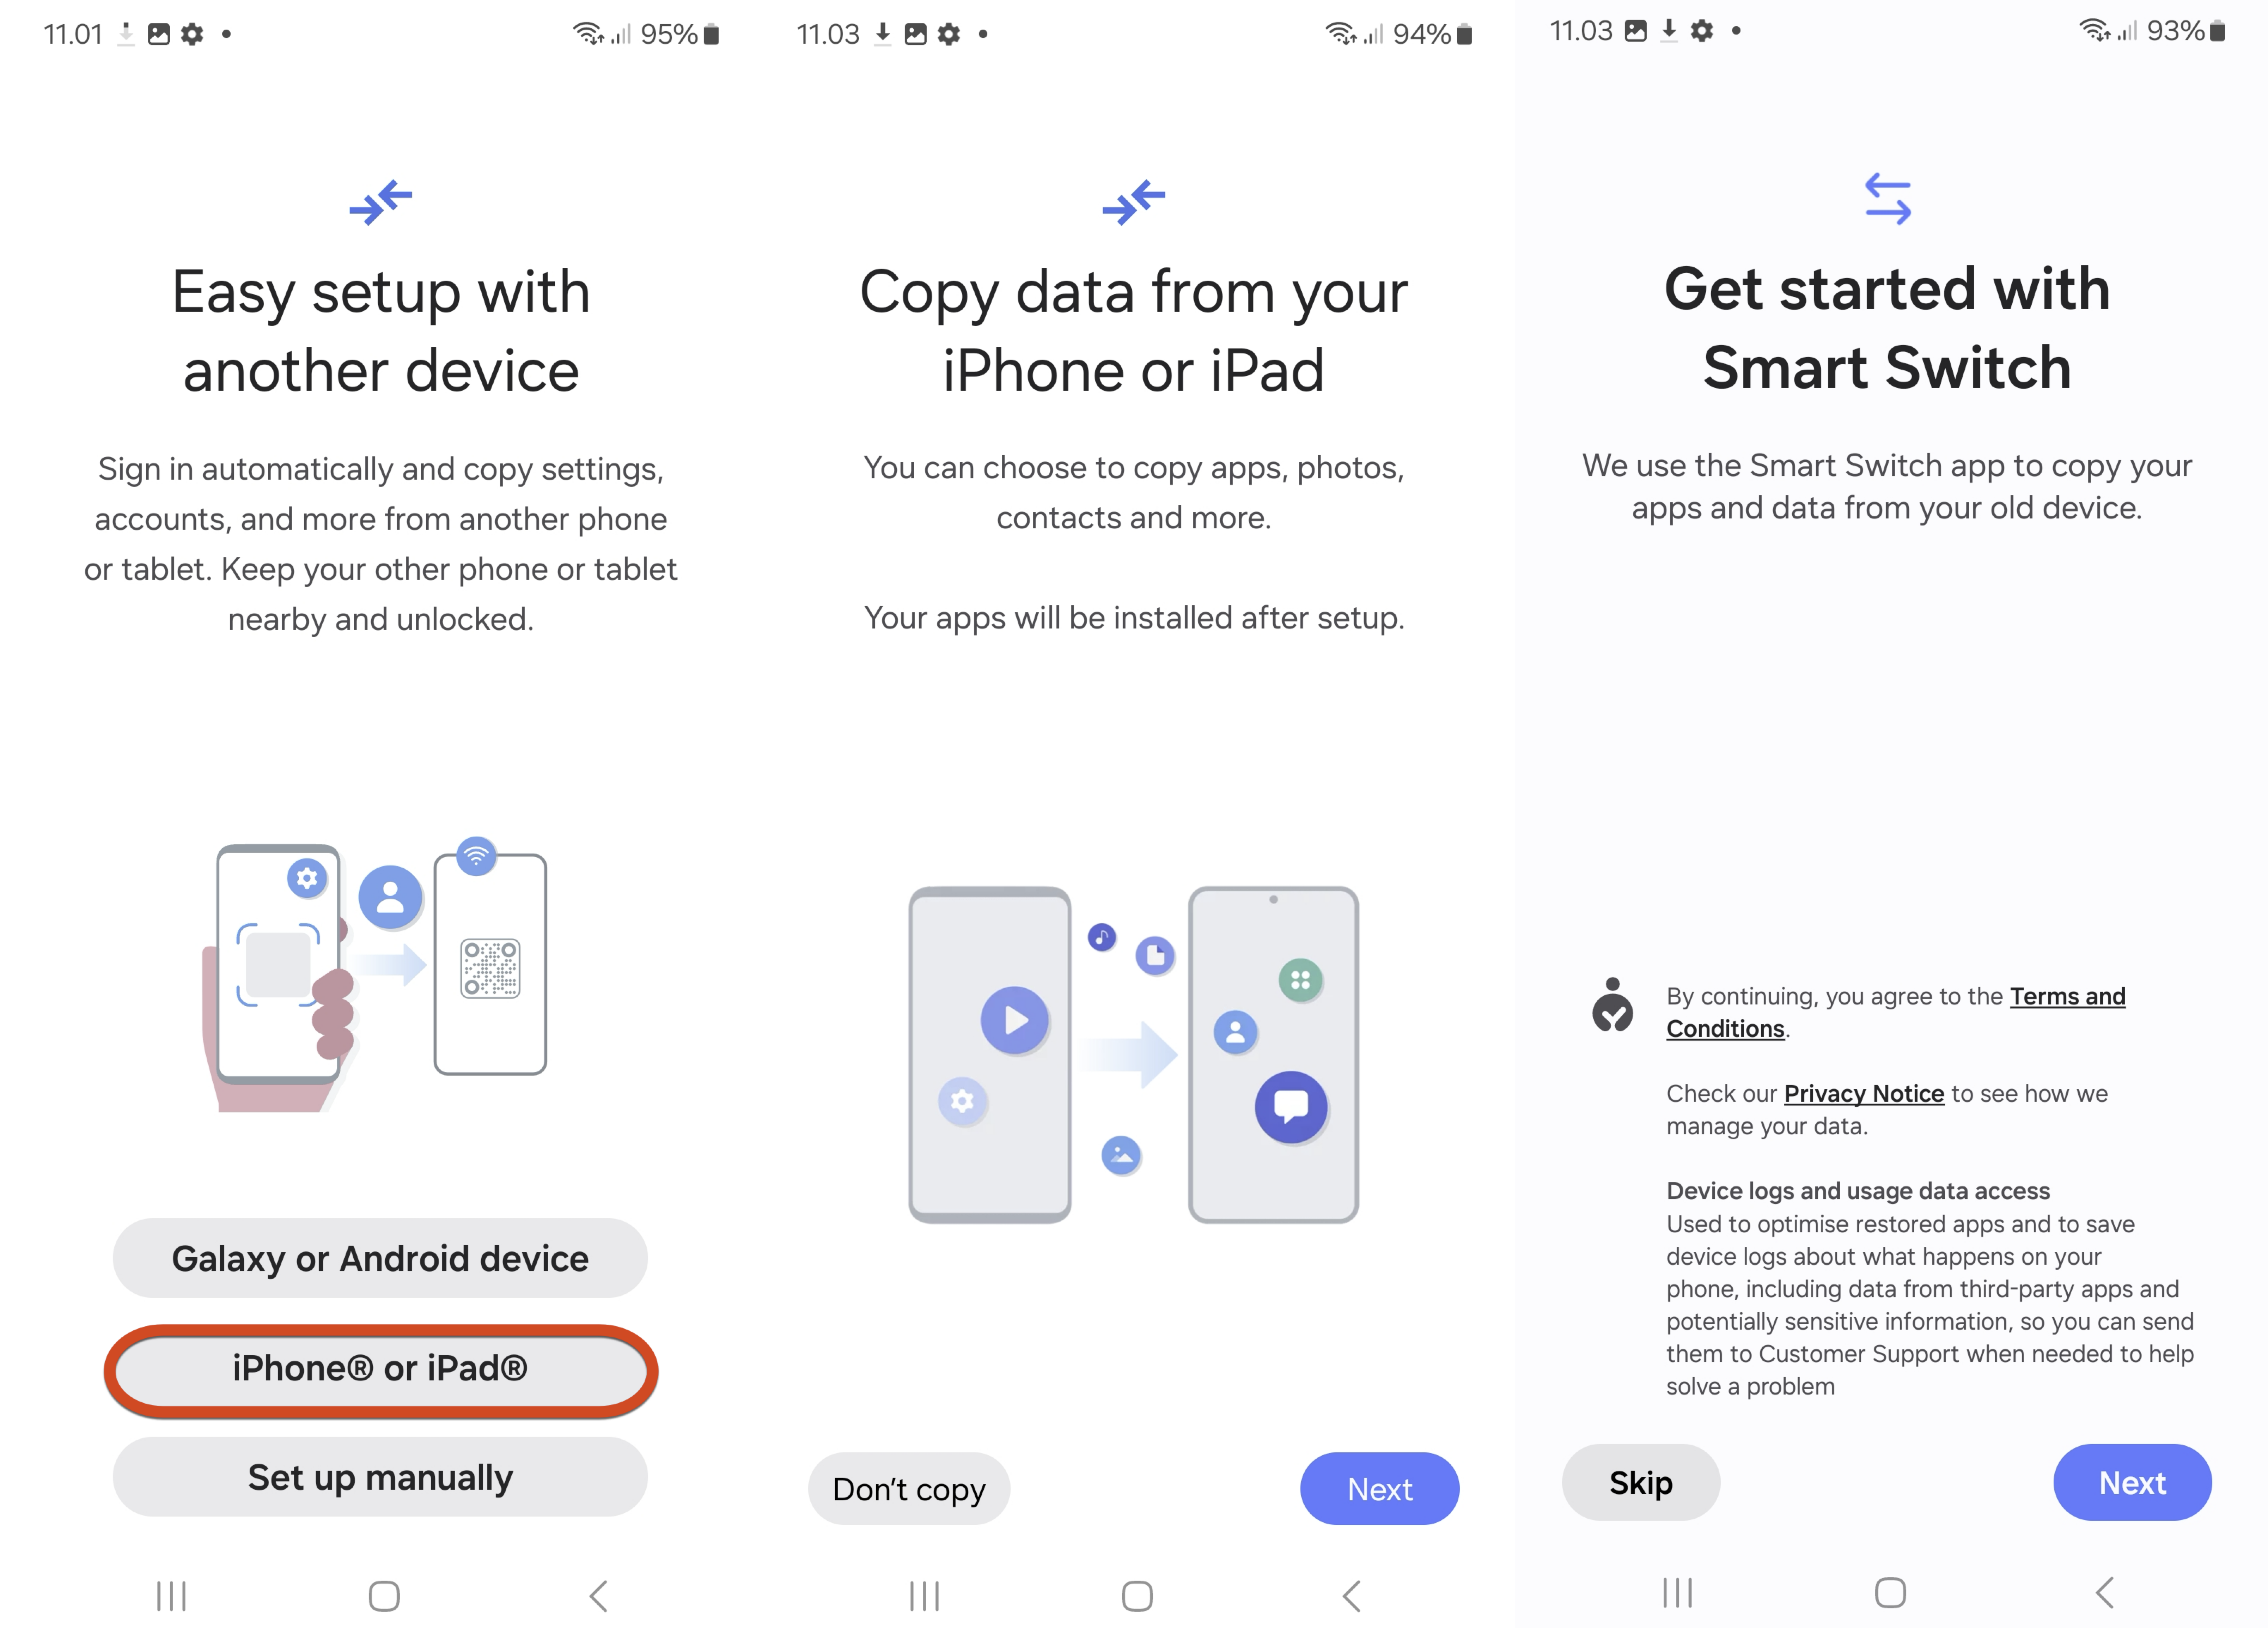
- Tap Allow to give the application the permissions it requests.
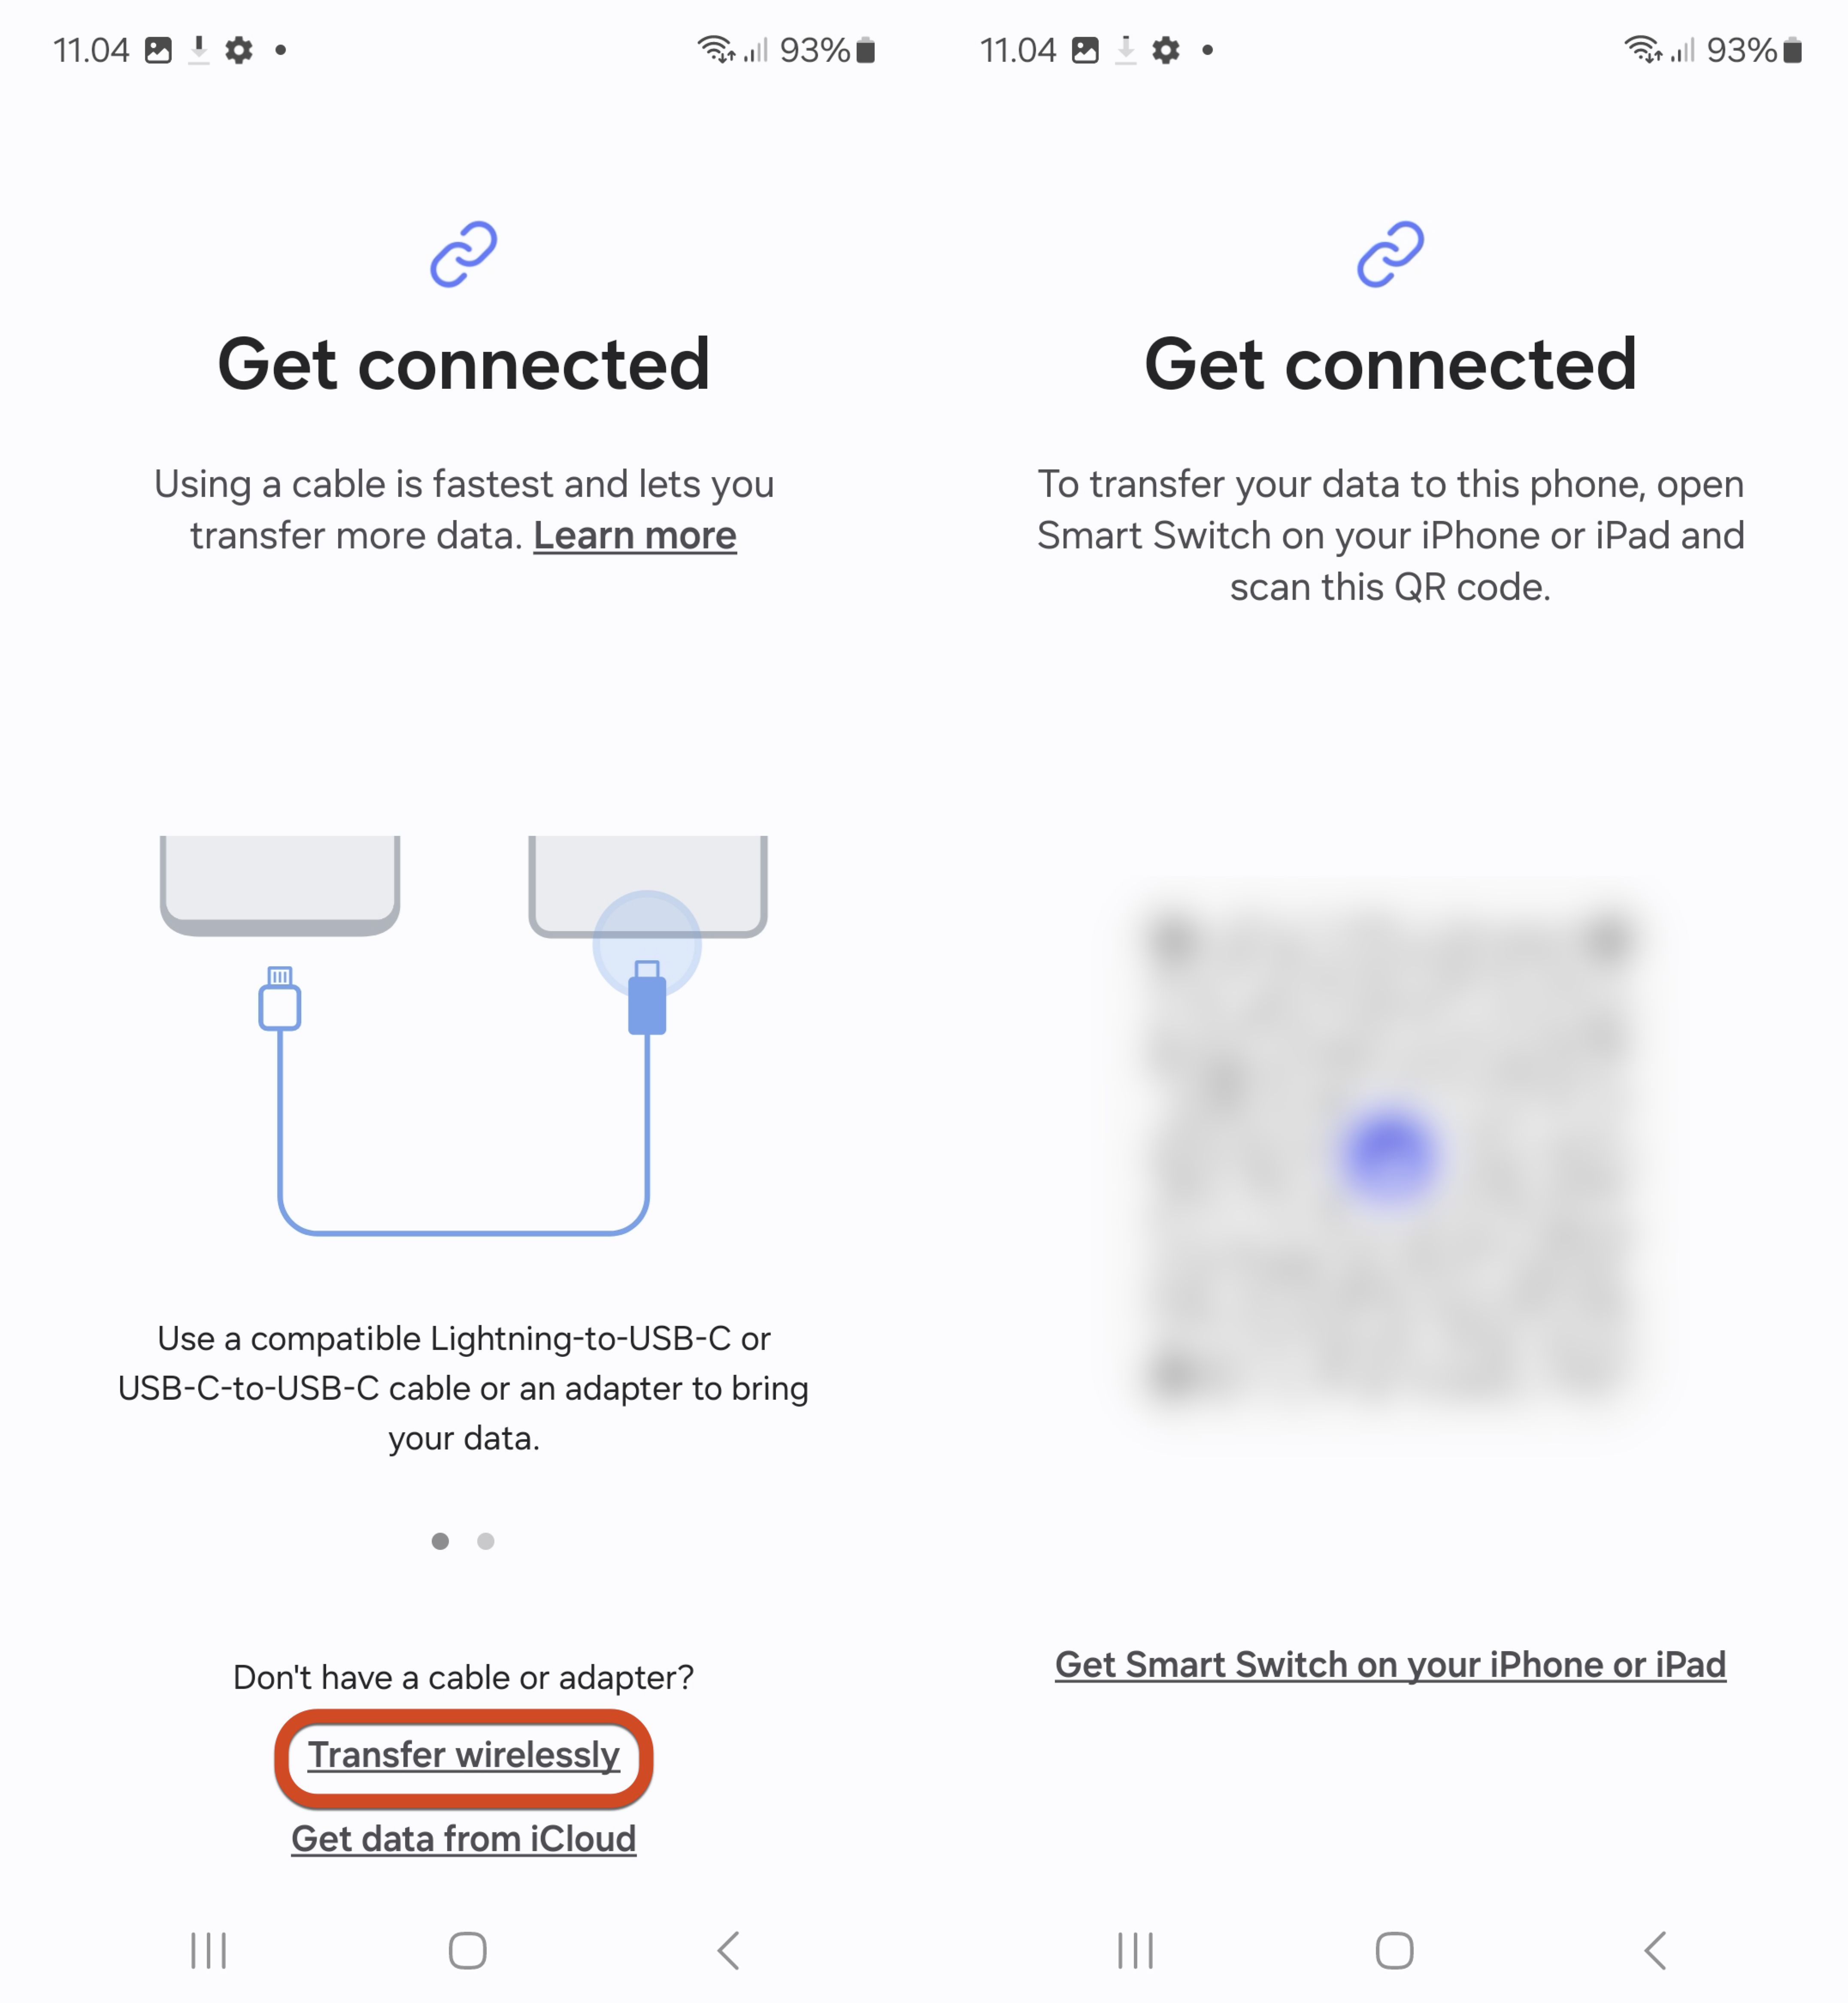
- Next, you are offered the opportunity to transfer data via USB-C cable, wirelessly or via iCloud. In this example, the data is transferred wirelessly, so you need to select Transfer wirelessly. The phone will give you a QR code, which is scanned with the Smart Switch application installed on the old phone.
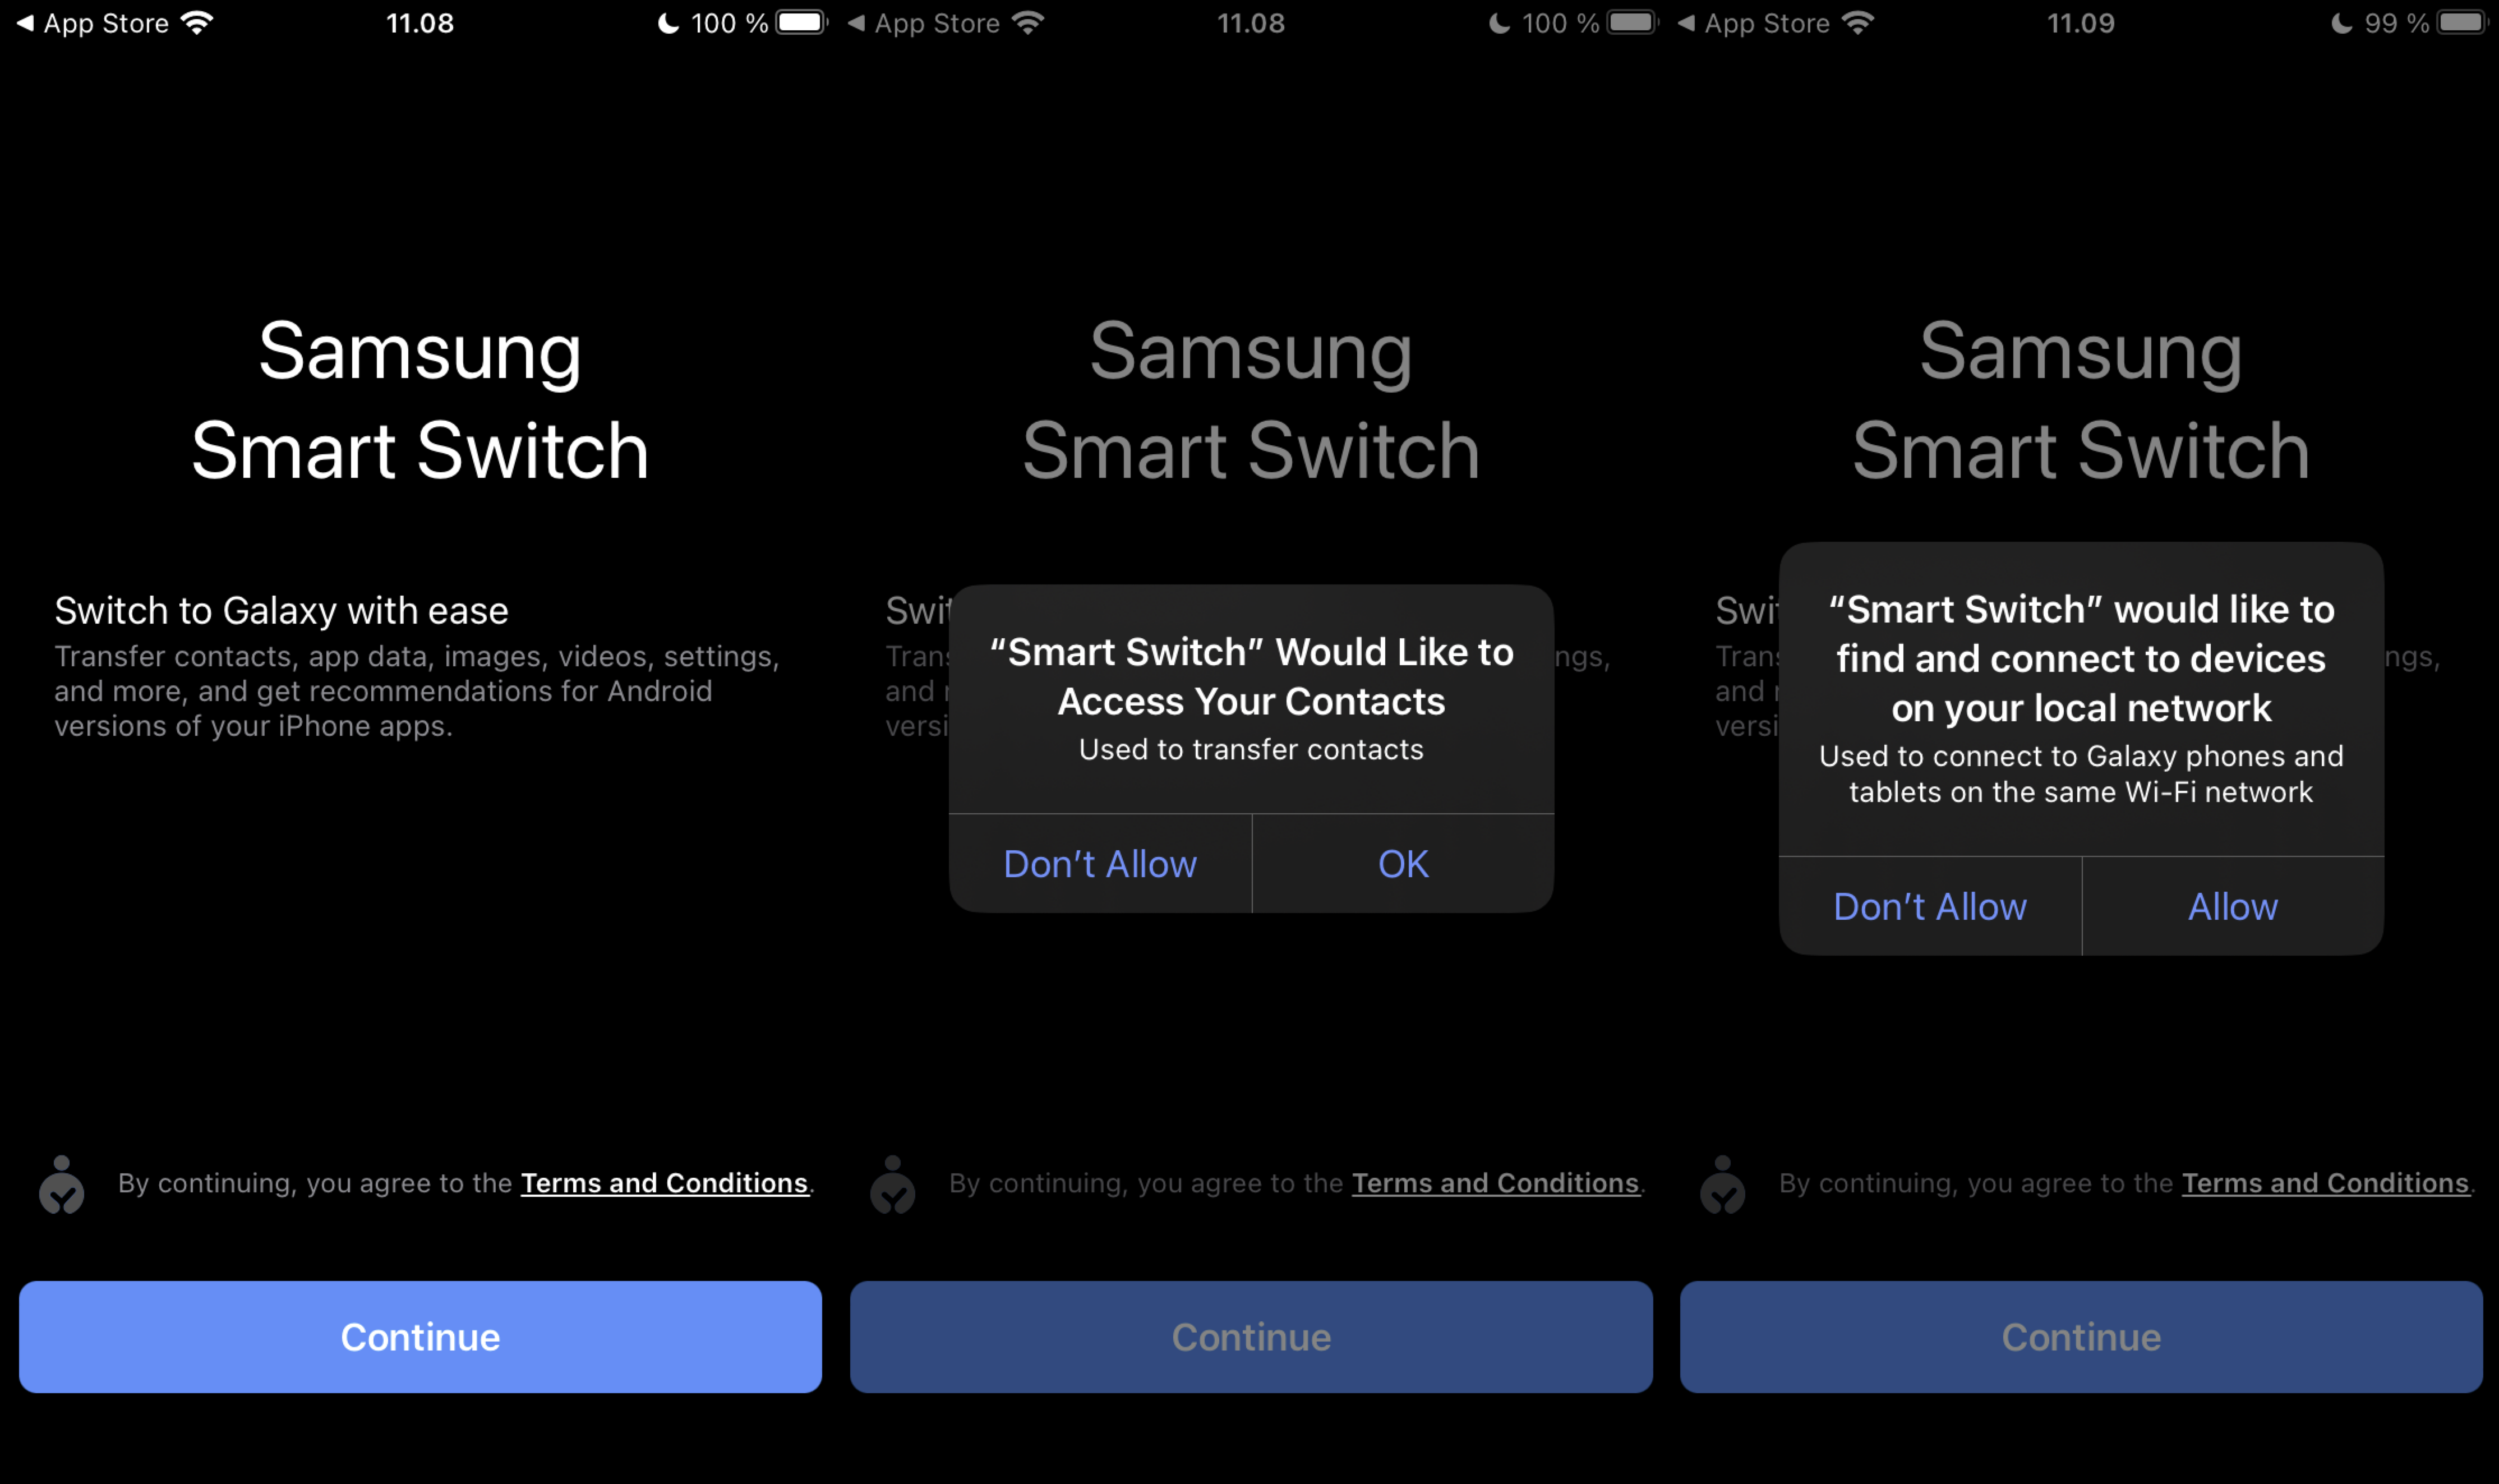
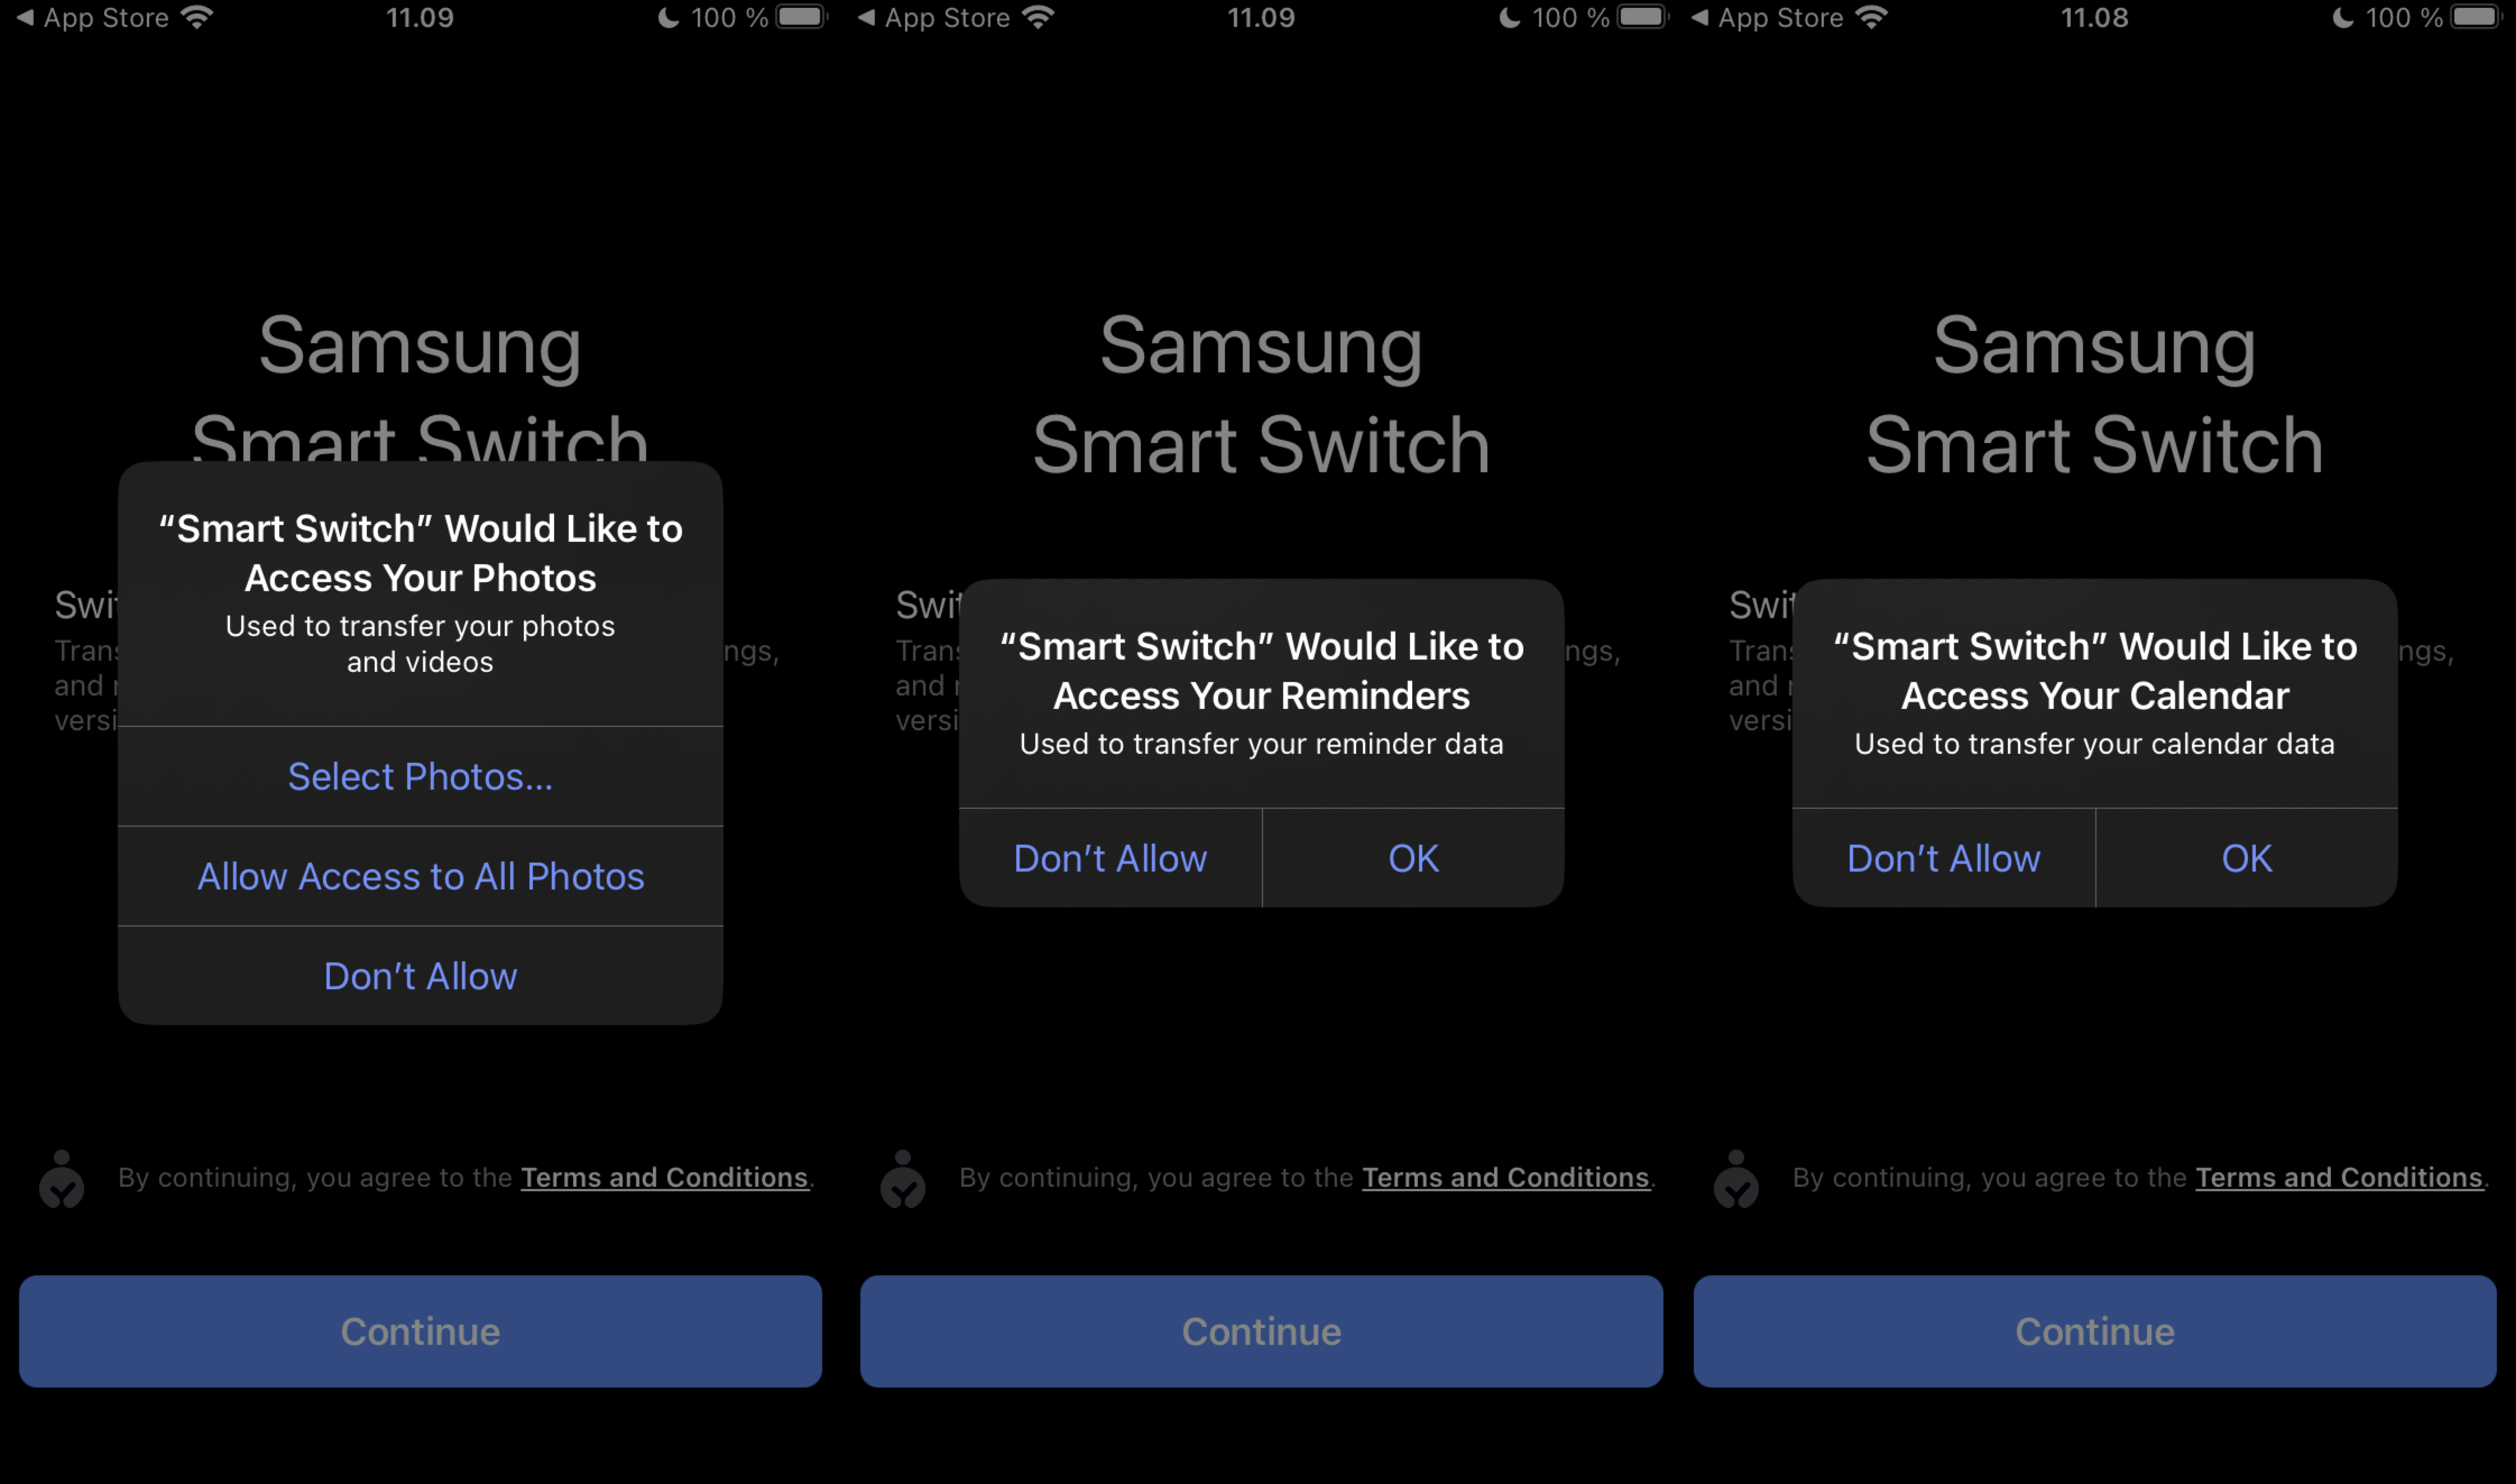
- You need to find Smart Switch in the App Store on the old iPhone. Give the application all the permissions it requests.
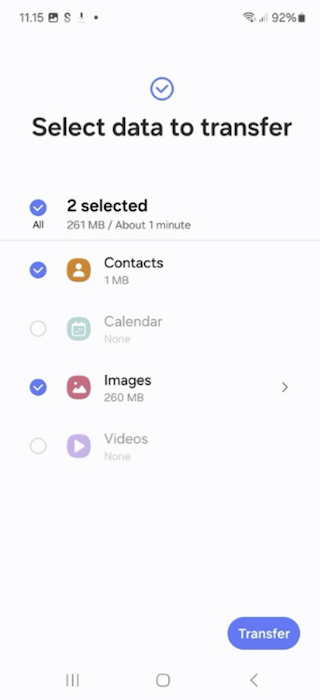
- Next, the app will ask what data is being transferred from the old phone to the new one. In this example, contacts and pictures are transferred from the old phone, so select these and tap Transfer.
Video instruction
Give feedback
The instructions site of the University of Helsinki's IT Helpdesk helps you with IT-related issues related to your work. Let us know how we can improve our instructions. We greatly appreciate your feedback!
How would you improve these instructions?