Zoom is a video communication service that allows all University staff and students to create meeting rooms and participate in meetings, seminars and conferences in real time through video and sound. Zoom is also suitable for remote teaching. The Zoom rooms created by University staff and students support a maximum of 500 simultaneous participants.
You can participate in Zoom meetings through a separate application installed on your computer or mobile device, or through a browser. Zoom has been installed on the computers managed by the University of Helsinki. The browser version of Zoom is available at helsinki.zoom.us.
We recommend using the browser version when preparing a meeting and making changes to the default settings of the software. The best browser for using Zoom is Chrome.
When attending meetings, we recommend using the client software. By default, meetings are always opened in the client software if it has been installed on your computer.
In addition to the following instructions
- You can find pedagogical guidelines for using Zoom in Instructions for Teaching.
- See also the frequently asked questions and answers concerning Zoom.
Pay attention to information security!
The same information security rules and guidelines apply to Zoom as to other tools, such as your email.
- Learn more about the information security of video conferences in separate Helpdesk instructions.
- More information and tips concerning information security can be found on Flamma.
Quick help
Zoom version used at the University
The University of Helsinki uses the On-Premise (On-Prem) Zoom provided by NORDUnet. The service has been implemented securely, with all video and audio traffic in the Nordic countries running on NORDUnet’s own servers. Only the validation of the Zoom licence takes place through Zoom’s own cloud service in the EU.
You use the University of Helsinki’s On-Prem Zoom when you are logged in to Zoom with your University credentials via SSO (Single Sign On).
In NORDUnet’s On-Prem Zoom, some functions, such as cloud recording, differ from those in standard Zoom.
Servers
University of Helsinki’s On-Prem Zoom
- Servers in the EU, meaning that
- The data remain in the EU
- The GDPR is taken into account
Zoom
- Servers in the USA
- beyond the scope of EU legislation
Cloud storage
University of Helsinki’s On-Prem Zoom
- Recordings are stored on NORDUnet’s servers in the EU
- A link to the recording is sent by email, and the video can be downloaded to your computer from the link
- No cloud sharing
- No cloud viewing
- More detailed instructions for the University of Helsinki’s cloud storage
Zoom
- Recordings stored outside the EU
- Can be viewed in the cloud service
- Can be shared in the cloud
Subtitles and captions
University of Helsinki’s On-Prem Zoom
- Subtitling and captioning can only be done manually – in practice, by having a stenographer write the text
- No automated captioning
Zoom
- Subtitles and captions possible with shorthand writer
- Automated captioning in English
Streaming
University of Helsinki’s On-Prem Zoom
- Not available in On-Prem Zoom
Apps
University of Helsinki’s On-Prem Zoom
- Not available in On-Prem Zoom
- By default, the data will not remain in the EU
- Secure apps, like Moodle, are available
Client program
Zoom is installed on all Windows and Cubbli computers centrally managed by the University. It can be installed on Mac computers from the Managed Software Center (separate instructions for installing Mac programs).
- To install the Zoom client software on your home computer or mobile device, go to https://zoom.us/download (Zoom Client)
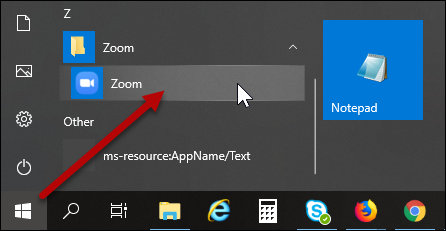
To start Zoom, type Zoom in the search box on your computer. Click on the program icon to open the program.
See the Detailed help tab for more information.
Using Zoom with a browser
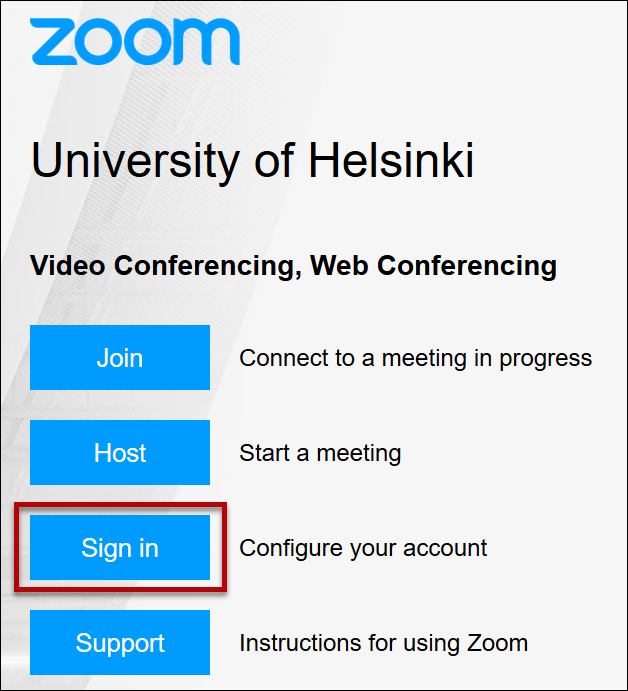
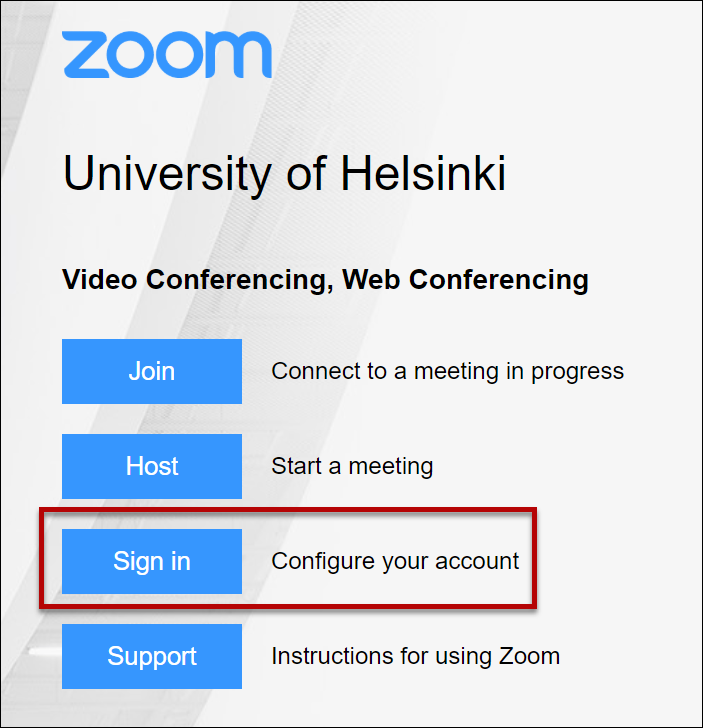
When using Chrome, Zoom can be accessed at https://helsinki.zoom.us. From the login page, you can join meetings, start a meeting, edit the settings of your account and visit Zoom’s own instruction pages.
Setting up a meeting and sending invitations
We recommend creating the meeting through your browser as it offers more settings than the application. The browser makes it easier to
- Prepare advance measures for small groups (Breakout Room pre-assign)
- Create polls in advance
- Create a recurring meeting (recurrence: no fixed time)
- For instructions on creating a recurring meeting, please see the video available in Instructions for Teaching.
Joining a meeting
- If you have been invited by email, select the link in the message
OR - Access Zoom on Chrome at https://helsinki.zoom.us.
- Select Join.
- Write the meeting room ID in the Meeting ID or Personal Link Name field.
- Select Join.
Starting a meeting (as a host)
- Access Zoom on Chrome at https://helsinki.zoom.us.
- Select Host.
- Zoom will ask you whether you want to host a meeting in the application or in the browser. Select start from your browser.
- A meeting room will be opened.
- The page that opens shows the Conference ID, and by selecting Invite at the bottom of the screen, you can see the meeting’s web address. You can use either of the two to invite participants.
Editing account settings
- Access Zoom on Chrome at https://helsinki.zoom.us.
- Select Sign in.
- You can change some of your account settings by selecting Edit. Some of the settings have been set by administration and cannot be changed by the user.
Instructions
- Access Zoom on Chrome at https://helsinki.zoom.us.
- Select Support to access Zoom’s instruction pages.
- See the Detailed help tab for illustrated instructions.
Detailed help
The Zoom client program is installed on all Windows and Cubbli computers centrally managed by the University. It can be installed on Mac computers from the Managed Software Center (separate instructions for installing Mac programs).
This Detailed help provides instructions for using the Zoom client program. Zoom can also be used on Chrome without installing the application (see Quick help for instructions). The screen captures in these detailed instructions are from Zoom used on a computer running Windows 10. The display may look different in a browser or another operating system, but the functions are mainly the same or similar.
Table of contents
- Logging in
- Home computers and mobile devices
- Installing the Zoom client software on your home computer (Windows 11)
- Creating a meeting
- Sending an invitation
- Leaving a meeting
- Personal meeting rooms
- Breakout Rooms
- Focus Mode
- Creating meeting notes using the Notes tool
- Webinar and Large Meeting functions
- Recording a meeting
- Recording locally
- Cloud recording
- Compiling a list of participants
- Sharing your screen
- Whiteboard
- Locking a meeting
- Zoom settings
- Adding a profile picture
- Adding a personal pronoun
- Changing the date and time
- Changing the background image
- Checklist for organisers of Zoom meetings
- Check the suitability of your hardware
- Advice and support for problems
- Manufacturer’s instructions site
Logging in
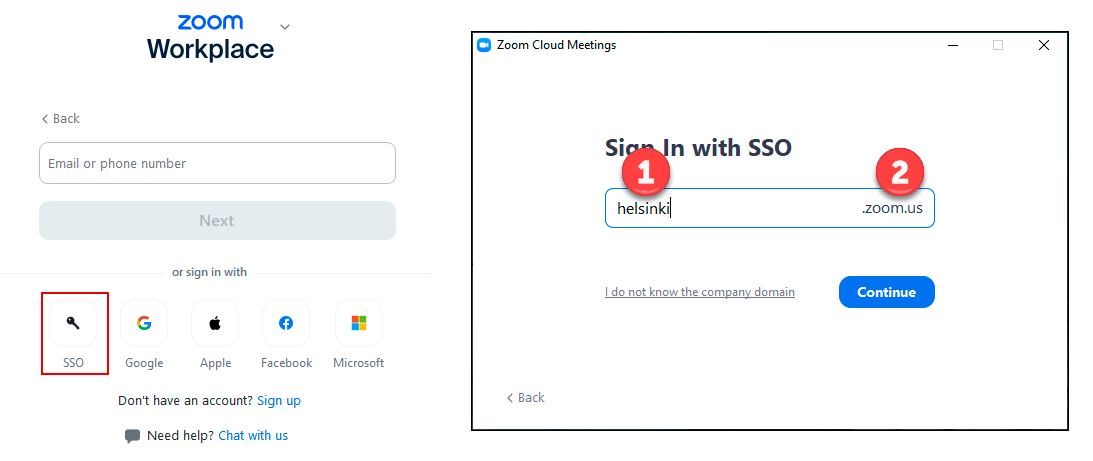
Start Zoom Workplace app on your computer. Select Sign In and Sign in with SSO.
Make sure that the address begins with helsinki (1) and ends with .zoom.us (2). Select Continue.
Home computers and mobile devices
You can download the Zoom client, plugins and other add-ons for your personal computer or mobile devices on the Zoom website at https://zoom.us/download.
Installing the Zoom client software on your home computer (Windows 11)
Installing the client
- Download the installer from https://zoom.us/download.
- Click Download (64-bit).
- Save the installer on your computer. Select Save File.
- Select the folder where you want to save the installer. By default, files are saved in the Downloads folder. Select Save.
- The browser will let you know when the software has been downloaded on your computer. Open the drop-down menu (1) and select Open Containing Folder (2).

- The browser will let you know when the software has been downloaded on your computer. Open the drop-down menu (1) and select Open Containing Folder (2).
- Double-click on the installer ZoomInstaller.exe.
- Wait for the installation to finish. Zoom has now been installed on your computer.
- Continue as instructed at the beginning of the instructions under Logging in.
Updating the client
- Remember to check for updates from time to time. To update the application: click your profile photo from the up right corner, open the menu and select Check for Updates.
Creating a meeting
We recommend that you use your browser (Chrome) to create meetings to ensure you have access to all your important settings. You can also create a meeting directly in the Outlook calendar, but there are fewer options available at that time.
Creating a scheduled meeting
Log in at helsinki.zoom.us and select Sign in.
The Meetings tab in Zoom has a link for scheduling meetings: select Schedule a Meeting .
You can adjust the details of the meeting in the window that opens from the link.
- Topic – Provide a descriptive name for the meeting.
- Description – Provide a more detailed description of the meeting.
- When – Date and time. In the calendar, select the date and time from the drop-down menu.
- Duration – Duration in hours and minutes .
- Time Zone – The time zone in which the meeting will be held. The default is (GMT +2:00) Helsinki.
- Recurring – Frequency. Select this box if you want to schedule a recurring or permanent meeting. Once you have selected a recurring meeting, you can select the following:
- Recurrence – For scheduling meetings with multiple occurrences (Daily, weekly, monthly or permanently (No fixed time). With the No fixed time setting, the meeting is valid for one year from the last time used.
- Repeat every – How often do you want to repeat the meeting.
- End date – Select an end date or a recurrence of the meeting.
- Invitees – You can invite participants before hand.
- Registration – Whether participants need to register for the meeting before joining.
- Template – If you have created templates using the meeting settings most often used by you, you can select them here.
- Whiteboard – You can add a whiteboard you created earlier to your meeting.
- Docs – You can add files to your meeting.
- Security – At least one of the following security features must be used in Zoom meetings: passcode, waiting room or required authentication.
- For more information on safety features, see Zoom security features.
- Video – You can specify whether the video of the host or participants is on or off by default.
- Audio – You can specify the audio settings for the meeting participants.
- Options – Additional settings for the meeting:
- Whether the participants of the meeting can enter before the hosts
- Do you use Q&A
- Whether the mics are turned off when participants enter.
- Are Breakout rooms designated beforehand.
- You can also specify if you want to record the meeting automatically.
- Alternative hosts (16) – Here you can grant permissions to other speakers/hosts by adding their email addresses. The alternative host can open the meeting on behalf of the actual host and will have the permissions of a co-host in the meeting.
- Interpretation – You can add and invite a person to interpret your meeting.
Once you have configured the meeting settings, select Save to create the meeting. You can edit the meeting settings later.
Adding a scheduled meeting to calendar
You now see the meeting settings and can open the Outlook meeting invitation by selecting Add to > Outlook Calendar (.ics).
Alternatively, you can copy the invitation under Invite link by clicking the Copy invitation icon:
You can view upcoming meetings on the Meetings page in Zoom’s browser view in the Upcoming Meetings list.
Sending an invitation
Sending an invitation in Outlook
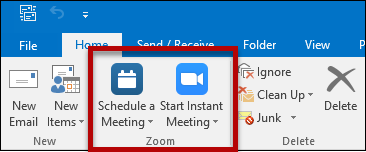
You can install the Zoom Outlook Plugin, available from the Software Center, on Windows computers that are centrally managed by the University. The plugin is installed on the toolbar of your email and calendar. For private computers you can get the plugin from https://zoom.us/download. The plugin is very useful if you use Zoom regularly.
You can schedule a meeting or start a meeting by selecting the relevant icon (Schedule a Meeting or Start Instant Meeting).
Sending an invitation from OWA
You can also install a Zoom plugin in OWA.
- Open the OWA calendar and select New event.
- Select the three dots to open the menu and then select Get Add-ins.
- Search for “Zoom” and select Zoom for Outlook.
- Select Add.
- Select Continue.
- You can now access the Zoom plugin in the top bar of OWA.
Sending an invitation in Zoom
NB! This is alternative method.
We recommend using a browser to create meetings (see instructions) because it offers more settings. You can schedule a meeting and send an invitation to the participants well in advance using the Zoom client. Start Zoom on your computer (Start > Zoom > Zoom).
Select Schedule.
In this example, the invitation is sent as an Outlook calendar invitation. Fill in the fields on the duration and features of the meeting and select the calendar. Select Schedule.
This will open the calendar. The information you entered above is in place. Just remember to add the participants! To send the invitation, select Send.
Adding participants to a meeting
During an active meeting, you can add new participants by selecting Participants and then Invite at the bottom of the screen.
A new window opens. You can invite participants from Contacts from within the University, from Zoom rooms (Room system) or by Email. At the bottom of the window, you can copy all the information in the meeting (Copy Invitation) or just the link (Copy Invite link).
Leaving a meeting
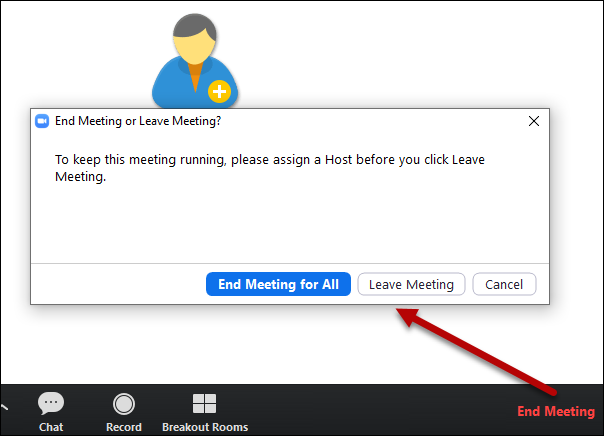
You can leave a meeting by selecting End Meeting (host) or Leave Meeting (participant) in the bottom right corner. The host can choose whether to end the meeting (End Meeting for All) or just leave the meeting while allowing the meeting to continue (Leave Meeting).
If you are the host and would like the meeting to continue after you leave, you must make another participant the host. In the list of participants, select the next host’s name and then select More.
Select Make Host.
Personal meeting rooms
Zoom will automatically create a Personal Meeting Room for you. The room has a permanent ID and a link that will never change.
To open your personal meeting room, select New Meeting.
- Please note the small arrow next to the New Meeting text (1). The arrow opens a menu where Use My personal Meeting ID (PMI) is selected by default. Below it, you can find your room’s permanent ID (2).
- If you do not want to use your personal meeting room, uncheck the selection and launch a new meeting by selecting New Meeting. This will start a new meeting. You can see the meeting’s web address under Invitation URL.
Similarly, if you schedule a meeting, you can use your personal meeting room or create a new room for the meeting. Select Schedule > Advanced Options > Use Personal Meeting ID 123-456-7890. Unlike above, your personal meeting room will not be selected by default.
Breakout Rooms
Creating rooms before a meeting
The host and co-host of the meeting can assign the participants to different rooms for work in small groups or similar arrangements.
The host can create breakrooms before the meeting in the Zoom browser view, under meeting settings (www.helsinki.fi/zoom > Sign in > Meetings > Name of meeting and Edit), by selecting Breakout room pre-assign.
Select Create Rooms to open a window where you can:
- Create rooms
- Rename rooms and assign participants to the rooms in advance*
- Import rooms and participants from a CSV file (see Zoom’s own instructions)
* Please note that only users of the University of Helsinki Zoom account can be added to small groups in advance. They also need to be logged in to Zoom before joining the meeting so that Zoom can identify them and assign them to groups. The host or co-host can assign Zoom users outside the University of Helsinki to groups only after the meeting has started.
If the pre-assigned groups do not immediately appear in the Breakout rooms window, try Recreate → Recover to pre-assigned rooms.
Creating rooms during a meeting
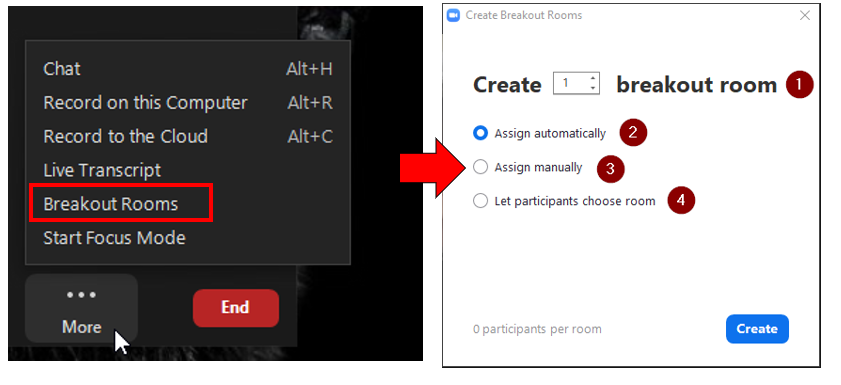
If the host does not want to create the breakout rooms in advance, they can also create them during the meeting by selecting More and Breakout Rooms.
In the dialog box, you can choose:
- The number of rooms
- Whether Zoom automatically assigns participants to rooms
- Whether the host assigns the participants to the rooms
- Whether the participants can choose their own rooms and move between the rooms
Starting Breakout Rooms
After the rooms have been created, either in advance or during the meeting, the Breakout Rooms button opens the Breakout Rooms management window.
In the window, you can:
- Name and delete the room
- Add participants to the rooms
- Recreate rooms
- Add new rooms
- Open rooms for the participants
- Define room settings
The host and co-host can move freely from room to room during small group sessions.
However, only the session in the primary room will be recorded, regardless of where the host is. The participants can record the local session in their own room.
If a participant arrives late for a meeting, they will be redirected to the main room, unless the host has pre-assigned the groups. In that case, the participant is directed to the correct group, provided that they are logged in to Zoom.
Broadcast
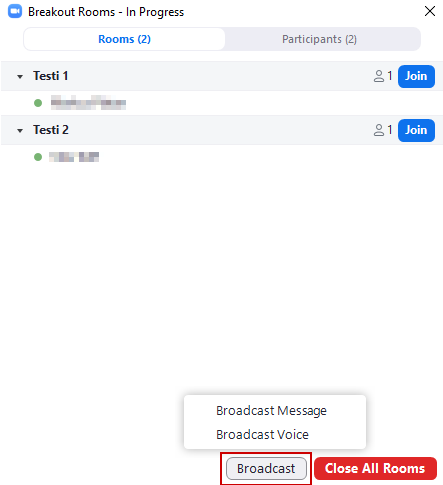
The host can broadcast to all active Breakout for rooms at once either by typing a message (Broadcast Message) or broadcasting their voice (Broadcast Voice).
The co-host can only broadcast to rooms by typing.
The Broadcast feature requires that both the host and the listener have the desktop application version 5.11.9 or higher. The Broadcast feature also works in Zoom’s browser version. You can find the Broadcast buttons in the Breakout Rooms window.
Broadcast Message
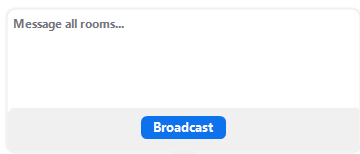
Both the host and the co-host can send typed messages to all breakout rooms at the same time. Open the Breakout Rooms window, select Broadcast and then Broadcast Message. Type your message and select Broadcast.
The text appears at the top of the users’ windows:
Broadcast Voice
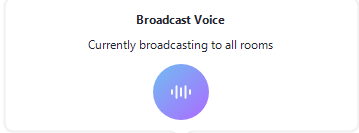
The host can broadcast their voice to all breakout rooms at the same time. Open the Breakout Rooms window, select Broadcast and then Broadcast Voice. Select the Broadcast button:
Broadcast is active when the lines on the Broadcast button begin to move:
You can also press the B key on your keyboard to open broadcasting to all rooms. The Broadcast Voice window opens and the button lines begin to move. Please note that you must continue to press the key for as long as you are broadcasting. Pressing the key while typing does not open the broadcast feature.
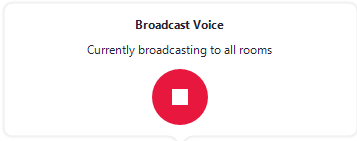
You can stop broadcasting by selecting the same button:
A notification appears at the top of the users’ windows when the host is broadcasting:
Focus Mode
Zoom’s Focus Mode provides the ability to direct the participants’ attention solely to the camera feed or presentation of a host, co-host, or the participant in the spotlight. The meeting’s host must be using the Zoom desktop version (version 5.7.3 or newer) to be able to start the Focus Mode. A co-host can manage Focus Mode with Zoom’s browser version.
Focus Mode can be turned on and off during the meeting. When the Focus Mode is turned on:
- The host and co-host can still see the participant’s camera feed and screen shares
- The participants can only see the hosts’ camera feed and their own camera feed •
- The hosts can place a participant in the spotlight so that the participant’s camera feed and screen share are visible to all participants
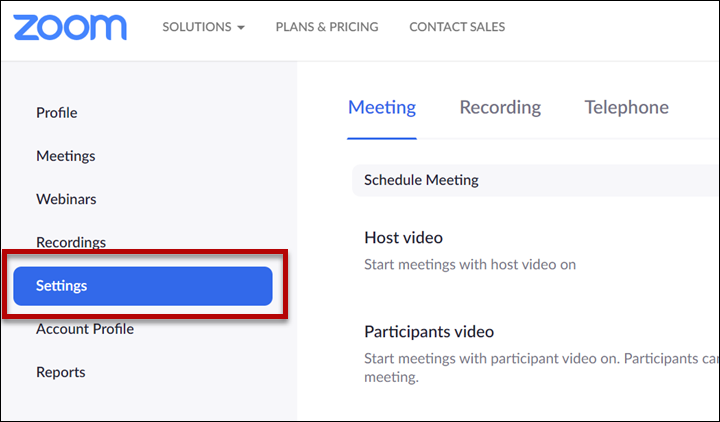
Focus Mode can be enabled in the Zoom settings. Sign in to Zoom with your university credentials at https://helsinki.zoom.us/ and select Settings. Focus Mode can be found under In Meeting (Advanced) in the settings.
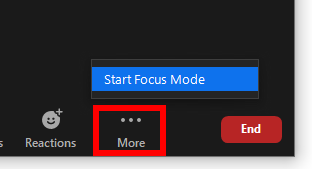
To turn on Focus Mode, select More at the bottom of the Zoom view and click Start Focus Mode.
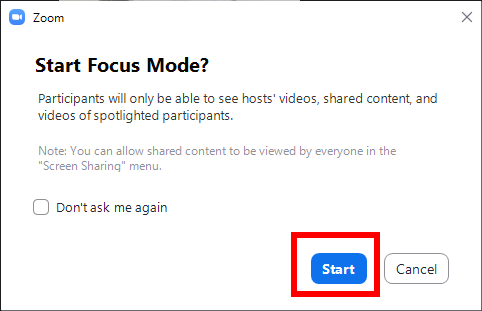
Zoom will still ask for confirmation to start Focus Mode. Select Start:
Once started, Zoom will notify the host and participants that Focus Mode has been started.
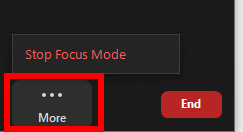
To turn off Focus Mode, first select More and then select Stop Focus Mode.
Creating meeting notes using the Notes tool
Zoom’s new Notesfeature (October 2023) allows you to create a note, write in a note and share a note with others in Zoom. The Notes feature works both during and outside the Zoom meeting. You can use Notes in both the Zoom client application and the browser version at https://helsinki.zoom.us/
Do not share sensitive data in Zoom Notes.
To use the Notesfeature, you must be logged in to Zoom.
Zoom Notes can be enabled in the Zoom settings. Sign in to Zoom with your university credentials at https://helsinki.zoom.us/, select Settings and then Notes.
To turn on Notes during a meeting, select Notes at the bottom of the Zoom view.
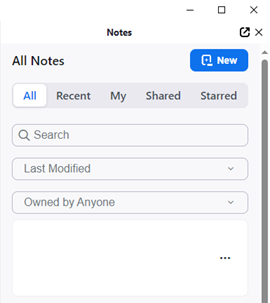
The Notes menu will open on the right side of the Zoom view.
Through the menu, you can start a new note (New), and in separate tabs, access all the notes available to you (All), your recent notes (Recent), your own notes (My), notes shared with you (Shared) and starred notes (Starred). You can also search for notes and browse through them by their editing date (Last Modified) or ownership (Owned by), for example.
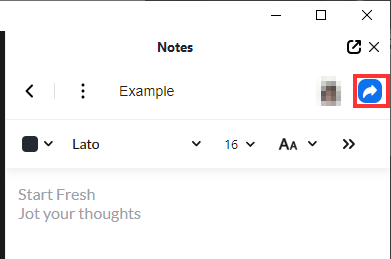
Selecting a new note (New) will open a new blank note for you. You can edit the text settings of your note and rename it.
To share your note, select the white arrow against the blue background (Share Note).
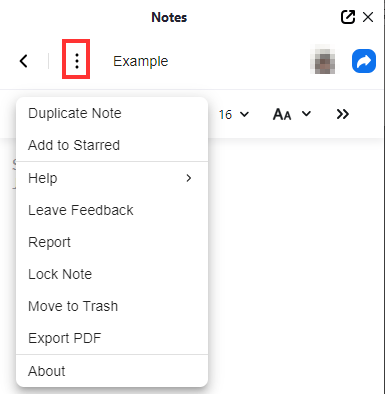
More settings are available behind the three dots (More).
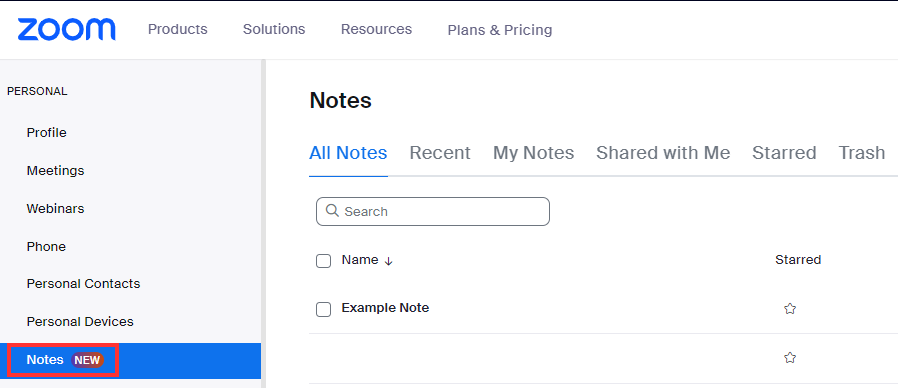
You can also find the notes available to you in Zoom’s browser version. It is also possible to edit and share notes outside the meeting.
Webinar and Large Meeting functions
The University has a limited number of special licences that can be used for larger Zoom meetings (1000–3,000 people).
See these instructions for more information about special licences.
Recording a meeting
Recording a lecture or a meeting is an easy and smart way to make the material available to others. In case of recurring lectures, training sessions or meetings, the recordings can also save time and effort.
At the University of Helsinki, Zoom recordings can currently be made locally and using the NORDUnet cloud recording service.
You can use Screencast-o-Matic to cut or trim your recordings or to add captions.
Recording locally
If you save your recording locally on a computer, please note that the file will be automatically converted into an mp4 file after the meeting ends. For example, creating a recording of an entire lecture may take more than 15 minutes. This may be relevant if you are using a shared computer.
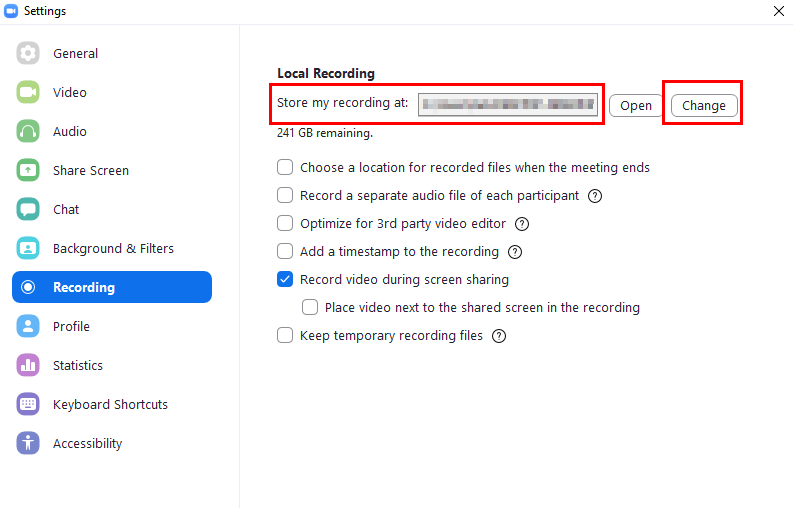
Always check the destination folder of your file. It is best to use a folder on the computer’s hard drive, for example under the C drive (C:\ drive LocalData\username). You can change the default folder in the Zoom settings. Files are then saved only on the computer’s hard drive and you avoid any network problems. In this case, you must back up the videos yourself.
Local storage can only be used with the Zoom desktop client.
Cloud recording
The University of Helsinki uses a cloud recording service for Zoom events and meetings provided by NORDUnet. Things to note about the cloud recording service:
1. When using the NORDUnet cloud recording service, the download link for the recording is sent to the meeting creator’s email after the recording is completed.
- If you do not receive an email by the next day, check the spam folder.
- The email subject is Zoom recording ready for download and the sender is no-reply@zoom.nordu.net.
2. The recording is stored on NORDUnet’s Nordic server and must be downloaded within ten (10) days. After ten days, the recording will be deleted from the server and cannot be restored.
3. You must download the recording to your own computer in order to process it further or upload it to the platform of your choice (Unitube, YouTube).
Deployment
Log in to Zoom at https://helsinki.zoom.us/. Select Sign in. Go to the Settings tab and then the Recording tab. Turn on cloud recording under Cloud recording:
Settings for cloud recording
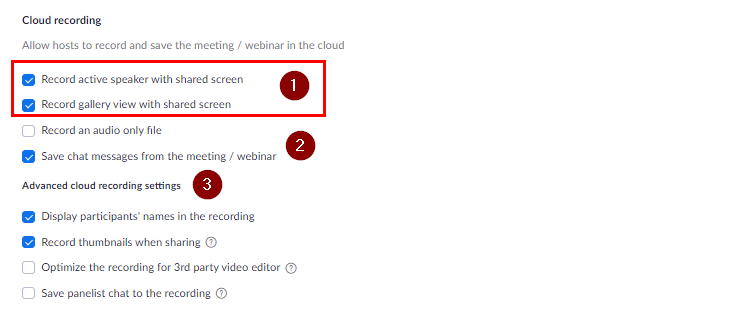
Activating the cloud recording will open a menu with settings for cloud recording:
The recommended settings are as follows:
1. It is important to select either Record active speaker with shared screen, Record gallery view with shared screen, or both. If neither of these are selected, no video will be included in the recording.
- Record active speaker with shared screen and Record gallery view with shared screen: both on.
2. However, you can choose to only record audio (Record an audio only file) or only the chat (Save chat messages from meeting / webinar).
- Record an audio only file is switched off.
- Save chat messages from the meeting / webinar is switched on.
3. Other settings:
- Display participants’ names in the recording: you can choose whether the participants’ names are displayed in the recording – on.
- Record thumbnails when sharing: choose whether to display a small thumbnail of the speaker’s video image during screen sharing – on.
- Optimize the recording for 3rd party video editor: this option increases the file size and processing time – off, but if you have problems editing the recording, you can try turning it on.
- Save panelist chat to the recording: shows panelists’ chat messages during the meeting – off.
Please note that only the settings described above are in use in the cloud recording service of the University of Helsinki On-Prem Zoom.
Using cloud recording
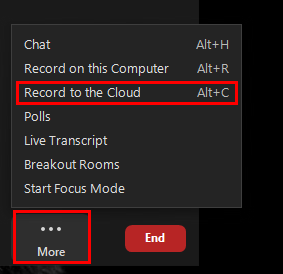
You can start cloud recording by clicking Record to the Cloud in the More menu of the Zoom meeting.
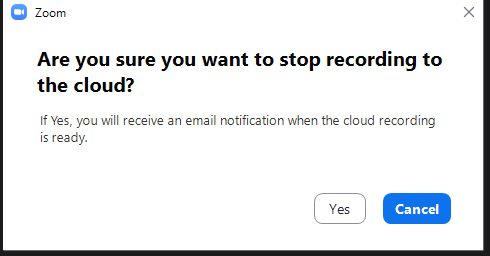
To stop the recording, select Stop Recording.
Zoom then tells you that you will receive an email when your recording is complete.
Downloading a cloud recording
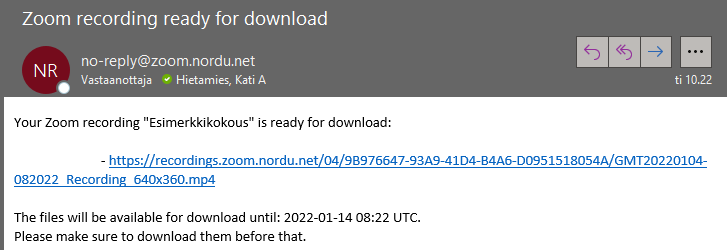
You will receive an email from NORDUnet when the recording is ready. The subject of the email is Zoom recording ready for download and the sender’s address is no-reply (at)zoom.nordu.net. The email will indicate the date by which the recording must be downloaded, after which the recording will be permanently deleted from the server.
Click on the email link to open a download page in your browser, from which you can download the recording to your own computer for further processing.
Compiling a list of participants
You can save a list of Zoom meeting participants as follows:
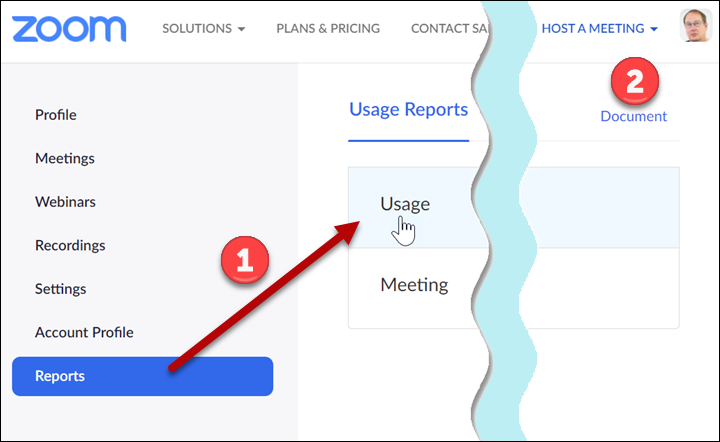
- Log in to Zoom using the browser at www.helsinki.fi/zoom
- Select Reports > Usage (1). Zoom’s own instructions are available under Document (2).
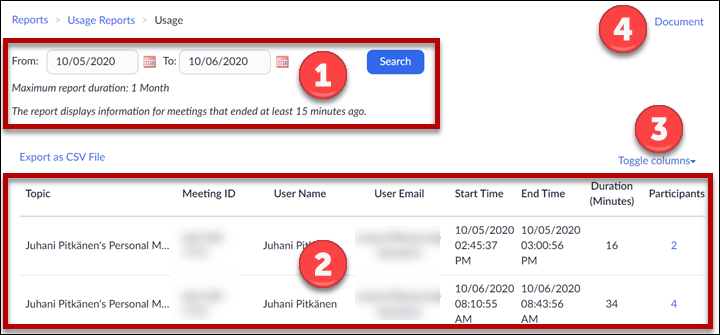
- You can choose the period for which you want to search participant data (1).
Please note that the list is not updated until 15 minutes after the end of the meeting and that only data less than one month old are available. Information about the participants is listed in section (2). Use Toggle columns (3) to select the information to display. Select Document (4) to open Zoom’s own instructions. - The number in the Participants column indicates the number of participants. Select the number.
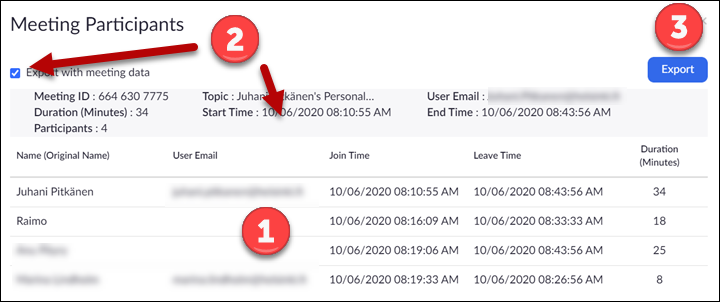
- The list of participants is displayed. Section (1) displays information about the participants. Select Export with meeting data (2) to see the meeting’s basic information. Select Export (3) to export the data to another location. This creates a CSV file that you can open in Excel, for example, or save on your computer.
Sharing your screen
You can share your screen or an open application for others to see.
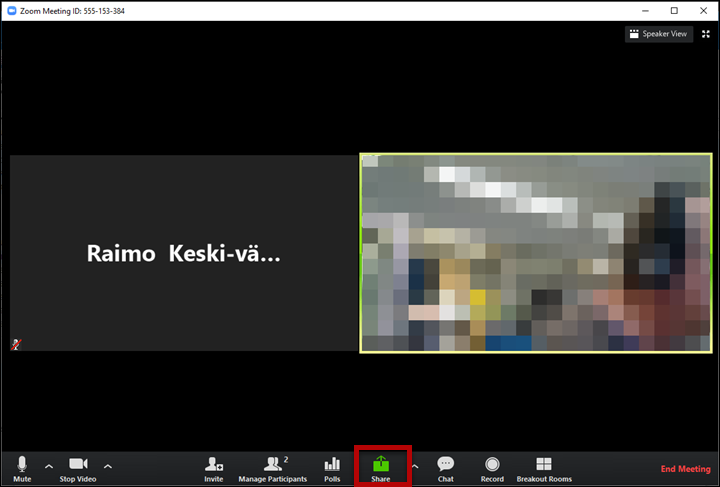
- Select Share at the bottom of the screen.
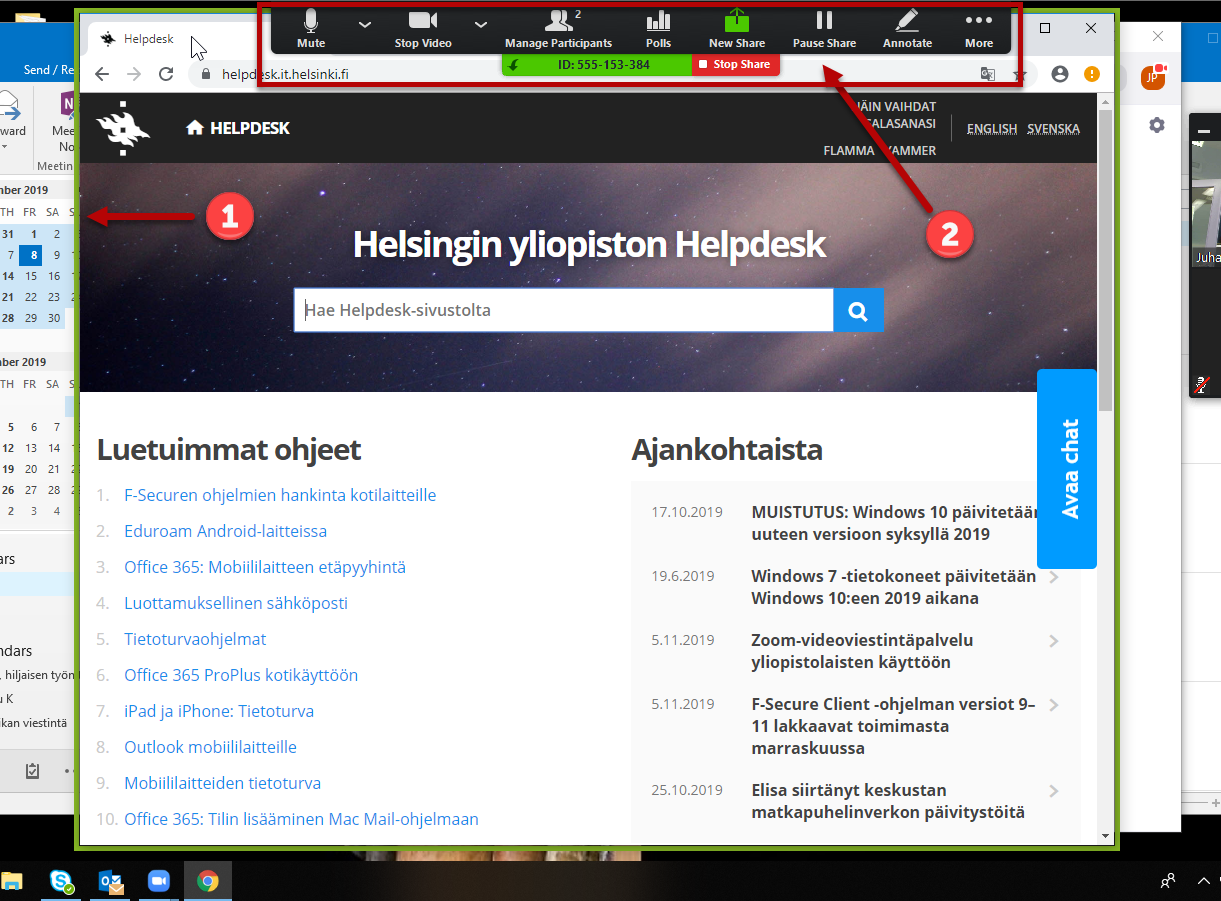
- In the window that opens, you can choose to share your entire screen (1) or one of your application windows (2). Choose what you want to share and select Share (3).
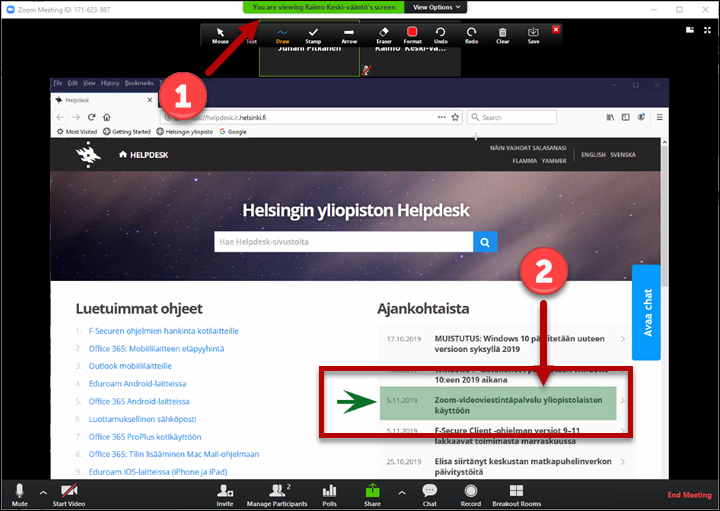
- The green frame (1) indicates the application being shared. The controls for sharing are located at the top of the window (2).
- The other participants can see the name of the person sharing a screen at the top of the window.
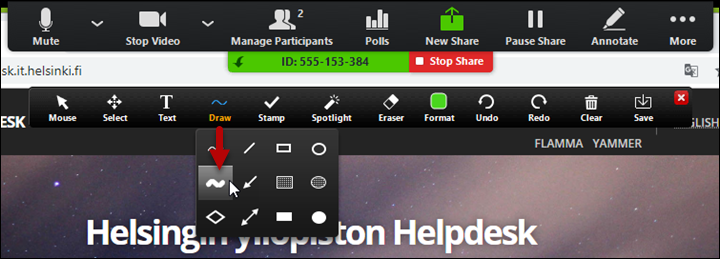
- You can add annotations and highlight items on the screen. Select Annotate. This will open the toolbar.
- Many of the tools also include a more specific submenu.
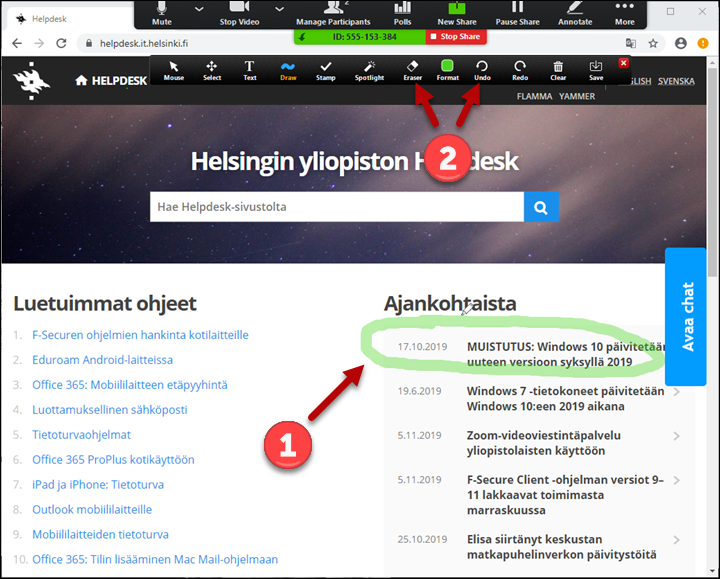
- You can erase your annotations (1) using the Eraser tool or click Undo on the toolbar (2).
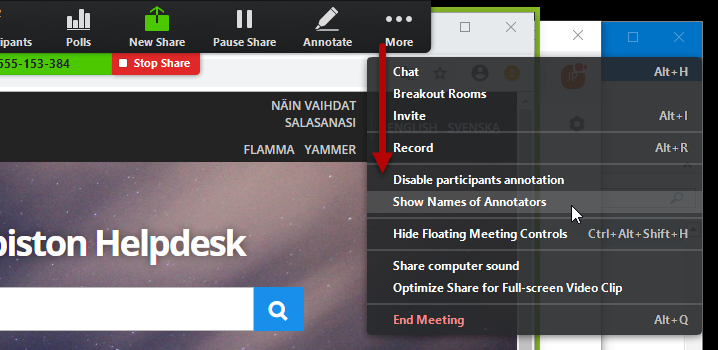
- In the More menu, the host can allow participants to annotate or disable participants’ annotation. The host can also choose to show the names of annotators or hide the names of annotators.
You can take a screenshot, including the annotations, during the presentation. In this example, Raimo Keski-Vääntö (1) is sharing his browser window. Raimo has highlighted parts of the window in green (2).
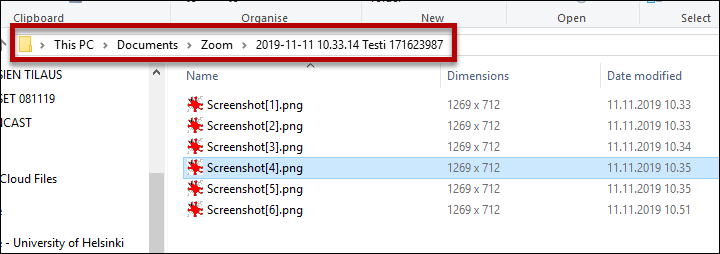
Select Save. The software confirms that a screenshot has been saved (Screen saved). You can open the destination folder by selecting Show in Folder.
The images are saved in the folder Documents > Zoom.
You can stop sharing your screen by selecting Stop Share.
Whiteboard
Deployment
Log in to Zoom at www.helsinki.fi/zoom. Select Sign in.
Go to the Settings tab, then to the Meeting tab and finally to In Meeting (Basic).
Activate the whiteboard using the toggle switch. The settings for saving the whiteboard are available in the same place.
Use
To access the whiteboard in a Zoom meeting, select Share Screen.
In the window that opens, select Whiteboard.
Locking a meeting
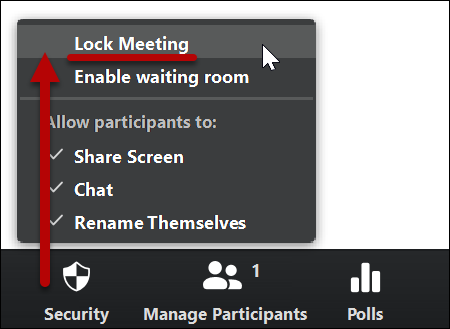
Select the Security icon at the bottom of the screen. Select Lock Meeting.
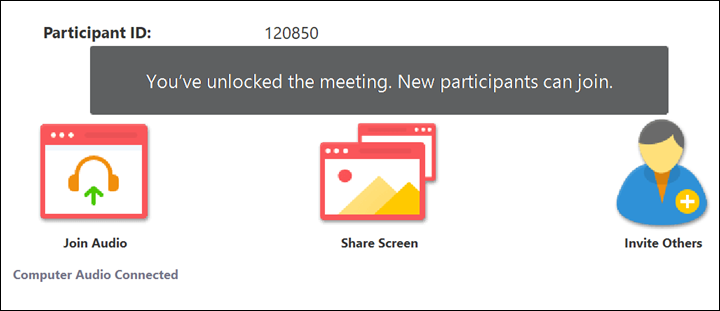
The meeting is now locked. No new participants will be allowed in.
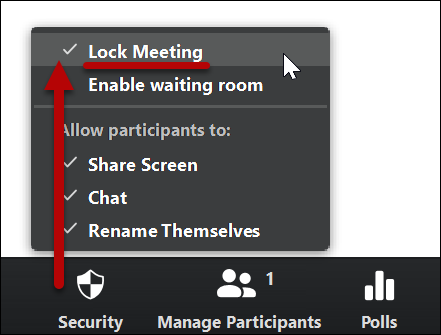
To unlock the meeting, select Lock Meeting again (by unchecking it).
The meeting has now been unlocked. Others will be able to join the meeting.
Zoom settings
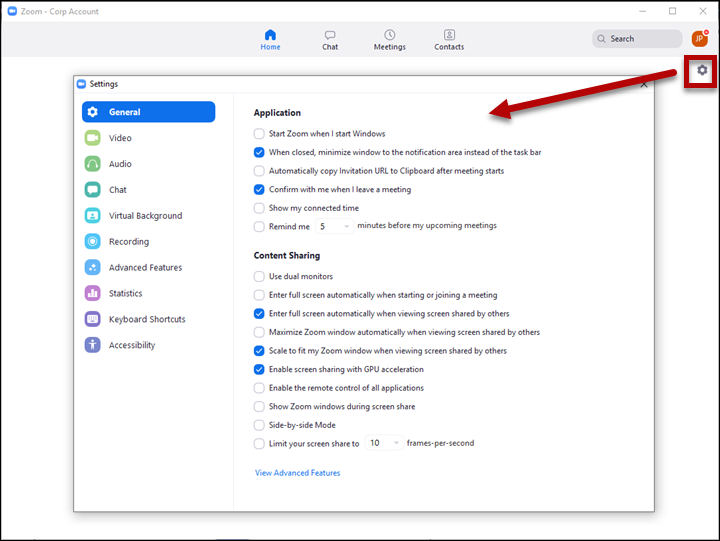
Start Zoom (Start > Zoom > Zoom). Click on the cog icon in the top right corner. You can edit your Zoom settings in the window that opens.
Adding a profile picture
Log in to Zoom at www.helsinki.fi/zoom.
- Select Sign in.
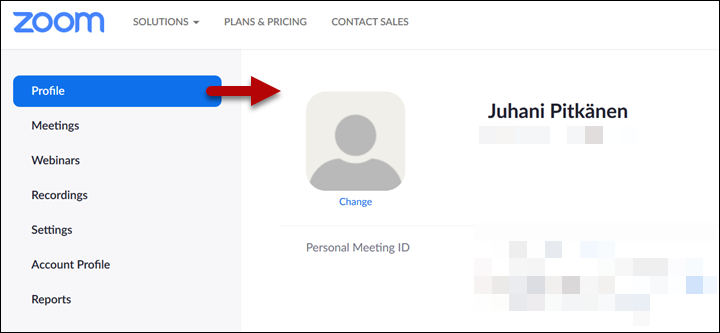
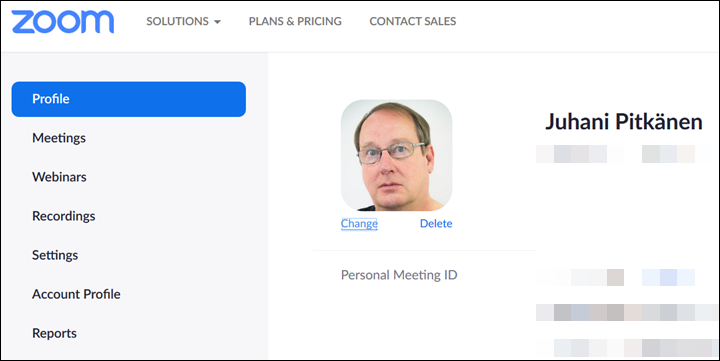
- In the Profile tab, select your profile picture.
- Select Upload.
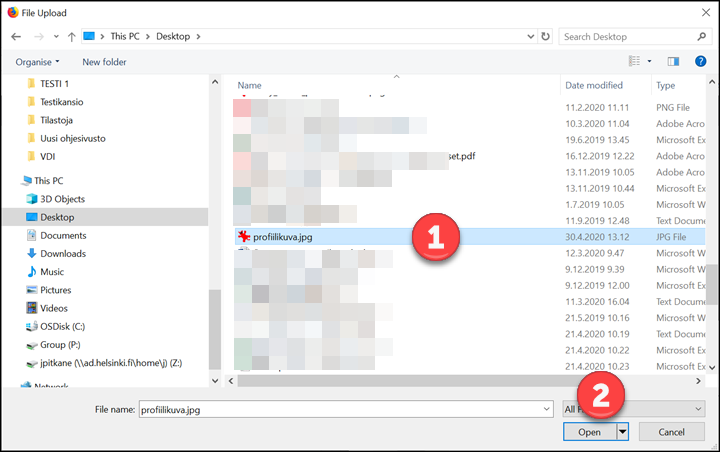
- Select the image (1) and then select Open (2).
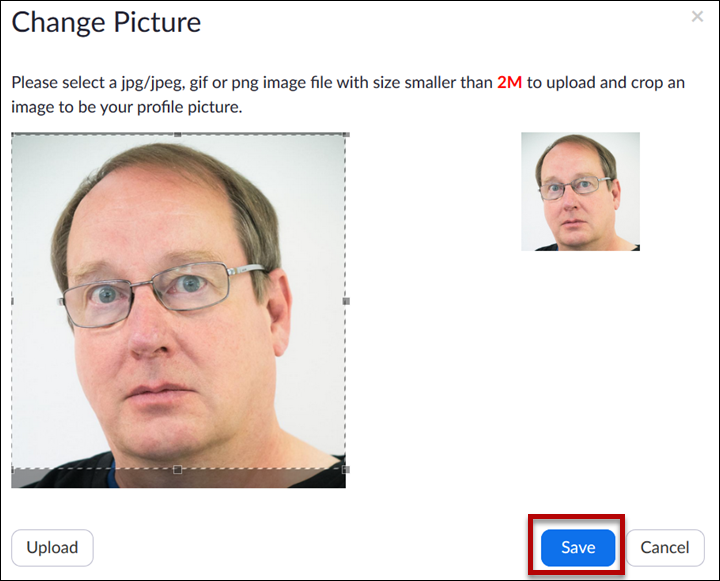
- You will see a full-size image on the left-hand side (1). Part of the image is cropped (2). You will see the selected area in the smaller image on the right-hand side. Use the frame handles to resize and move the image (3). The smaller image (4) is updated when you crop the image.
- When you are satisfied with the image, select Save.
To delete the picture later, select Delete.
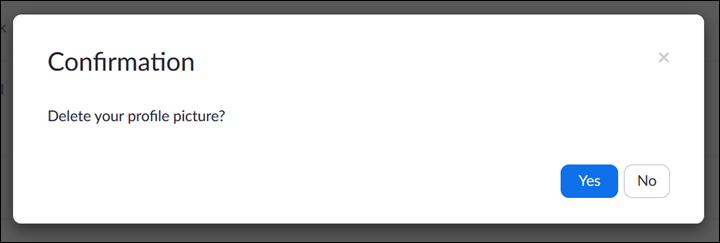
Confirm the deletion by selecting Yes.
Adding a personal pronoun
Log in to Zoom at www.helsinki.fi/zoom. Select Sign in.
In the Profile tab, select Edit next to your profile picture.
Enter your pronouns under Pronouns.
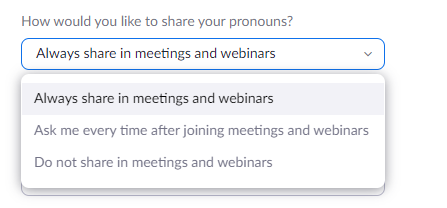
You can choose how to display pronouns in Zoom meetings:
- Always share in meetings and webinars
- Ask me every time after joining meetings and webinars or
- Do not share in meetings and webinars
Select Save to save your choice.
Changing the date and time
Log in to Zoom at www.helsinki.fi/zoom. Select Sign in. Go to the Profile tab.
Date
Select the Edit button in the Date Format row. You can select the desired date format by clicking on it in the drop-down menu.
In Finland, the recommended format is dd.mm.yyyy, e.g. 24.11.2021.
Time
Select the Edit button in the Time Format row. You can select a 24-hour clock by selecting Use 24-hour time.
Changing the background image
You can use a virtual background image or video in Zoom meetings. In this example, a custom photo is set as the background image, but you can also use a background video.
Navigate to www.helsinki.fi/zoom
- Select Sign in.
Open Settings.
In the settings, find In Meeting (Advanced) (1). Slide the toggle switch to the right (2).
Start the Zoom client (Start > Zoom > Zoom).
Select your profile image and in the menu that opens, select Settings.
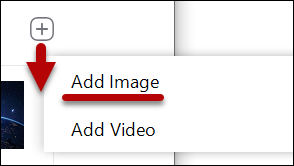
Open the Virtual Background tab and click on the plus sign on the right-hand side.
Select Add Image.
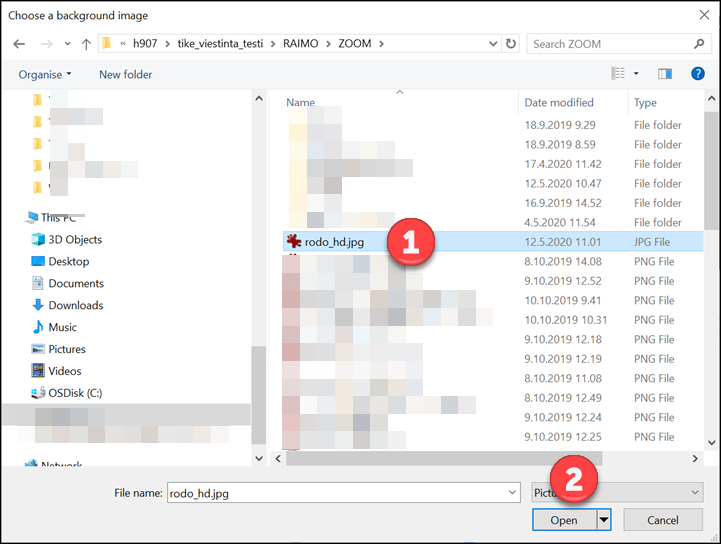
Select the background image (1) and Open (2).
If the program prompts you to download a software package for the virtual background image, select Download.
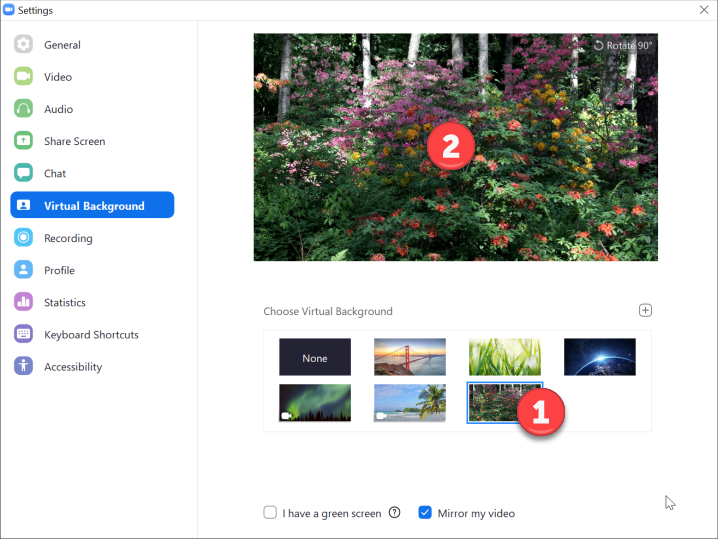
After downloading, you can use your own background images. Click on a thumbnail (1). You can see it in a larger size above the thumbnails (2).
The image you selected is now displayed as the video’s background image.
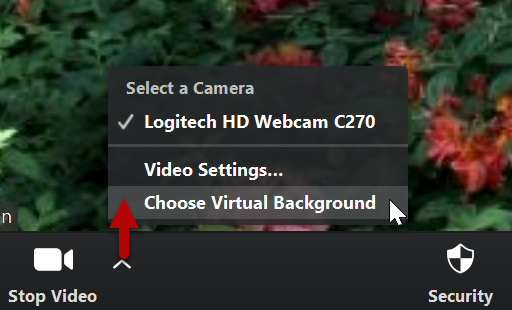
To change the background during the video meeting, select the arrow next to the video camera at the bottom of the screen and then select a new background image.
Checklist for organisers of Zoom meetings
Well before the meeting
Plan the roles and responsibilities
Before the meeting, plan the roles for the meeting’s organisers, for example:
- The person sending out the event invitation
- The person(s) managing the presentation computer(s)
- The chat moderator(s) – two moderators are recommended for larger events!
- The chair/”host” and presenters
- Any breakout room administrator
- Any breakout room facilitators
- The person in charge of recording the meeting
- The person in charge of the schedule (if not the host)
- The person in charge of any editing of the event recording
It is also a good idea to agree on who has the host rights for the event and who may need co-host rights. Co-host rights should be granted at least to the person recording the meeting. For example, sharing content does not require co-host rights. A host cannot grant co-host rights until the beginning of the meeting.
When creating the event, it is also possible to determine alternative hosts; the persons assigned as alternative hosts can start the meeting on behalf of the host with host rights.
Other things to consider when planning an event
- It is a good idea to have a programme/script for the meeting and to distribute it to the participants beforehand.
- If the meeting will be recorded, the participants should be informed about it in advance.
- Based on experience, it is best to share the presentations on the presenters’ computers. To prepare for any problems, copies of the presentations can also be sent to the host.
- If a common space (e.g. a meeting room or classroom) has been reserved for the event organisers, it is a good idea to determine in advance whose roles call for in-person participation in the common space and who can participate on their own computer from another location. This should be considered especially with regard to small-group facilitators as it may be difficult for them to work in the same room.
- It is advisable to agree in advance whether chats will be recorded and published, and notify the participants about it.
Polls
- Polls can be created before the meeting.
Breakout rooms
- Breakout rooms can also be created before the meeting, but the members must be added manually. If you automatically assign the participants into groups, any group selections made beforehand will be overwritten.
- However, if you know exactly who will be attending the meeting, you can assign them into groups in advance (provided that the participants are already using Zoom).
- You can name the manually created rooms and set a time limit for them (e.g. for tasks).
- Carefully plan the use of breakout rooms, the instructions for the participants and any breakout room facilitating.
Before the meeting in the presentation or meeting space
- Reserve at least half an hour or an hour for preparations. Test the technology beforehand, especially the microphones.
- Turn off the microphones and speakers for everyone else except the presenter computer.
- Put mobile phones on silent.
- Open the materials on the presenter computer(s).
- Close Outlook, Teams and other similar programs on the presenter computer to avoid accidentally showing anything unnecessary when sharing the screen.
- Make sure that the right person has been assigned as the host and add any co-host rights for those who need them.
At the beginning of the meeting
- Make sure the participants can hear the audio and see the video and presentation materials.
- Instruct the participants with regard to asking questions: should they use their microphones or the chat for asking questions and will the questions be answered during or after the meeting. Briefly instruct the participants on the essential buttons (microphone, video, chat, any polls).
- Share the meeting schedule with the participants.
- If the event will be recorded, remind the participants about this.
During the meeting
Chat moderating: if questions are not answered until the end of the presentation, and the chat is very active, it might help if the moderator(s) pick out questions as they are being asked in the chat.
Hosting and instructions if required.
Make sure the meeting is advancing according to the schedule.
If you are not recording the meeting, take screenshots of the poll results during the meeting. After the meeting, the results can only be retrieved as a CSV file.
At the end of the meeting
- Save the chat.
- Share any polls with the participants if this has not already been done. If necessary, also take a screenshot of the results for yourself.
- Wrap up the event.
- Any recording of the event will be stored as an mp4 file on the recorder’s computer.
Things to consider regarding different functionalities
Facilities and equipment
- Make sure that the participants can also see a video about the presenters.
- In small spaces and to capture the voices of only a few persons, a table microphone like Jabra is adequate.
- For larger events with numerous speakers in the same space, a meeting space with fixed equipment is a better alternative.
- For example, in the University’s Unitube lecture recording rooms, it is possible to plug the computer in to the lecture room’s camera and microphone and to stream the image and audio through Zoom.
- Many University meeting spaces are equipped with fixed meeting microphones and prism cameras, for example.
- Such equipment usually works by simply plugging in the device and selecting the appropriate source of image and audio in Zoom.
Further information on meeting arrangements
- Pre-assigning participants to breakout rooms, Zoom support site
- Managing breakout rooms, Zoom support site
- Polling for meetings, Zoom support site
Check the suitability of your hardware
You can check whether your hardware is suitable for Zoom meetings at https://zoom.us/test.
If the microphone test function does not start automatically, click on the small arrow next to Mute and select Test Speaker & Microphone...
Manufacturer’s instructions site
Video instruction
Give feedback
The instructions site of the University of Helsinki's IT Helpdesk helps you with IT-related issues related to your work. Let us know how we can improve our instructions. We greatly appreciate your feedback!
How would you improve these instructions?
