These instructions describe in more detail how the University of Helsinki classifies information in Microsoft 365 emails (Outlook).
The category of an email message should correspond to the risk level of the message content. The choice of the category is also influenced by the recipient of the message: the higher risk categories of the data classification model (e.g. 2A) have predefined encryption and protection mechanisms, some of which are more suitable for messages sent within the University of Helsinki and some for messages sent outside the organisation.
NOTE! It is not recommended that information classified as category 1R be handled by e-mail as a matter of principle. However, the protection mechanisms for email messages classified as 1R work in a similar way as for class 2A.
Read more about data classification on the data classification landing page.
Quick help
Data classification in email in brief
Always classify a message before sending it
- In Outlook, select Sensitivity according to the message content.
Categories in brief and level of risk
- 1R (Red) Secret: serious damage
- 2A (Amber) Strictly confidential: clear damage
- 3Y (Yellow) Confidential: moderate harm or damage
- 4G (Green) Internal: minor damage
- 5W (White) Open: no risk and its disclosure benefits the university
- Private (non-work related)
Select protection by recipient
- Internal (person)
→ Select e.g. 2A - Encrypted
→ No separate encryption required - University service address (e.g. Helpdesk)
→ Select 2A - Unencrypted
→ Add .s to the recipient's address (Securemail) - Outside the University
→ Select 2A - Unencrypted
→ Use Microsoft 365 encryption separately
Important
- Classify at the latest at the sending stage
- Higher risk messages (e.g. 2A) always require protection
- The wrong type of protection may prevent the message from being read
Read the Detailed Instructions tab for more detailed instructions
Detailed help
Table of contents
- Data classification model
- How to classify your email
- Why is it important to classify information correctly?
- Available data categories in email
- When you send an email within the University of Helsinki (e.g. to a colleague)
- When you send an email within the University of Helsinki to a service address (e.g. IT-Helpdesk)
- When sending email outside the University of Helsinki
- When you include an attachment in an email
Data classification model
How to classify your email
Every time you send an email, you need to classify the message. Classify the email you send according to the risk level. Please note that emails that have already been sent can no longer be reclassified.
If the message category requires protection (categories 1R and 2A), the methods of protection and encryption is chosen according to the recipient.
In the list below you will find solutions for different situations:
- If you send an email within the University of Helsinki (e.g. colleague)
- If you send an email within the University of Helsinki to a service address (e.g. IT-Helpdesk)
- When sending email outside the University of Helsinki
- When sending an attachment as an email attachment
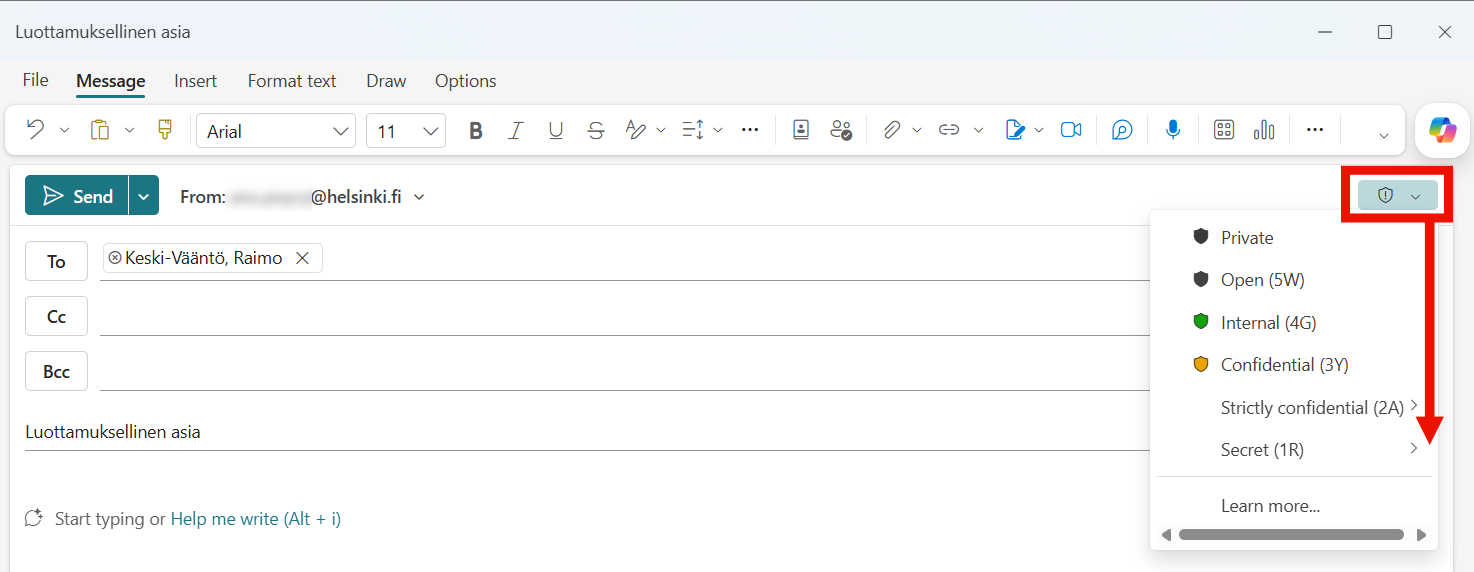
Categorizing a message in Windows Outlook
Categorize the message in the Sensitivity menu in Outlook.
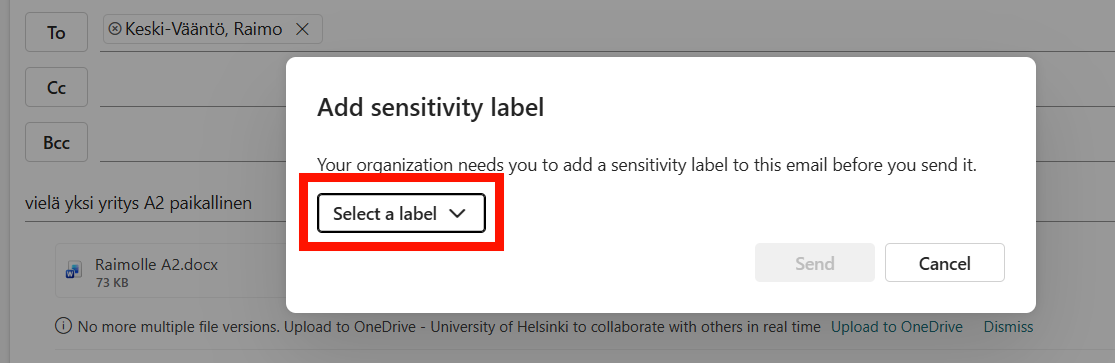
If you did not classify the message before sending it, you will be prompted to classify it at the send stage. Select a confidentiality level (Select a label). Once you have selected a level, the Send button will become active and you will be able to send the message.
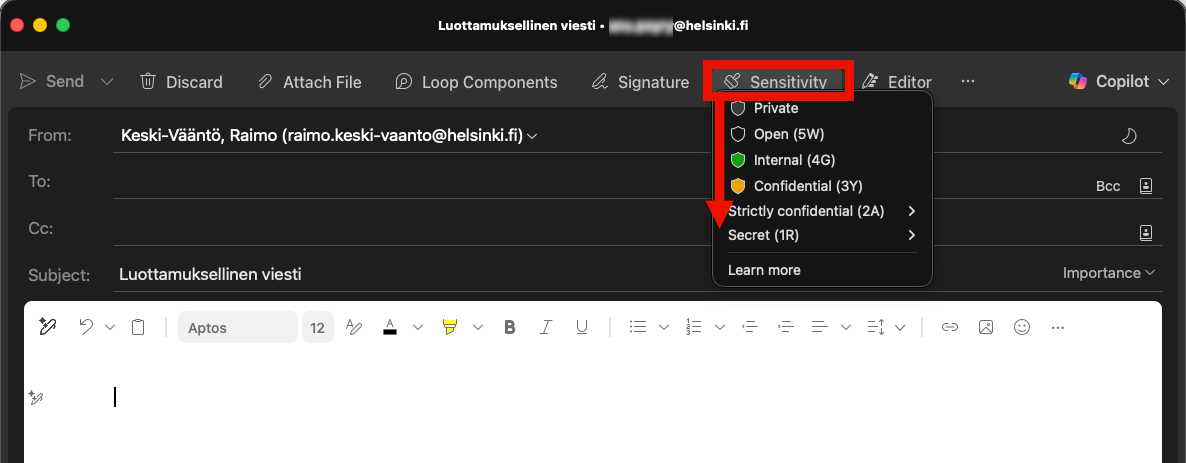
Categorizing a message in Mac Outlook
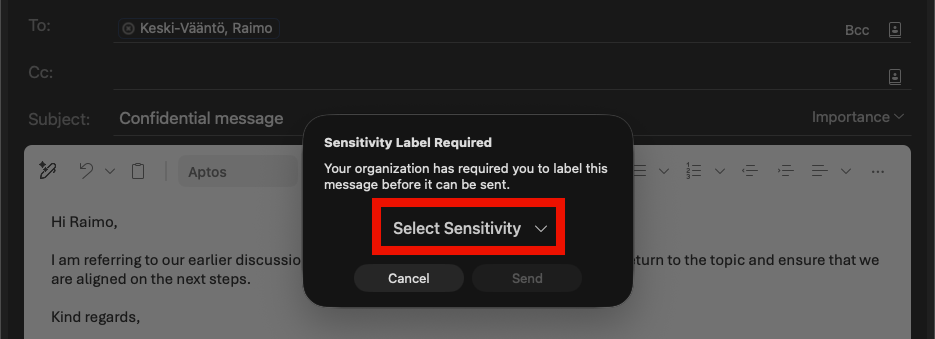
Categorize the message using the Sensitivity button in the Outlook tool menu.
If you did not classify the message before sending it, you will be prompted to classify it at the send stage. Select the confidentiality level from the menu (Select sensitivity).
Why is it important to classify information correctly?
Available data categories in email
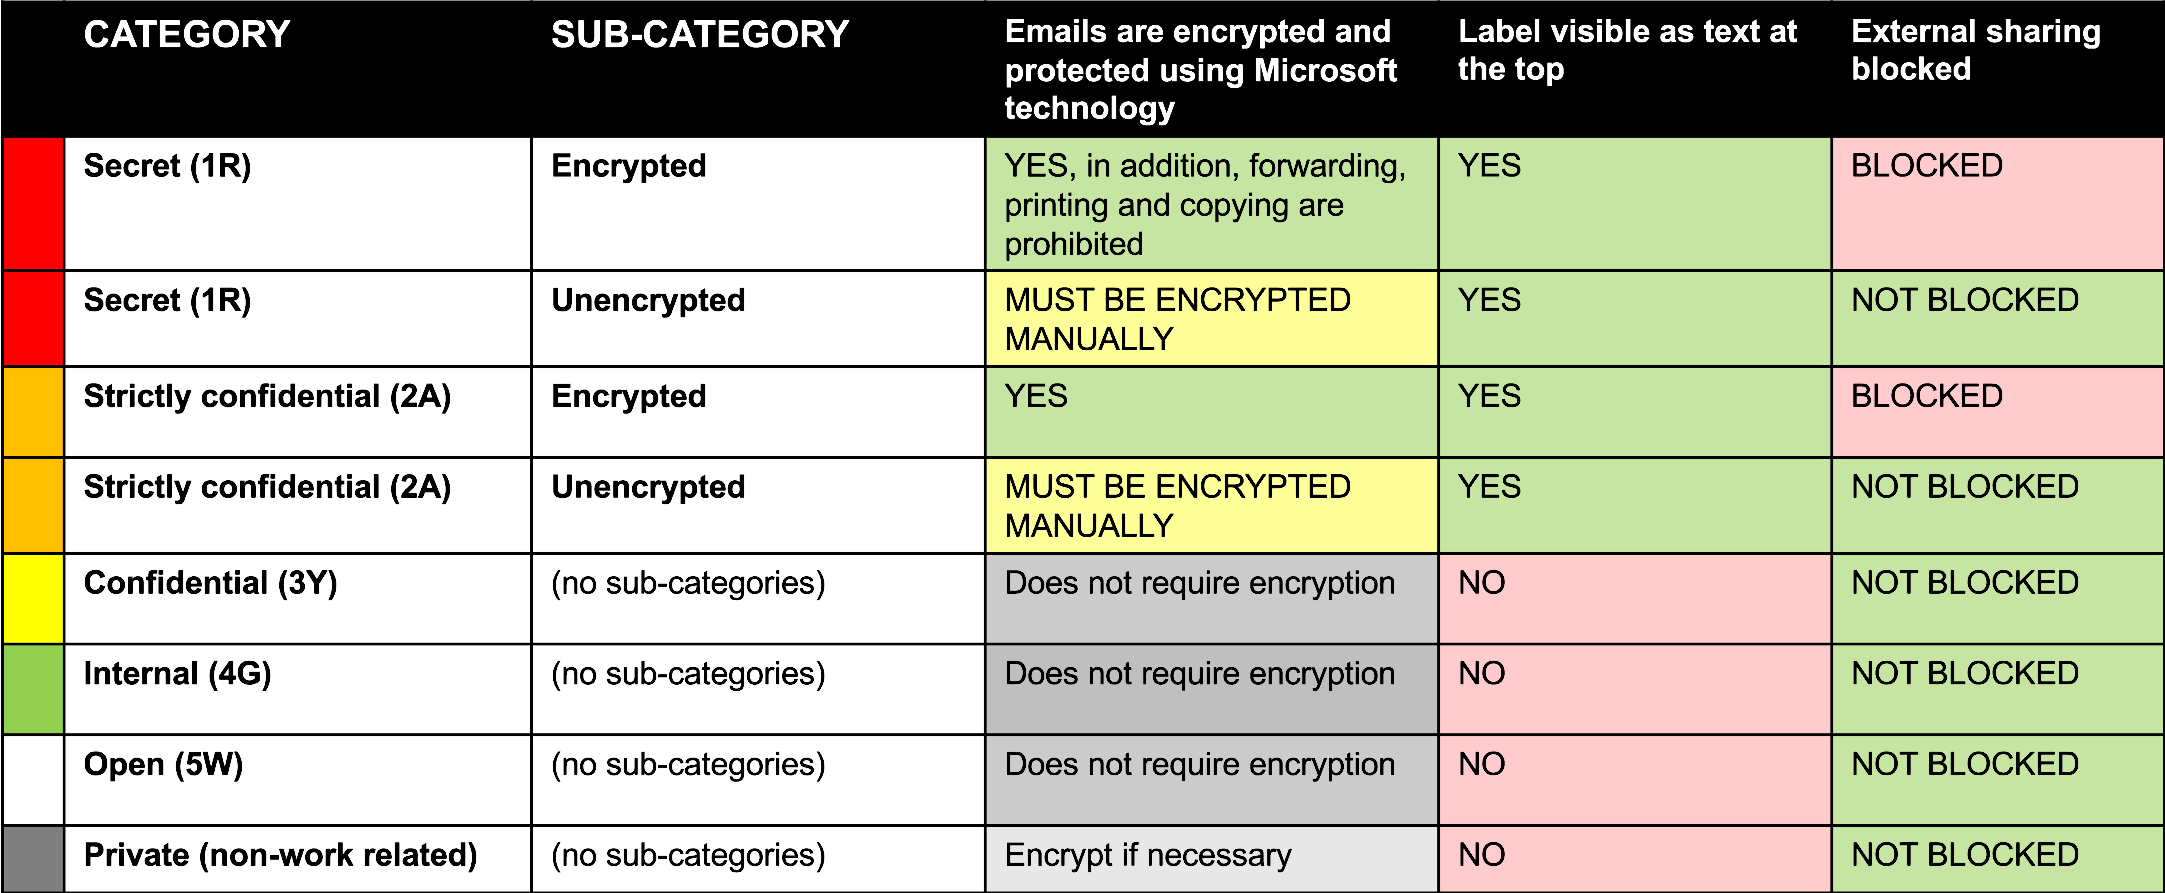
Here is a more detailed list of the data categories used by the University of Helsinki in e-mail, as well as their more detailed settings and restrictions.
Email categories and restrictions
Secret (1R)
- Subcategory: Encrypted
- Emails are encrypted and protected using Microsoft technology. In addition, forwarding, printing and copying are prohibited
- The category appears as text at the top of the email
- External sharing is blocked
- Subcategory: Unencrypted
- You must encrypt the email yourself
- The category appears as text at the top of the email
- External sharing is not blocked
Strictly confidential (2A)
- Subcategory: Encrypted
- Emails are encrypted and protected using Microsoft technology
- The category appears as text at the top of the email
- External sharing is blocked
- Subcategory: Unencrypted
- You must encrypt the email yourself
- The category appears as text at the top of the email
- External sharing is not blocked
Confidential (3Y), Internal (4G) and Open (5W)
- Does not require encryption
- The category does not appear as text at the top of the email
- External sharing is not blocked
Private (non-work related)
- Emails should be encrypted where necessary
- Category does not appear as text at the top of the email
- External sharing is not blocked
When you send an email within the University of Helsinki (e.g. to a colleague)
Select the category corresponding to the content of your message under the sensitivity menu.
If your message is of a higher risk level, e.g. 2A, select 2A Encrypted.
You do not need to encrypt the message separately, as the category selection includes encryption using Microsoft technology and no further encryption is required. Only those users of the University of Helsinki who have been selected as recipients of the email will have access to the encryption.
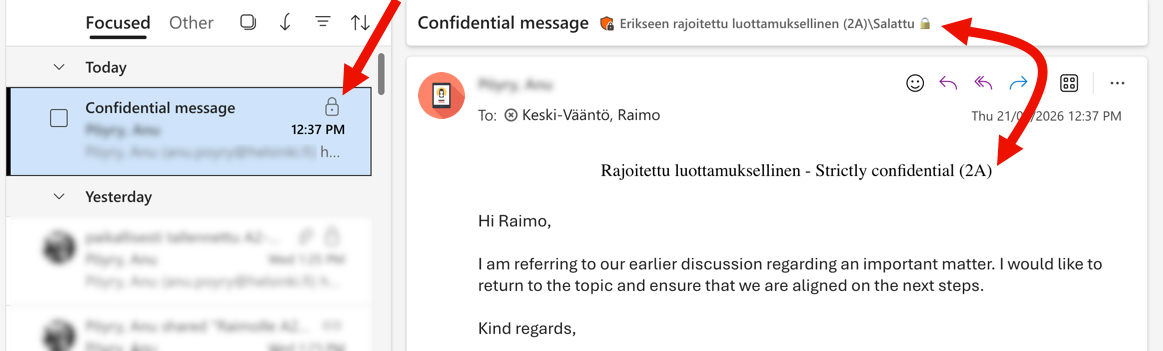
The lock icon on the recipient's email indicates that the message is encrypted. The message field also shows the protection class.
When you send an email within the University of Helsinki to a service address (e.g. IT-Helpdesk)
Select the category corresponding to the content of your message under the sensitivity menu.
If you need to send secure email to service addresses, select the category under the Sensitivity menu 2A Unencrypted (not recommended) and encrypt the message separately with Deltagon encryption or type .s after the recipient's address.
This is how it works, because secure messages sent to service addresses cannot be handled in the same way as those sent to individual members of the university.
For more detailed instructions on how to use Securemail, please see the separate instructions.
When sending email outside the University of Helsinki
Select the category corresponding to the content of your message from the sensitivity menu.
If your message contains higher risk content, e.g. 2A, select the category 2A Unencrypted (not recommended) from the Sensitivity menu and encrypt the email separately with Microsoft security. This is because emails classified as 2A Encrypted are not accessible to anyone other than University of Helsinki users.
When you include an attachment in an email
We recommend that you classify the message in the same way as the attachment. When you include a classified attachment, in Windows Outlook the message data class is determined by the attached attachment, but in Mac Outlook, for example, you have to define the message data class separately.
Read more about file classification in the separate instructions.
Video instruction
Give feedback
The instructions site of the University of Helsinki's IT Helpdesk helps you with IT-related issues related to your work. Let us know how we can improve our instructions. We greatly appreciate your feedback!
How would you improve these instructions?